Do you want a WordPress NGINX based server?
Do you want a WordPress DigitalOcean based hosting?
Do you want WordPress CloudFlare CDN?
Do you want to save money$ on DigitalOcean plan?
This post is for you!!!
A step by step tutorial on how to install WordPress NGINX based server on DigitalOcean (shorthand: DO) with the help of EasyEngine (shorthand: EE) the easiest LEMP stack & WordPress installer.There is high demand for cloud-based servers these days that probably you will see a lot of websites get hosted by them. WordPress DigitalOcean based hosting is a great combo for scalable websites, websites that are about future expansion in mind.
The end WordPress installation result at this article will have the ability to have minimum 10,000 concurrent unique users at one second and minimum 600,000 unique users per minute.

This post is not about whether you should choose between DigitalOcean or Linode or AWS or any kind of cloud-like hosting or just good old regular shared hosting. Instead, I am under the assumption you have decided that DigitalOcean is the solution for your needs or you have heard about DigitalOcean and you didn’t get into many details and you want to try WordPress on DigitalOcean or you want a WordPress NGINX based server, and you want it fast. I will give you a tutorial how to install WordPress on DigitalOcean in the fastest, reliable, scalable intended way.
Some DigitalOcean Background
 What is DigitalOcean? DigitalOcean is a cloud infrastructure provider. DigitalOcean is SSD-only based VPS hosting in the Cloud:
- SSD: It stands for Solid-State Drive. Basically, it is a hard-drive on steroids. SSD is faster, reliable, durable and much more than the prior ones SATA (Serial advanced technology attachment) & HDD (Hard Disk Drive – the name that is in the mouth of millions when it comes storage). You can see it on amazon with the search term SSD. Internal SSDs: Samsung 850 EVO SSD / Transcend 256GB SSD, External SSDs: Samsung T3 Portable SSD.
- VPS: It stands for Virtual Private Server. VPS is a virtual machine sold as a service by an Internet hosting service. A VPS is still shared by others clients but the sharing is done far less than a shared hosting service (Imagine VPS as an apartment in a building and shared hosting as a room in an apartment at a building). A VPS gets more resources and power than shared hosting such as server space and CPU A VPS runs its own copy of an operating system, and clients have superuser-level access to that operating system instance. That means they can install software on the operating system without being depended on or constrained by the hosting company.
DigitalOcean calls its virtual private servers “Droplets“. Each Droplet is a VPS. By this time, DigitalOcean claims to have 19.6 million droplets.
DigitalOccean can handle sites on a very large scale like AddictingInfo.org that has millions of entries per month.
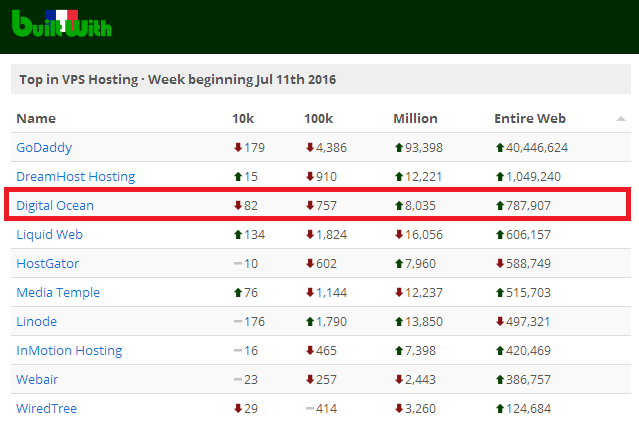
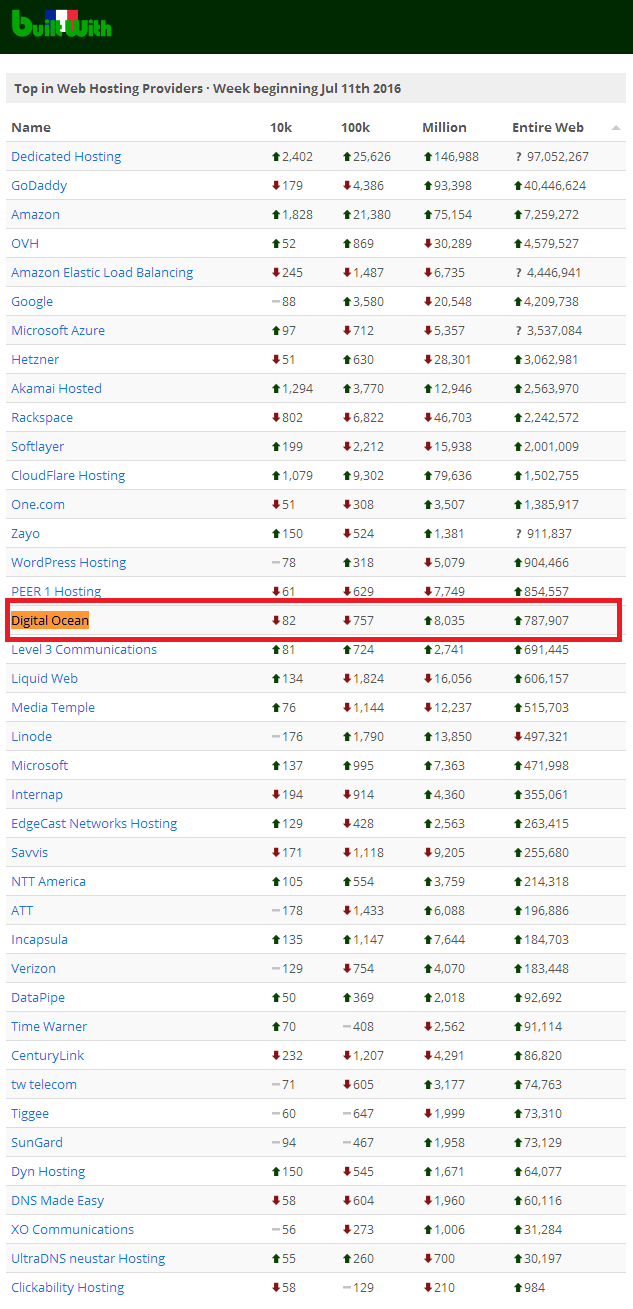
With the BuiltWith tool, we can see DigitalOcean hosts 787,000 websites. I took screenshots on the two verticals: VPS Hosting & Web Hosting to find out where DigitalOcean is placed in these markets.
Setup Overall Steps:
- Step 1: Buy a domain name.
- Step 2: SignUp for DigitalOcean & Fill payment information.
- Step 3: Create a Droplet.
- Step 4: Hook up your domain to the droplet.
- Step 5: Connect and start a Session with your droplet.
- Step 6: Install EasyEngine.
- Step 7: Setup WordPress on CloudFlare CDN.
- Step 7.1: Install and activate the official CloudFlare WordPress plugin.
- Step 7.2: SignUp for a CloudFlare account.
- Step 7.3: Add a website to the CloudFlare account.
- Step 7.4: Change the Domain’s NameServers to CloudFlare.
- Step 7.5: Add caching Page Rules in CloudFlare.
- Step 7.6: Official CloudFlare WordPress plugin final adjustments.
- Step 7.7: Install SuperSonic CloudFlare cache purge WordPress plugin.
- Step 7.8: Configure W3 Total Cache browser caching settings.
- Step 7.9: How to validate that CloudFlare is serving your site.
- Step 7.10: Load/Stress testing with loader.io and benchmark.
- Step 8: Appendix.
Step by Step Tutorial
NameCheap or GoDaddy are the most reliable and trusted by millions. These domain register companies have a simple & convenient way to buy and manage domains. Go to their site and signup and register for a domain name.


I am going to give an example to hook up NameCheap to DigitalOcean because they give very cheap “.xyz” extension domains at the cost of 0.88$ (aka Crazy 88 – from the Kill Bill movie). The price is so funny and cheap I bought a domain just for the purpose of demonstrating the tutorial. The domain is “4test.xyz” (the domain will be used for future tutorials / examples / tests etc. as well).
Besides the pricing, I find that NameCheap has a very simple inviting, relaxing, intuitive, self-explanatory, easy to use control panel / dashboard. Their dashboard is so simple it is like I feel it is a toy and we are the children who play with it with no hassles nor explanation. Also, you will get a WhoisGuard protection for free, meaning hiding your details when someone searches the domain details at the WHOIS lookup.
Step 2: SignUp for DigitalOcean & Fill payment information.
Now, you might get confused here, because you will think you are signing up for a plan (5$/mo or 10$/mo or ect.), I know that because I was confused. The plan does not matter here for the moment. It matters when creating the droplet. (Step 3.1 in the tutorial – there is a table on which droplet size you should choose).
After you signup, you must enter your payment/billing information. Some Notes:
– You won’t be able to create a droplet until you enter your billing information.
– It appears that you can pay with PayPal but you have to pay one month upfront instead of just giving them your credit card information and they will bill you based on the monthly usage. If you plan to use the droplet full time then this is great, but if you want to stop or drop the droplet right after, let’s say 2 weeks, then you probably will need to handle refunds and such.
After you have entered the payment information you can create a droplet. This screen should appear once you have filled the payment information. Then press the blue button: “Create Droplet“.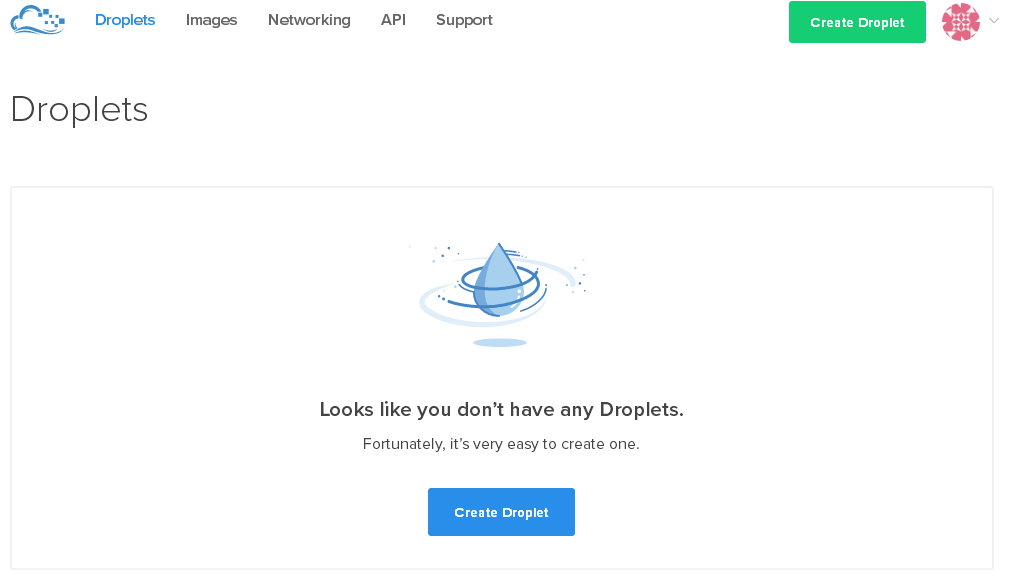
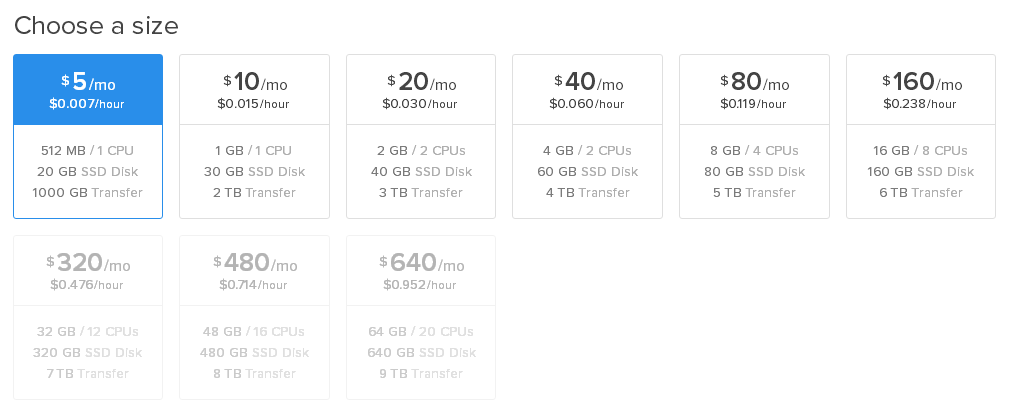
After you press the button you will be directed to the “Create Droplet” view wich has 7 sections that I will explain one by one, how to setup the options.
We are going to choose Ubuntu (the latest release that is mentioned there – which at this time being is 16.04 x64):
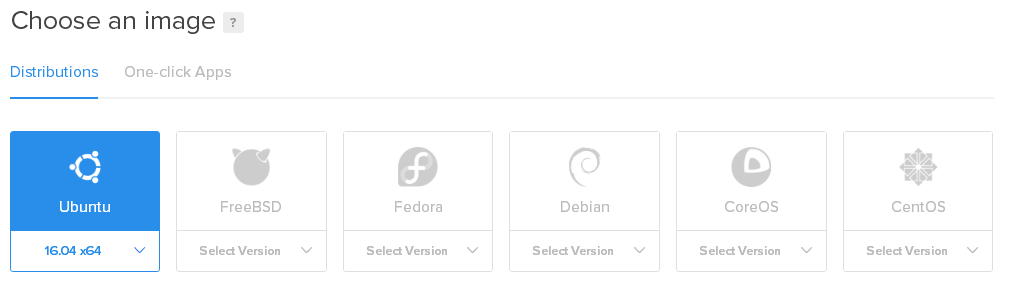
Let’s explain some things first and why we have chosen Ubuntu (You can skip the explanation and proceed to the next step if you know already why or just want to get things going and have a WordPress NGINX based server):
There two ways you can install WordPress with DigitalOcean:
- By creating an Operating System Image and set up by yourself one of the web stacks:
- LEMP = Linux, Nginx, MariaDB/MySQL, PHP
- LAMP = Linux, Apache, MySQL, PHP
- (…There are more web stacks, but that’s what’s needed for WordPress)
followed by installing WordPress at the end.
- By letting DigitialOcean setup everything by One-click app install. The only choice available for WordPress right now is WordPress on 14.04. Meaning, installing WordPress on Ubuntu 14.04 with LAMP stack.

Because the LAMP stack uses Apache which is less preferred in scalability and delivery terms than the LEMP stack that uses NGINX (NGINX is a lot more scalable and faster than Apache because of its nonblocking behavior) we will not go with the One-click app install that DigitalOccean offers. Instead, we will choose to install all by our selfs, but do not think it is going to be hard. On the contrary, we have EasyEnginge that will make it super easy and fast to install. You will see that by using EasyEngine we will have a server that the big sharks use like:
WordPress.com, WordPress.org, TechCrunch, NameCheap, Pinterest, Zynga etc.
The list goes far beyond these websites. In fact, more website owners are ditching Apache in favor to NGINX. You want to be prepared for the high traffic volume, and man, these sites have tons of traffic that everyone wishes to have. I also like to mention again that even WordPress “.com” & “.org” use NGINX, so that means a lot. The systems creators basically say that their system works better on NGINX.
Also, I have to mention that the One-click install, forces you to start with a minimum of $10/mo (=$ 0.015/hr) plan and with the DIY install we can have the $5/mo(=$ 0.007/hr) plan with a faster and scalable server. And of course, DigitalOcean restricted it because the one-click install uses the LAMP stack instead of the LEMP stack and they didn’t want that people will complain about bad delivery (which means basically a bad server).
Now that we know that we are going to use EasyEngine we can use 2 operating system images only (aka Distributions) because that’s how EasyEngine supports currently. The two are Ubuntu & Debian. Because Ubuntu (Currently 16.04 x64 LTS) is very popular and has far more developers reach than Debian and even though Debian is considered a little more stable than Ubuntu we are still going to use Ubuntu as our operating system image, because mainly by its popularity.
There is another One-click install that needs attention and it is LEMP on 14.04. Now this one-click install allows the 5$/mo plan because it is LEMP stack and it uses NGINX, but there are fewer more steps to be done in order to install WordPress, so still using EasyEngine is easier.
I need to mention that changing the operating system image option is not possible after you create the droplet.
Regardless to DigitalOcean and choosing the right size / plan, when you want your website to handle high traffic volume (that means having a big amount of unique visitors per time-span) it all comes down on the way you make your installation and configuration of the entire stack. All aspects should be considered, right from the millisecond the front end user requests a site page (or a resource) up until he receives the response, all should be scaled. If one thing is not installed or configured correctly your website won’t scale, if all is installed and configured correctly your website will reach unbelievable scale level even with small hosting resources.
The things you should have if you want to handle high traffic volume is a CDN (Content Delivery Network), caching mechanism – both browser & server caching, reliable & fast hosting service that supports SSD, a fast server such as NGINX, a mature CMS that handles SQL queries in a smart manner such as WordPress. Of course, there are more and I won’t get into it right now but these are the main important things.
Now, I brought you an installation guide for your website that can handle high traffic volume and you must make all the steps up until Step 8 inclusive in order to achieve that. By the load-testing / stress-testing, I did in loader.io on the installation and the configuration guide of the current post only!!! I suggest you choose a DigitalOcean plan by the table below.
Note if you plan to make some other installation or configuration on your DigitalOcean’s droplet than this table won’t apply to you and you will need to make load testing / stress testing in loader.io to see how much traffic your site can get based on your setup.
DigitalOcean Plan / Size to Traffic Volume
| DigitalOccean Plan / Size |
Unique Users / Second | Unique Users / Minute | Unique Users / Hour | Unique Users / Day | Unique Users / Week | Unique Users / Month |
| $ 5 / mo = $ 0.007 / hr | 10k | 600k | 36m | 864m | 6b | 26b |
| $ 10 / mo = $ 0.015 / hr | 20k | 1m | 72m | 2b | 12b | 52b |
| $ 20 / mo = $ 0.03 / hr | 40k | 2m | 144m | 3b | 24b | 104b |
| $ 40 / mo = $ 0.06 / hr | 80k | 5m | 288m | 7b | 48b | 207b |
| $ 80 / mo = $ 0.119 / hr | 160k | 10m | 576m | 14b | 97b | 415b |
| $ 160 / mo = $ 0.238 / hr | 320k | 19m | 1b | 28b | 194b | 829b |
| $ 320 / mo = $ 0.476 / hr | 640k | 38m | 2b | 55b | 387b | 2t |
| $ 480 / mo = $ 0.714 / hr | 1m | 77m | 5b | 111b | 774b | 3t |
| $ 640 / mo = $ 0.952 / hr | 3m | 154m | 9b | 221b | 2t | 7t |
Choose a size that suits your needs. The smallest plan (=size): $5/mo (=$ 0.007/hr) will actually be suitable for the majority of website owners. I have purchased the smallest plan just for the sake of this tutorial.
Of course, the table is derived from the load testing / stress testing I did in loader.io and all is an estimation:
![]()
If you truly plan to handle 500K unique users and up per minute or even an hour than I suggest you have a website uptime checker service such as Pingdom (Free for 14 days) or UptimeRobot (Free), that will notify you for your website uptime, and if by any chance you experience any down time you will know that you will need to resize your DigitalOcean’s droplet to a bigger plan.
I need to mention that the droplet size is changeable after you create the droplet. You can resize the droplet to your needs. You can only resize it to a bigger size (plan). Because this is a create and not edit droplet tutorial I will leave out the in-depth details. If you come across wanting to resize the droplet (expanding the plan) then read how to resize the droplet size on DigitalOcean website. Now, don’t feel afraid to choose a droplet that not exactly matches the traffic you intend getting. It can always be resized.
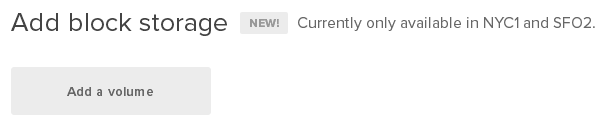
At this time of point, DigitalOcean has added a new feature named “Block Storage“. It is merely an option where you can add extra storage only without CPU power, so it costs less than the bigger droplet plans, and it all being managed under the same droplet. This will be great for media uploads, file uploads, backups etc. We will not use it in our droplet creation because a new blog is not going to need an extra storage right at the start unless you are migrating to DigitalOcean. If you want extra information then read on how to use block storage on DigitalOcean. So leave the “Add block storage” untouched and proceed to the next step.
You need to select a DataCenter Region that is the closest to your traffic area.
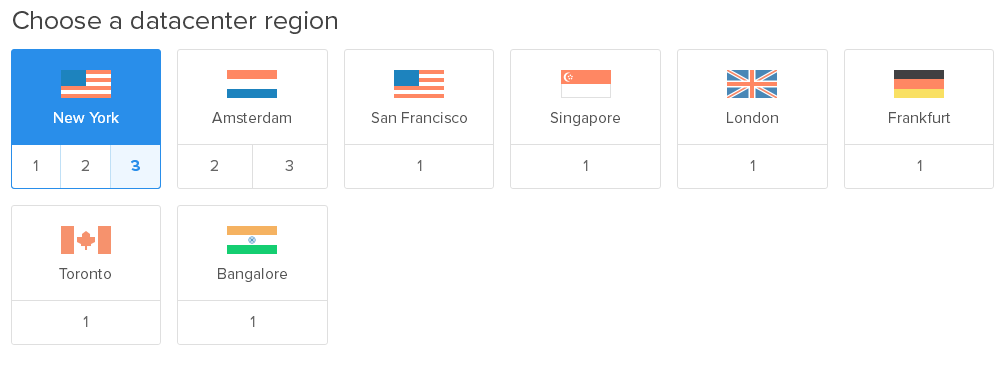
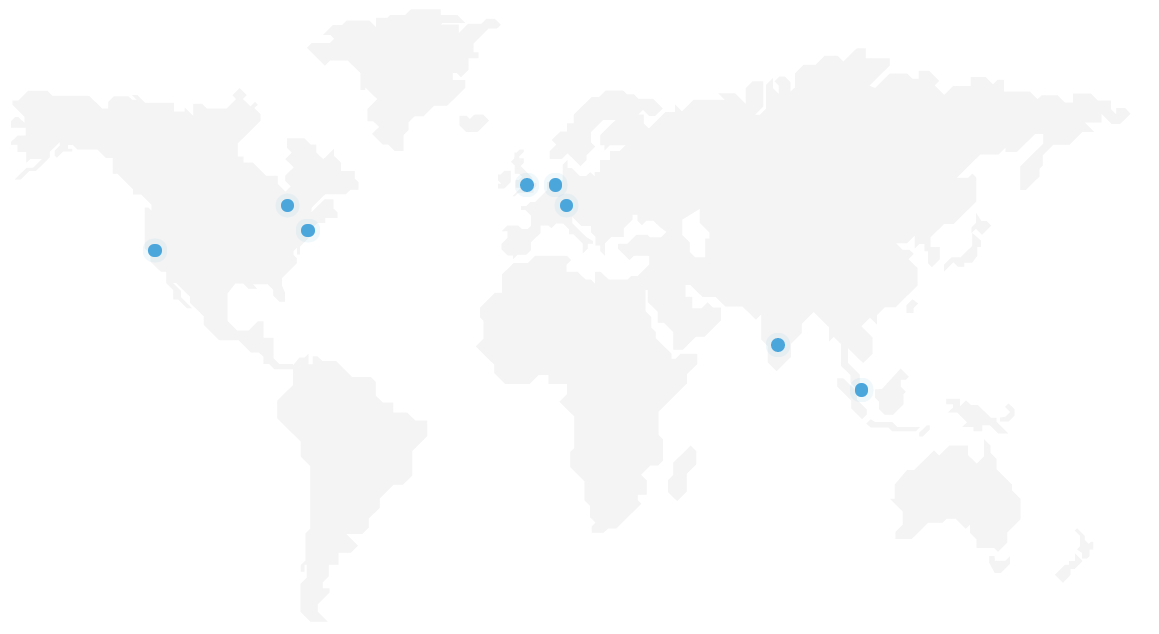
Here is the regions layout on the global earth map as displayed in the DigitralOcean:
You can test the speed from your location to the desired DataCenter in the following links:
- New York 1 / New York 2 / New York 3
- San Francisco 1
- Amsterdam 2 / Amsterdam 3
- Singapore 1
- London 1
- Frankfurt 1
- Toronto 1
I need to mention that changing a DataCenter is not possible after you create the droplet. You need to migrate the droplet to a new DataCenter with snapshots. Read on how to migrate DigitalOcean snapshots between regions.
- Private Networking – Adds Droplet-to-Droplet networking, within the same region.
- Backups – Enables weekly backups. Each backup is retained for four weeks. Adds 20% to monthly Droplet cost. (Highly Recommended)
- IPv6 – Enables public IPv6 networking.
- User Data – Allows the use of Cloud-Init to configure your Droplet.

The only thing you should be interested in as a WordPress developer or blogger is the backups option. The rest is really not relevant for WordPress needs.
As a WordPress blogger, you probably know that the time you took to write your posts, pages, edit your images, getting comments, answering comments, setting up general & plugin settings etc, is very precious and you want to backup things in case something goes wrong, Remember: We are merely humans, and who knows what will happen some day.
Now, there are few backup plugins for WordPress like:
BackupBuddy, UpdraftPlus, WordPress Backup to Dropbox (Will require you to get a bigger DropBox plan than the free version) etc. Now all of these plugins are great and do their work, but why not backup the entire droplet and make a few clicks to restore the entire site? It is much smarter to handle backups on the lower layer which is the hosting rather within the WordPress level meaning the server layer. Also, these plugins are worth money, even the free plugin WordPress Backup to Dropbox needs a Pro Dropbox plan which also costs money. I suggest to invest the 20% extra cost to Droplet cost or add it later when you see you are serious about blogging and you are not there for testing the blogging surface and you want to be a pro and not staying in a rookie level.
I need to mention that changing the additional settings is allowed after you create the droplet.
For just telling, you can skip this step, even without knowing why, but it is highly recommended that you shouldn’t!!! Even though you can change this after you have created your droplet.
I will make an introduction to SSH without getting into too much detail because this tutorial is about having a WordPress blog on DigialOcean.
DigitalOcean lets you manage your servers with password-based logins. That’s what will happen if you will skip this step and create the droplet as is. Once you will create the droplet without adding SSH key, you will be sent an email that contains your auto-generated password login to the droplet. At your first login to your droplet will have to change the password to a password you create on your own and only possess it.
SSH stands for Secure Shell. It is a protocol for securely getting access to a remote computer. It uses cryptography with public-private key pairs for holding sessions between to sides. It is a lot more secure than a password based mechanism. Also with SSH you don’t have to even remember your password. It is a good practice to have a secure server from day one.
I will explain how to create SSH Keys with Windows OS. For Mac OSX please refer to DigitalOcean’s guide at Link1 or at Link2. Mac OSX has built in software named OpenSSH so It is a much simpler process to generate public-private key pair.
Step 3.5.1: Download and Install PuTTYgen (PuTTY & PuTTYgen).
PuTTY is a software made for windows to create SSH sessions and the PuTTYgen is for generating the SSH Keys. In this step we will use PuTTYgen only, and in step 5 will we also use PuTTY for connecting (making a session) with our droplet.
Search on the page the text: “A Windows MSI installer package for everything except PuTTYtel” and download and install the latest MSI installer (currently PuTTY 0.67:
“putty-0.67-installer.msi”). The installation itself is pretty straightforward, it’s a standard windows program setup.

After you have installed PuTTY threw the MSI installer you will have “PuTTYgen.exe” program on your computer. Go ahead and search that in the windows search and activate it.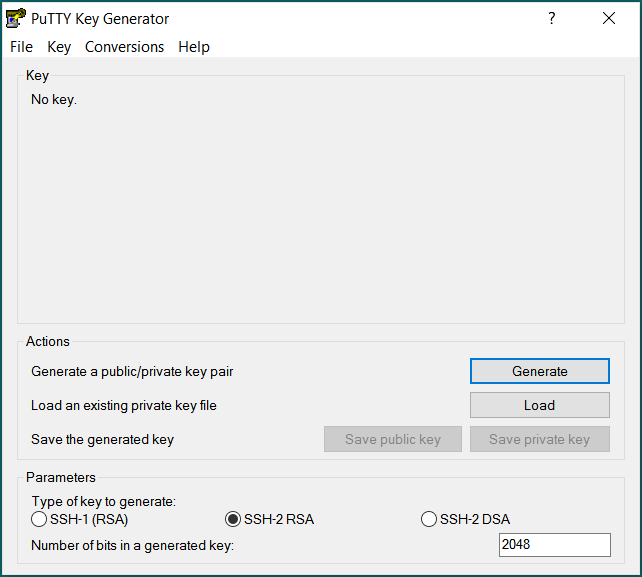
Make sure these values are set (These are the default values of PuTTYgen):
- Type of key to generate → SSH-2 RSA
- Number of bits in a generated key → 2048
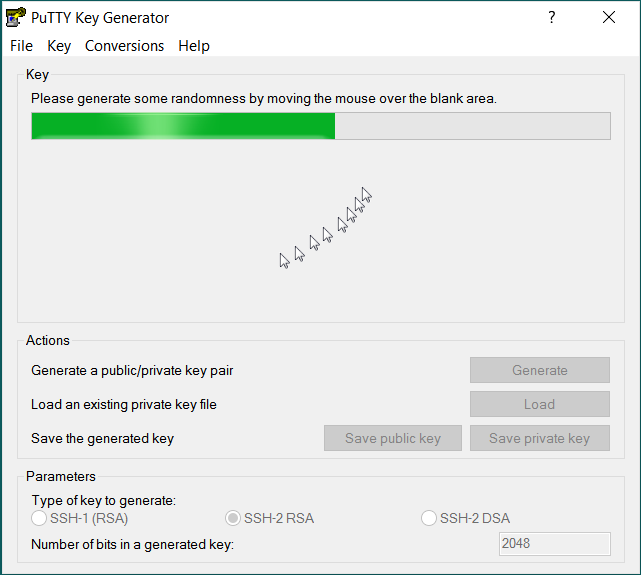
Now hit the “Generate” button. Once you hit generate go with your mouse above the generate button area where there is a big empty space and move the mouse in the blank area up & down & left & right in order to generate random keys. Don’t stop until you the progress bar hits 100% and until you will get your 2048 length key. This method of generating randomness is called entropy.
Here is what you should see after finishing this process (Without the red arrows):
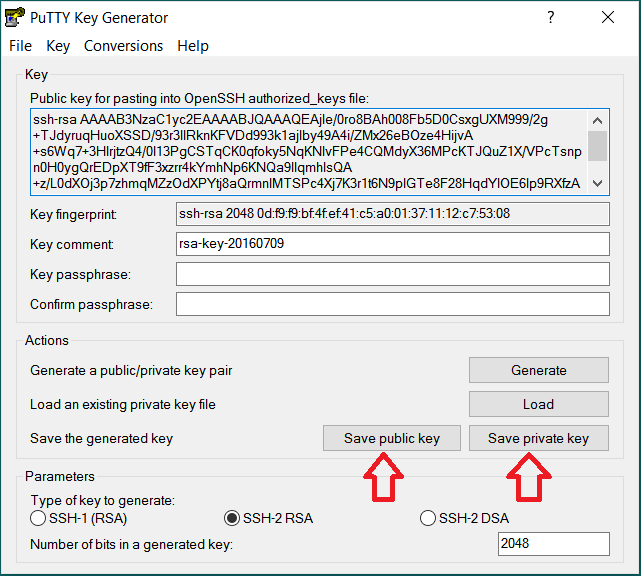
Now save both the public & private key pair on your hard drive. Name them: “PublicKey.ppk” & “PrivateKey.ppk” respectively. The PPK extension stands for PuTTY Private Key, and eventually it is a plain text file. Now, when you try to save the private key and you did not set a value in the “key passphrase” input you will get the following prompt message: “Are you sure you want to save this key without a passphrase to protect it?“. Hit yes. We want security but a passphrase will make us entering it every time we make a connection. A passphrase adds another layer of security but for now, the key pairs are sufficient.
Step 3.5.3: Add the public SSH key to DigitalOcean.
Go back to the create droplet view in the DigitalOcean website where we left off.
Now we can add new SSH key. Hit the blue button named “new SSH key“.
A popup appears looking like this (Don’t mind the green circle, it is the Grammarly checker. It is a great tool for checking WordPress posts for spelling and grammar):
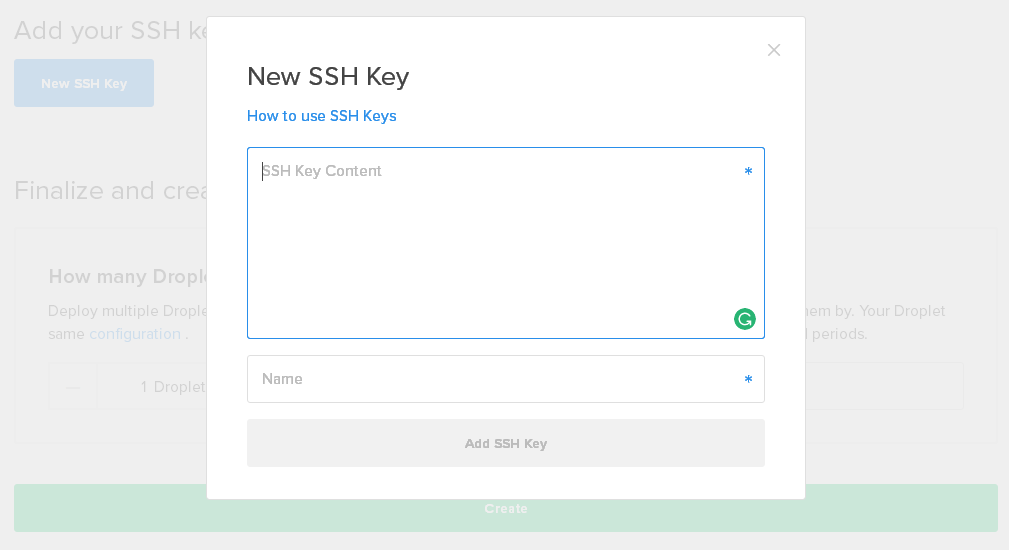
The public key is meant to be shared with trusted parties but the private key is private and you do not share it with anyone. Now, go to your “PublicKey.ppk” file you saved earlier and copy & paste the entire file content (open the PPK file in a text editor such as Notepad (windows) or Notepad++) into the popup filed named “SSH Key Content“.
We should make minor changes in order that this field will be valid. Here is our “PublicKey.ppk” content:
---- BEGIN SSH2 PUBLIC KEY ----
Comment: "rsa-key-20160709"
AAAAB3NzaC1yc2EAAAABJQAAAQEAjIe/0ro8BAh008Fb5D0CsxgUXM999/2g+TJd
yruqHuoXSSD/93r3IIRknKFVDd993k1ajIby49A4i/ZMx26eBOze4HijvA+s6Wq7
+3HIrjtzQ4/0l13PgCSTqCK0qfoky5NqKNlvFPe4CQMdyX36MPcKTJQuZ1X/VPcT
snpn0H0ygQrEDpXT9fF3xzrr4kYmhNp6KNQa9IlqmhIsQA+z/L0dXOj3p7zhmqMZ
zOdXPYtj8aQrmnIMTSPc4Xj7K3r1t6N9plGTe8F28HqdYIOE6Ip9RXfzAKPMOmbT
a6SShK8NwJ2rYnQjbhtSuDTG6AvdDAX3HPkvRagt6WaPGhDMUQ==
---- END SSH2 PUBLIC KEY ----
Let’s delete the first and last rows:
---- BEGIN SSH2 PUBLIC KEY ----
...
---- END SSH2 PUBLIC KEY ----
Get the text in the comment row: Comment: “rsa-key-20160709” (without the double quotes) and contact it to the end of the last row after the double equation operator “…==“, with a single space character, and afterward, delete the comment row. We should get:
AAAAB3NzaC1yc2EAAAABJQAAAQEAjIe/0ro8BAh008Fb5D0CsxgUXM999/2g+TJd
yruqHuoXSSD/93r3IIRknKFVDd993k1ajIby49A4i/ZMx26eBOze4HijvA+s6Wq7
+3HIrjtzQ4/0l13PgCSTqCK0qfoky5NqKNlvFPe4CQMdyX36MPcKTJQuZ1X/VPcT
snpn0H0ygQrEDpXT9fF3xzrr4kYmhNp6KNQa9IlqmhIsQA+z/L0dXOj3p7zhmqMZ
zOdXPYtj8aQrmnIMTSPc4Xj7K3r1t6N9plGTe8F28HqdYIOE6Ip9RXfzAKPMOmbT
a6SShK8NwJ2rYnQjbhtSuDTG6AvdDAX3HPkvRagt6WaPGhDMUQ== rsa-key-20160709
Afterward, let’s put the text “ssh-rsa ” (there is a single space here at the end, so pay attention) in the first row in the previous result and we will get:
ssh-rsa AAAAB3NzaC1yc2EAAAABJQAAAQEAjIe/0ro8BAh008Fb5D0CsxgUXM999/2g+TJd
yruqHuoXSSD/93r3IIRknKFVDd993k1ajIby49A4i/ZMx26eBOze4HijvA+s6Wq7
+3HIrjtzQ4/0l13PgCSTqCK0qfoky5NqKNlvFPe4CQMdyX36MPcKTJQuZ1X/VPcT
snpn0H0ygQrEDpXT9fF3xzrr4kYmhNp6KNQa9IlqmhIsQA+z/L0dXOj3p7zhmqMZ
zOdXPYtj8aQrmnIMTSPc4Xj7K3r1t6N9plGTe8F28HqdYIOE6Ip9RXfzAKPMOmbT
a6SShK8NwJ2rYnQjbhtSuDTG6AvdDAX3HPkvRagt6WaPGhDMUQ== rsa-key-20160709
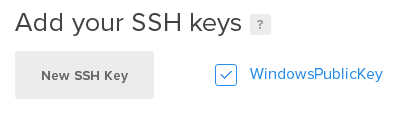
We are finished with the SSH Key Content form field. Let’s just fill the Name form field with: “WindowsPublicKey“. Now hit the big “Add SSH Key” button, and we are set.
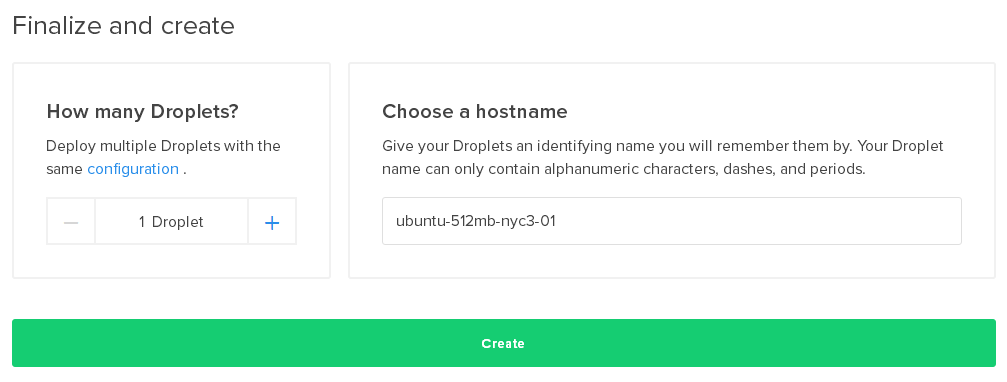
Because we are creating only one droplet for our WordPress blog we can just hit the big “Create” button.
If you haven’t added an SSH key than DigitalOcean will send you an email (you should receive it up to 5 minutes) after the droplet is created. The email contains the credentials Username (which will be root) and Password to the droplet.
Now, finally, that we have a droplet. Let’s hook up the domain to our new created droplet.
Rember that I bought the domain “4test.xyz” at NameCheap from step 1? Now is the time where it comes to hook it up. Go to the NameCheap control panel and click on the “Domain List” menu item on the left sidebar. Then the domain list view will show up with your wanted domain:
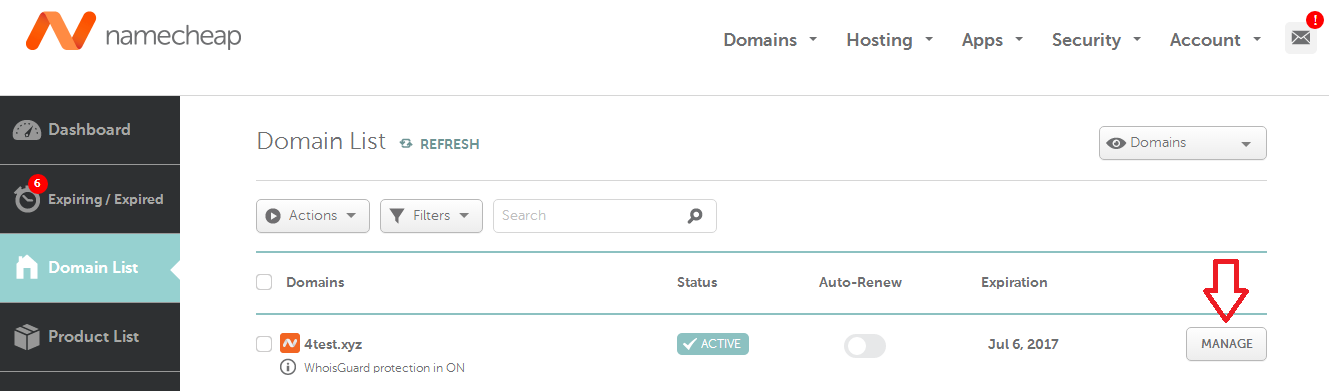
Click the “Manage” button the right side of the screen that is aligned with your domain on the same row. That will show us the domain manager view:

Now, let’s change the domain nameservers. At the Nameservers option change the drop-down option to “Custom Domain“, and fill in the to the form that will be shown once you change that the following DigitalOcean nameservers (If there are only two options available then click on the “ADD NAMESERVER” button to see 3 – It should correspond to the image below):
- ns1.digitalocean.com
- ns2.digitalocean.com
- ns3.digitalocean.com

Then hit the green V sign at the right corner. It may take an hour or two for the changes to take effect. Go to the WHOIS site to see the domain’s nameserver point to DigitalOcean NameServers.
After the first droplet creation, we will see a droplets list view which will have only one droplet listed.
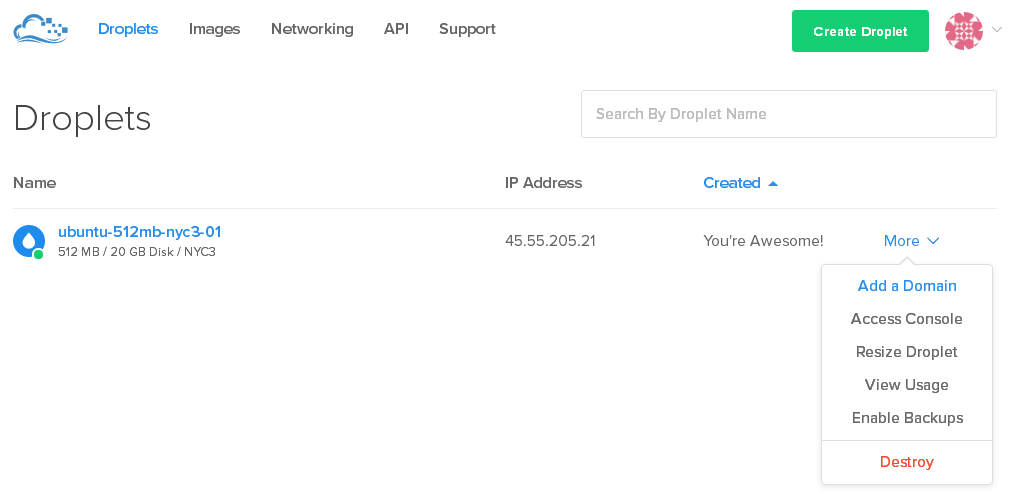
Click on the “More” button on the right of the screen and click on “Add a domain” menu item. You should get “Add a Domain” view:
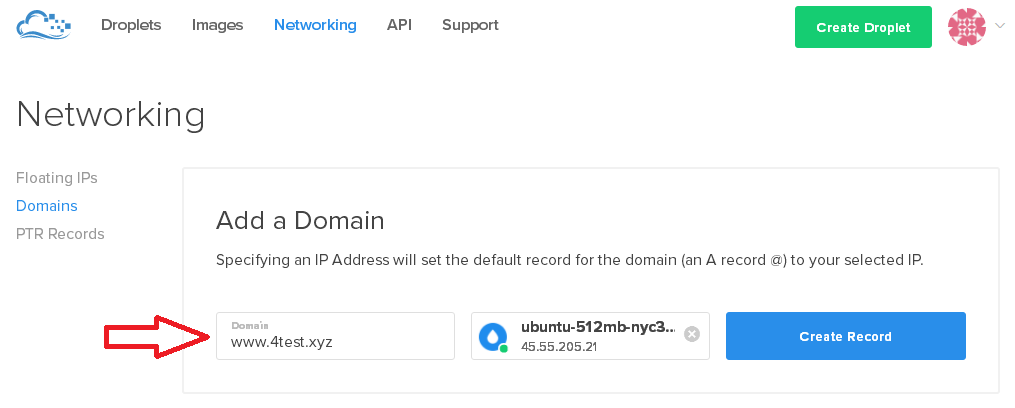
You can add multiple domains to the droplet and the NGINX server will be able to handle them all. Remember: The Droplet is Operating System Image.
We will add only one domain which is: “www.4test.xyz“. So let’s put this domain name in the “Domain” input field (The left most input field). Now click the big “Create Record” button at the right.
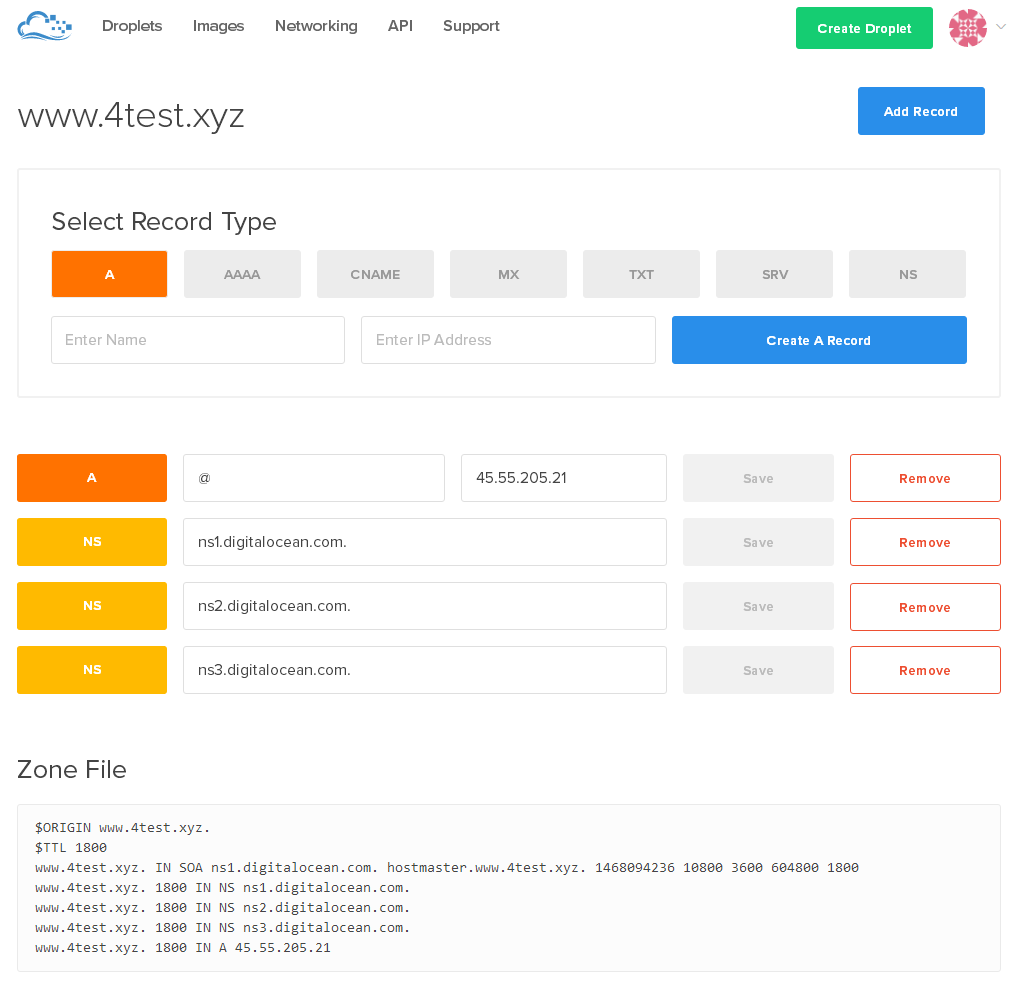
Make sure the domain “4test.xyz” is pointed to the droplet’s IP and the domain “www.4test.xyz” has DigitalOcean nameservers.
The first row represents the domain “4test.xyz“. It has a field with the value “@” in it. Next to this field there should be IP address of the droplet. If the “Save” button near it is not grayed out then click on the save button.
When viewing the zone file which holds the domain details, it should contain the 3 DigitalOcean nameservers.
Of course by now if you visit the site “www.4test.xyz” nothing will show up. It will not show anything or the Jenkins (an automation server that DigitalOcean uses) control panel will show up(don’t panic when it shows up). You will need to wait until you have installed EasyEngine (which will happen at Step 6).
Also, if by any chance you will finish the tutorial under half an hour it might be possible you will not see any changes because the DNS needs to be resolved.
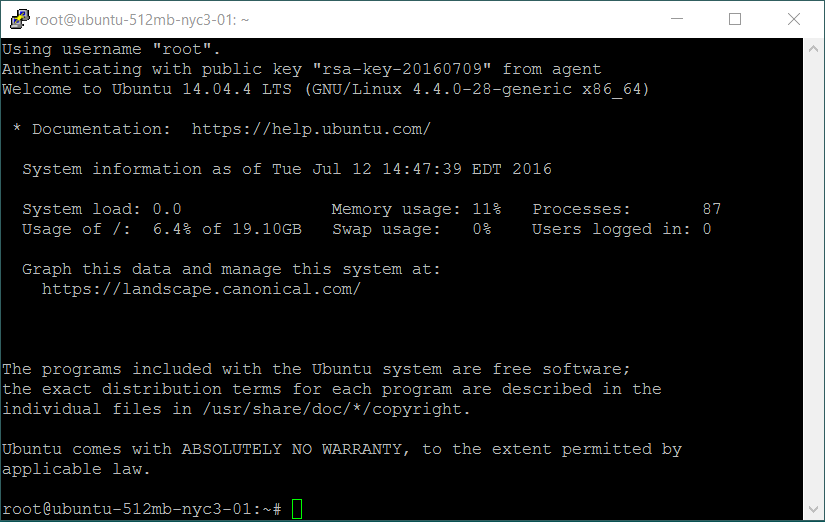
We need to start a session with our droplet in order to make commands such as installing EasyEngine. The piece of software that does that is PuTTY which is SSH (Secure Shell) client for windows (See step 3.5 for some explanation).
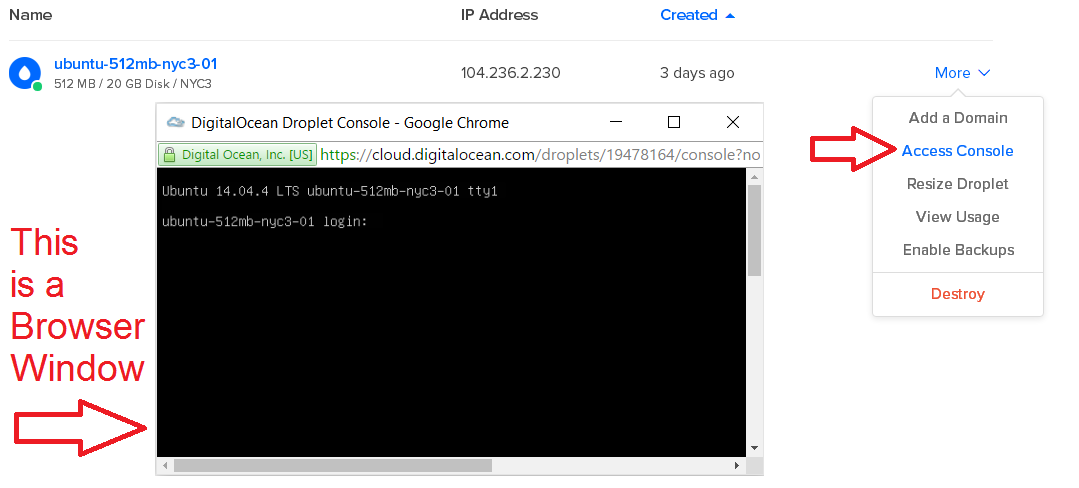
DigitalOcean has a built-in console which you can access it from the browser. On the droplet’s list item in the droplets list view click on “More” → “Access Console” option.
The console is neither good for people who didn’t add SSH key to the droplet and also for people who did. The console is very sluggish, and the fonts are super small which is unreadable. DigitalOcean added the console feature for the sack for having a console feature. The proper way to access a droplet is through SSH client. The SSH client has the ability to make a connection even without the private key, so those of you who did not add an SSH public key to the droplet and want to use the emailed password SSH client is the also the solution for you.
I will explain how to connect to your droplet with SSH on Windows OS. For Mac OSX please refer to DigitalOcean’s guide at Link1 (step five at the page) or at Link2. Mac OSX has built in software named OpenSSH.
Step 5.1: Download and install PuTTY.
Make sure you download the MSI: Search on the page the text: “A Windows MSI installer package for everything except PuTTYtel” and download and install the latest MSI installer (currently PuTTY 0.67: “putty-0.67-installer.msi“). The installation itself is pretty straightforward, it’s a standard windows program setup.
Start the “PuTTY.exe” program (Search for “PuTTY.exe” in Windows search and open the first result) and start configuring the Session settings (the configuration starts at the first screen that will show up when you activate the program):

I have added yellow markers to highlight what needs to be set:
- The Field: “Host Name (or IP address)” – Here you will put your droplet’s IP address which can be found in the droplets list view in the DigitalOcean control panel at their website:
 The Field: “Port” – Make sure it is 22.
- The Field: “Connection type” – Make sure it is SSH.
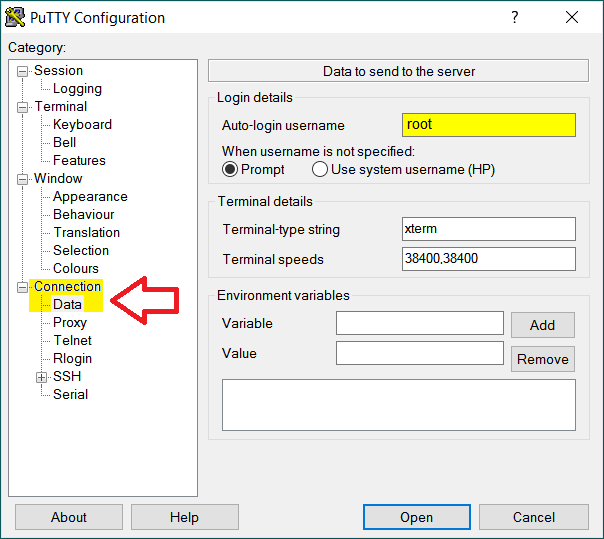
Next, let’s go to the “Data” configuration screen found in the left side configuration menu: Connection → Data. The only field that needs to be touched there is the field:
“Auto-login username“. Give it the value “root“. Keep other fields untouched.
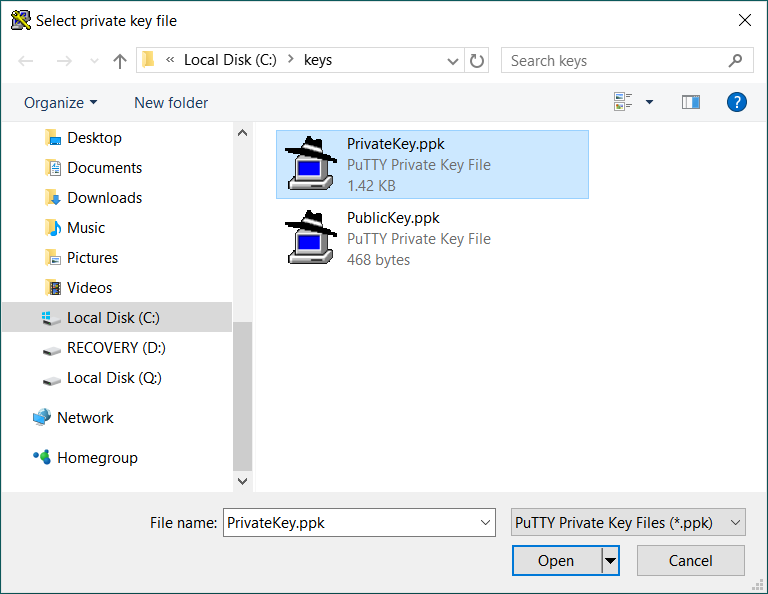
Next, let’s give the connection the SSH private key we generated in the step 3.5.2. In the configuration menu on the left side of the screen go to:
Connection → SSH (open the subtree) → Auth.
Give the field: “Private key file for authentication” the path to the “PrivateKey.ppk“. Everything else needs to be untouched.

Next, let’s go back to the Session configuration screen and let’s save our configured session settings and name it “DigitalOcean Droplet Session” for future connections. Hit the “Save” button to save the session configuration. When you open PuTTY once again you can select the “DigitalOcean Droplet Session” list item from the saved sessions list and click the “Load” button to reload the session settings.
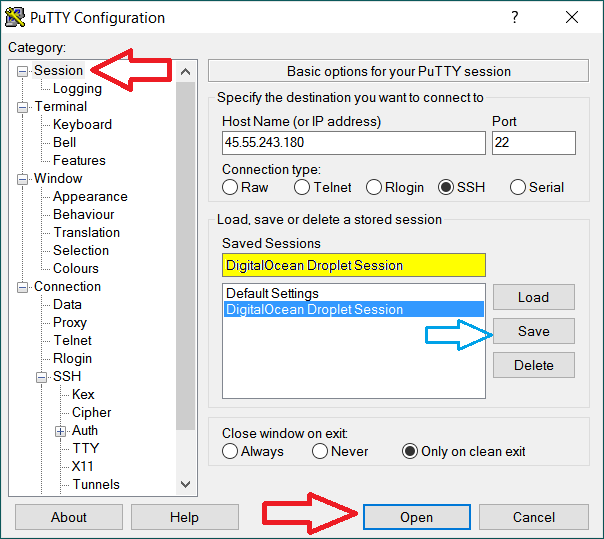
You should now have a configured SSH Session and you are able to connect with your droplet (your new server) by hitting the “Open” button.
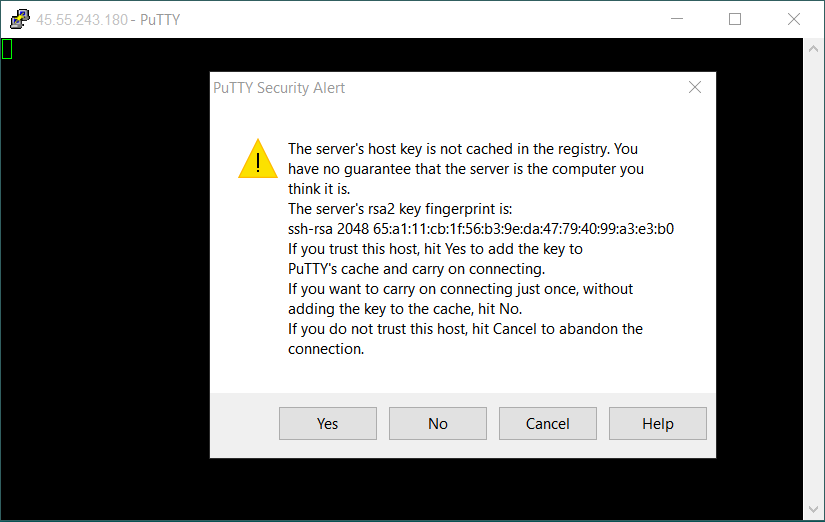
After you click the “Open” button you will get the first time prompt screen with multiple buttons in it. In a nutshell, it asks you if you trust this host. Hit the “Yes” button. The second time you will try to connect to your droplet it should not show this screen.
Now, you have a terminal / shell – a command line which is connected to a remote host (droplet) which waits to execute your commands, and on top of that, it is secure.
Step 6: Install EasyEngine.
 EasyEngine is the easiest way to install WordPress on LEMP stack, meaning having NGINX as our server.
Now that we have a shell open let’s type a command to install EasyEngine on the host:
wget -qO ee rt.cx/ee && sudo bash ee
While installing don’t go anywhere because you will need to fill your name and email address in order the installation will finish. The installation will freeze and you will be asked to fill that information in the shell.
Now, that we have installed EasyEngine we have a NGINX server on our host (droplet).
Next, let’s make the server recognize what happens when someone requests the “www.4test.xyz” domain. That we will do by making this command in the shell:
sudo ee site create 4test.xyz --w3tc
This will create a folder named “4test.xyz” on the host which has WordPress installation in it and the NGINX server will serve requests from this folder. The path to that folder in the host is “/var/www/4test.xyz/“.
I like to note that I didn’t use the “www.4test.xyz” domain in the command because EasyEngine treats the www as the non-www. You could interchangeably write the command above with the www version. In both cases, EasyEngine will create a folder named “4test.xyz“.
I also want to note that you could replace the “–w3tc” attribute, which installs WordPress with the famous featured rich caching plugin “W3 Total Cache“, with one of the attributes in the table below for the caching mechanism. “W3 Total Cache” is selected because of its great control of all the caching aspects especially browser caching.
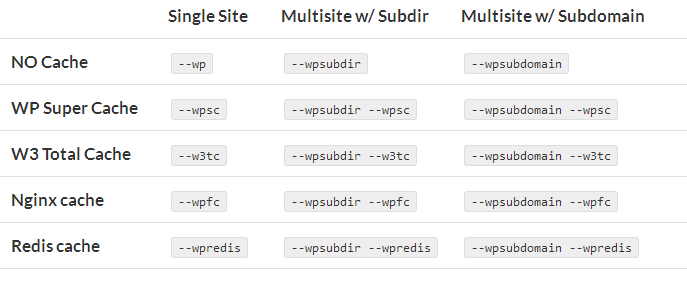
Preferably you should look at the “Single Site” column, and choose one of the supported caching mechanism: NO Cache / WP Super Cache / W3 Total Cache / Nginx cache / Redis cache. The best caching system in our book is the combination of:
NO Cache + CloudFlare CDN provider. I like to mention that the caching mechanism is changeable, you can do this with one command only (EasyEngine made it easy). Say, you want to change the caching mechanism to WP Super Cache, you just run in the shell: (see all the update commands at EasyEngine)
ee site update example.com --wp --wpfc
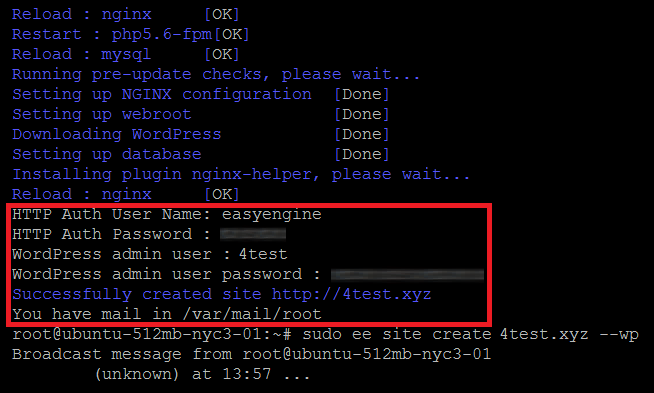
After EasyEngine finishes installing Do Not close the shell right away!!!. You need to copy the information EasyEngine generates in order to log in into the WordPress admin and to the phpMyAdmin & MySQL database:
HTTP Auth User Name: easyengine
HTTP Auth Password : <EASYENGINE_GENERATED_PASSWORD>
WordPress admin user : 4test
WordPress admin user password :<EASYENGINE_GENERATED_PASSWORD>
Successfully created site http://4test.xyz
You have mail in /var/mail/root
If by any chance you ended up to this point under half an hour then it might be a chance you won’t see changes right away. You have to wait at least 30 minutes to see the WordPress initial frontend screen because the Domain’s DNS needs to be resolved and it takes time.
Finally, we have installed WordPress on DigitalOcean which is connected to the domain we wanted (“www.4test.xyz“). Now you can go to the WordPress admin panel: “www.4test.xyz/wp-admin” and log in with the credentials EasyEngine generated you and starting adding posts (or whatever you want to do with WordPress).
Step 7: Setup WordPress on CloudFlare CDN.

Now that you have a WordPress NGINX based server on DigitalOcean its time to make the website even more scalable by setting up the website to a CDN – Content Delivery Network. Basically, a CDN is multiple servers placed around the globe. Each one of the servers has the website copy and the end user connects to the closest server to his location, making the requests with the minimal latency, that also means that the CDN takes a load from the website’s actual server. A CDN also takes care of the security aspects making your site up running even some hacker attacks your site (some well-known threats are Denial of Service – DoS, or the Distributed DoS – DDoS. At the bottom line, you should have a CDN connected with your website if you want to scale.
The easiest way and the cheapest to have a CDN coupled to your awesome website is by connecting it to CloudFlare. CloudFlare has a free plan and now serves more than 2 million websites worldwide. It is funded by enterprises and by the SaaS (Software as a Service) plans it has for their CDN.
Before we start the actual tutorial, I like to inform you that the W3 Total Cache plugin for some strange reason doesn’t operate with CloudFlare API very well, which is quite a shame because it is best to have one plugin to do all the features the site needs instead of being dependent on several plugins. So I brought alternatives to the 2 main features that are needed: Retrieving the actual IP of front-end users and automatically purging cache when a post is modified. We will still use W3 Total Cache plugin for browser caching.
Step 7.1: Install and activate the official CloudFlare WordPress plugin.
At first, it sounds “why there should be a plugin to connect to a CDN? Why not just go to CloudFlare.com and set up an account and hook it up to the domain and that’s it?”. Well, the answer is that you will get the correct IP addresses of your end users and not CloudFlare’s servers IP addresses. It is major important for comments posted on the site.
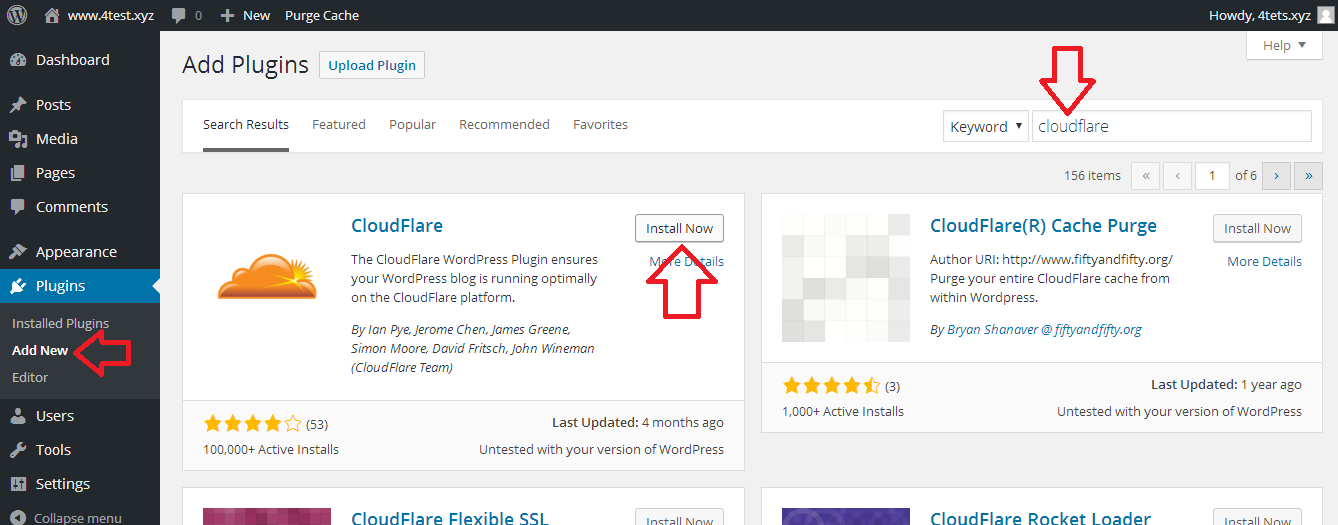
Go to: Plugins → Add New. Search for CloudFlare, install the CloudFlare’s official plugin for WordPress (it should be the first result probably).
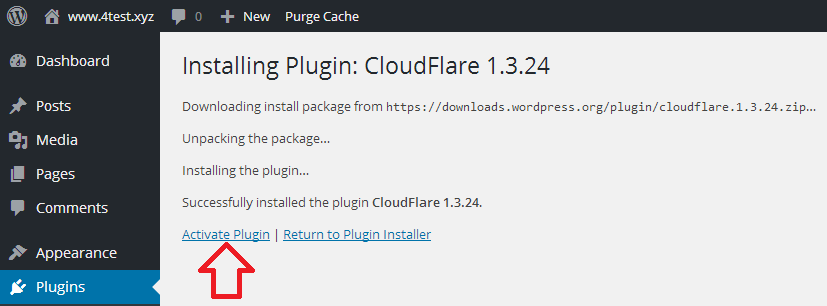
Activate it:
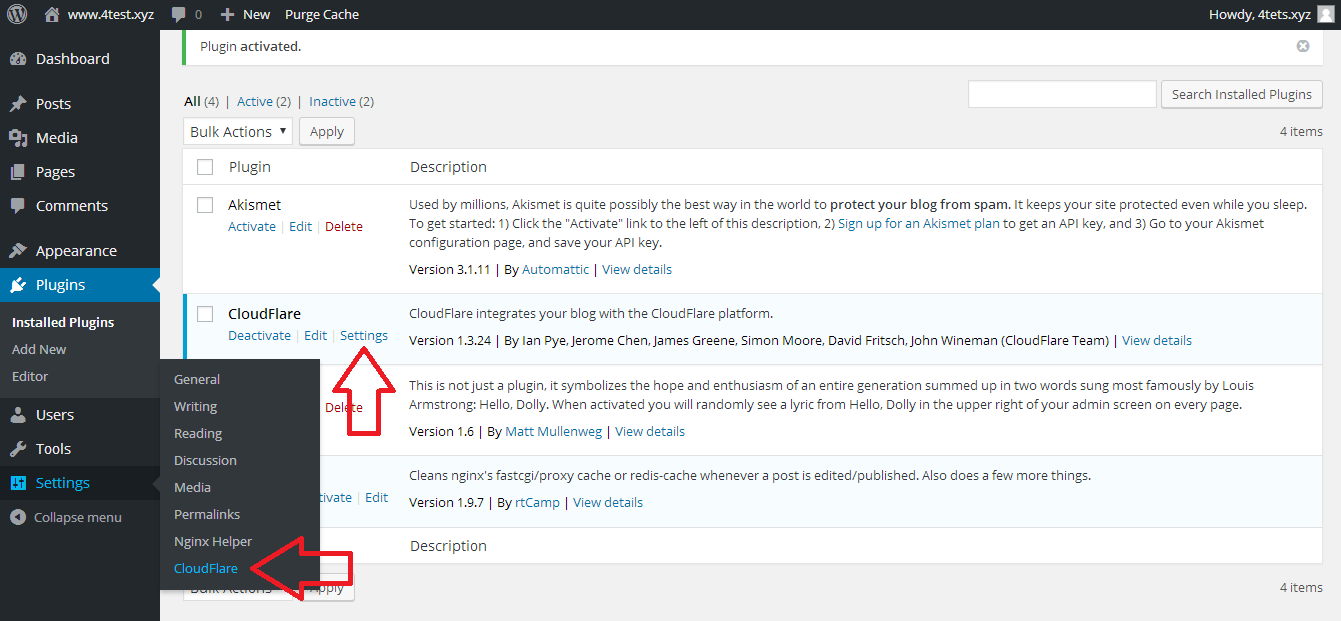
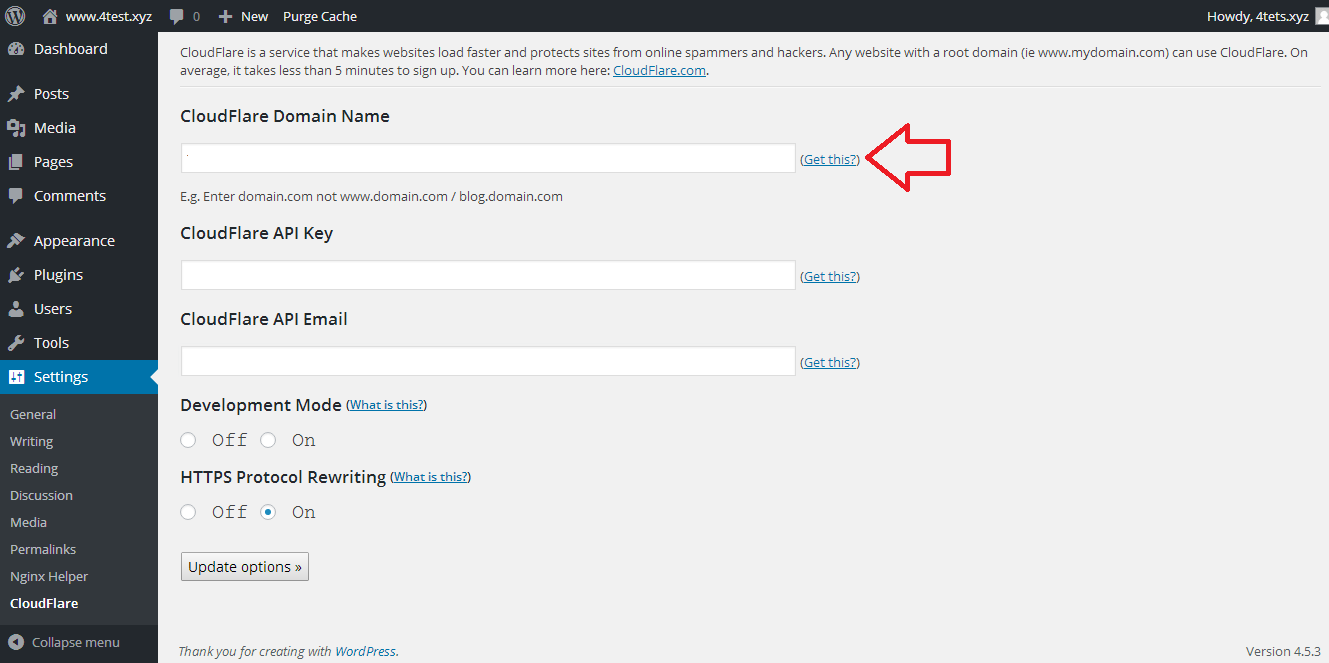
Go to the settings page from the WordPress Control panel: Settings → CloudFlare, or Plugins → Installed Plugins → CloudFlare → Settings.
Scroll down to the fields section in the settings page. The first field is: “CloudFlare Domain Name“. Click the “(Get this?)” link near the field.
From the end of the last step after we clicked the “(Get this?)” link it should have open a new window of the CloudFlare’s login page.
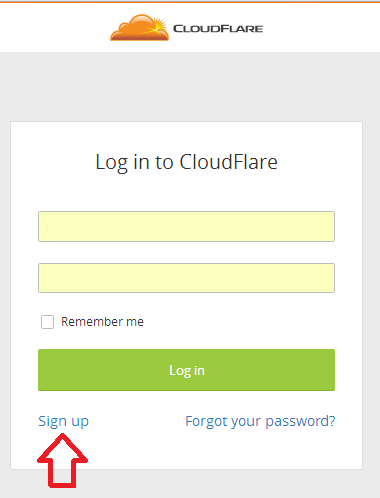
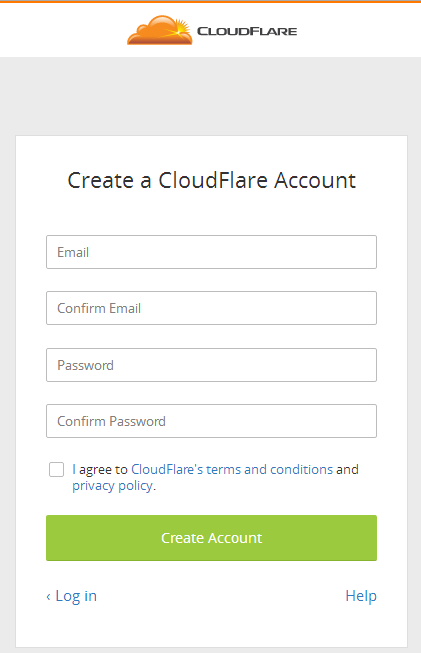
Click the “Sign up” link, and Sign up for a CloudFlare account:
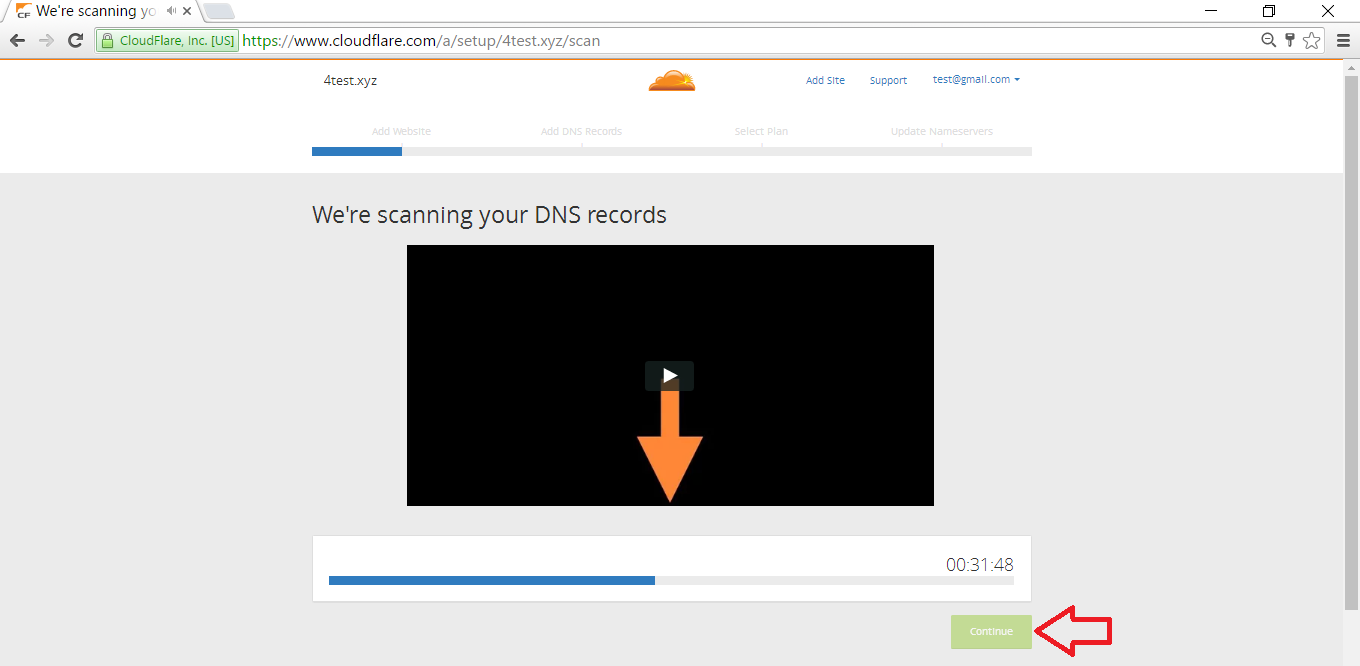
Enter your domain name in the “Add a website” section at the bottom. As CloudFlare says: “There is no downtime when you add a domain“. Next, click the “Scan DNS Records” big button.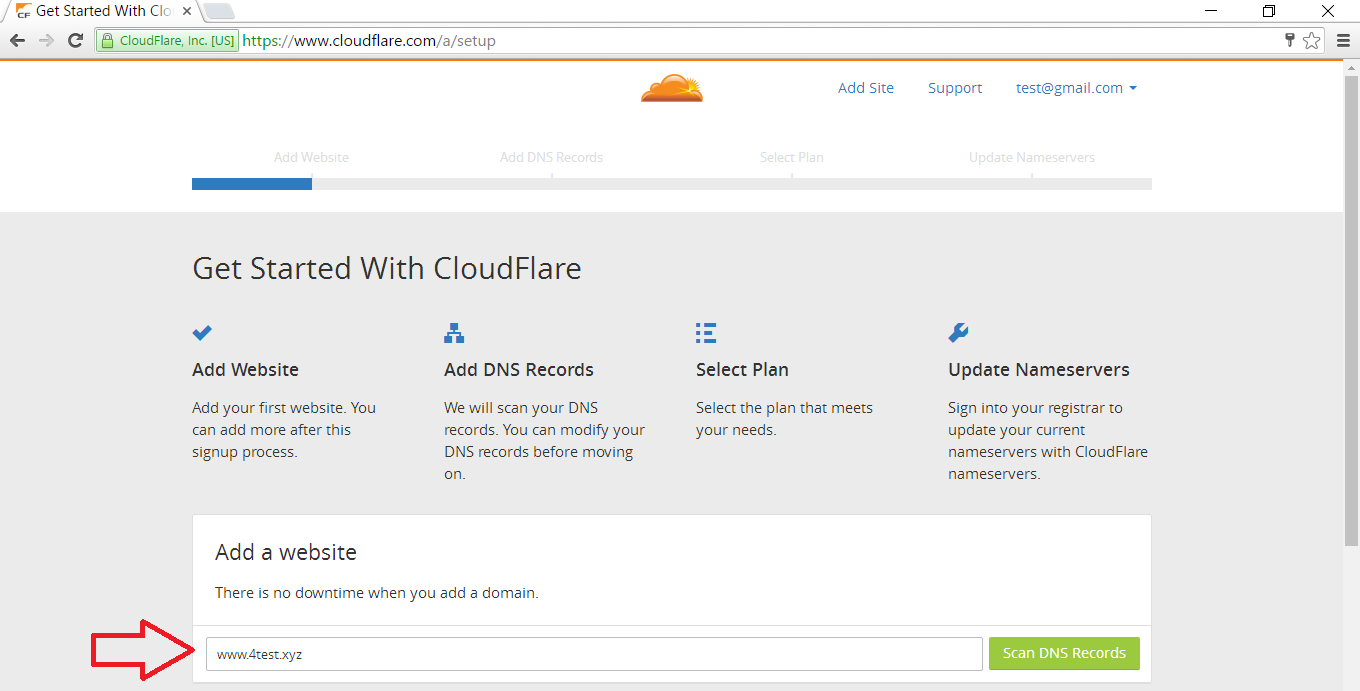
Wait 1 minute for the scan to finish. It is preferable not to go anywhere and stay on the page while it scans the website:
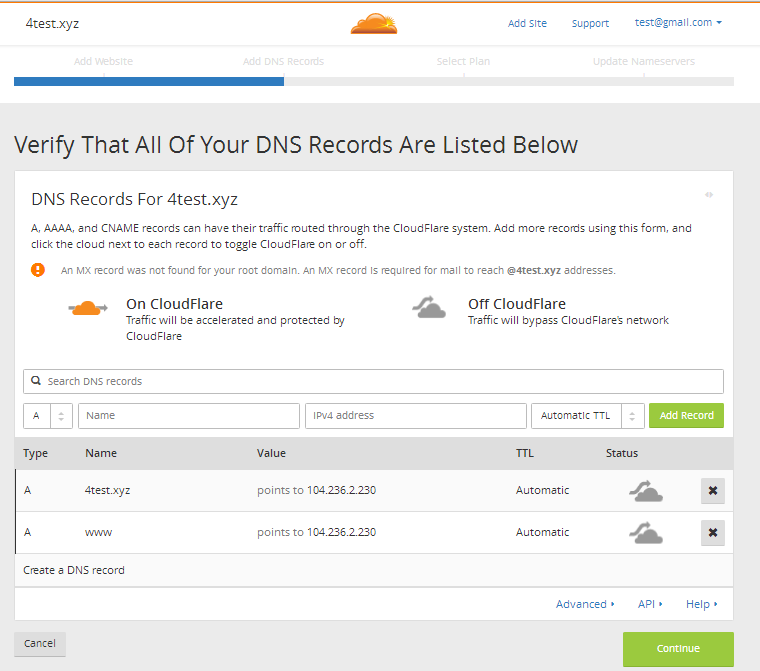
After the scan has finished, verify the domain & subdomain you want to associate with CloudFlare. The domains & subdomain should point to DigitalPcean’s droplet IP address. The “www.4test.xyz” has just only two records: the: “www.4test.xyz” & “4test.xyz” which both of them point to the droplet’s IP address. This step is the same as step 4.2, just here we are connecting the domain to CloudFlare and CloudFlare will be connected to DigitalOcean’s droplet (This is called Reverse Proxy).
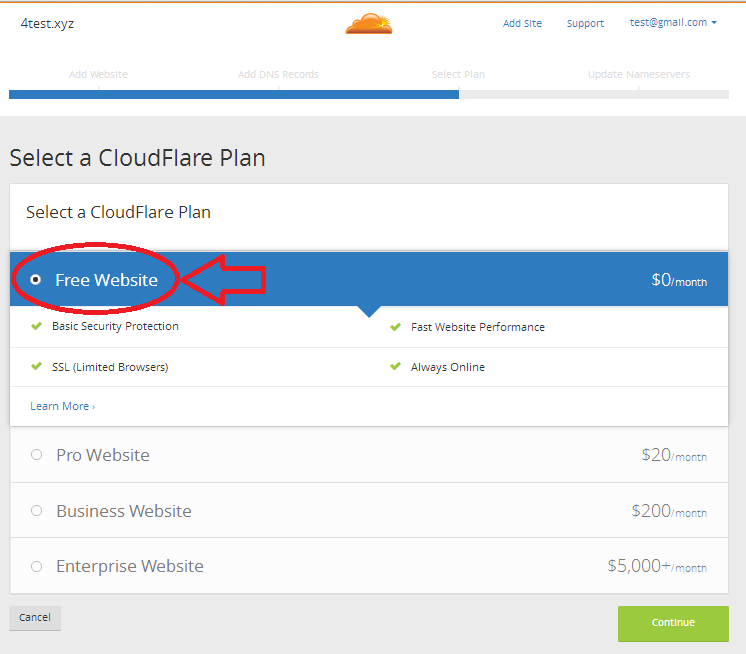
Next, click the “Continue” button where you will need to select a plan. CloudFlare has a Free, Pro, Business & Enterprise plans for you to choose. For most blog owners the free plan will be sufficient the “4test.xyz”. After selecting the plan, click on the “Continue” button.
After selecting the CloudFlare’s plan, CloudFlare will now give us a screen that tells us how to change the current domain’s DigitalOcean nameservers to the new CloudFlare’s nameservers.
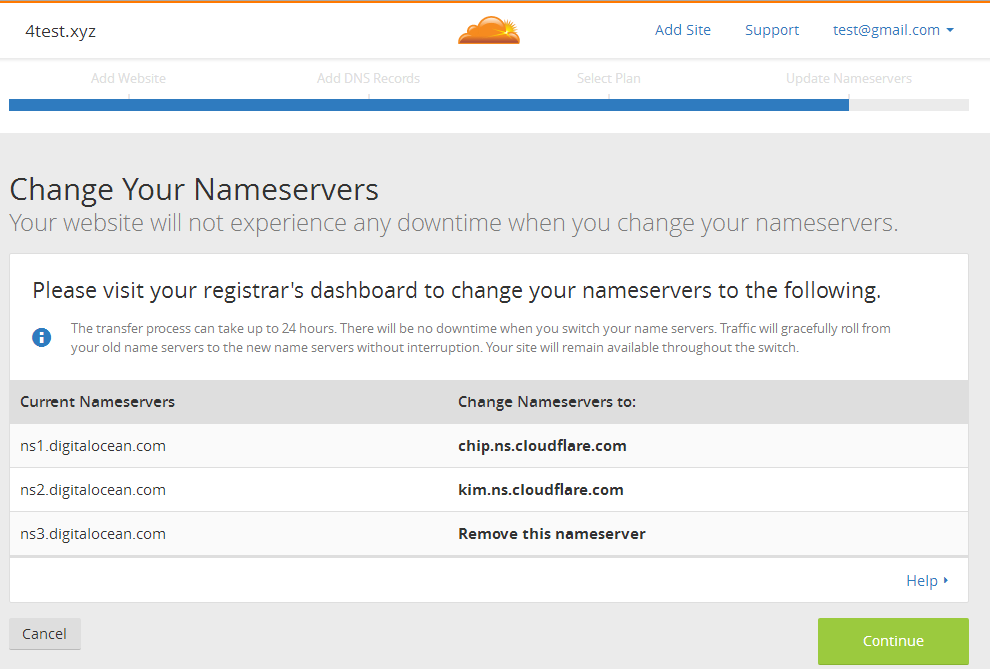
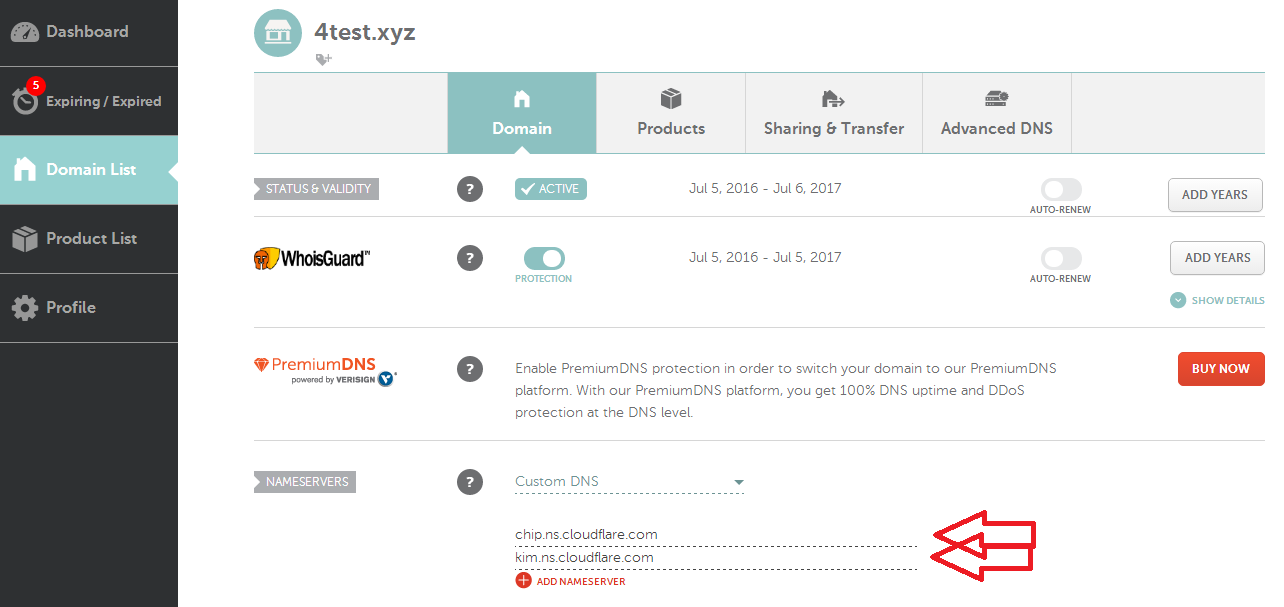
Open a new tab in the browser and keep CloudFlare’s tab open. In the new tab go to your domain’s register website, open the domain manager and change the nameservers to CloudFlare’s nameservers. This step is similar to step 4.1 but instead of DigitalOcean’s nameservers we hook to CloudFlare’s nameservers. I bought the domain “www.4test.xyz” at NameCheap so we demonstrate the change with the NameCheap control panel. CloudFlare needs two NameServers so let’s delete the third nameserver and change the other two exactly at the same order they gave us and hit the green ✓ sign to save the new nameservers.
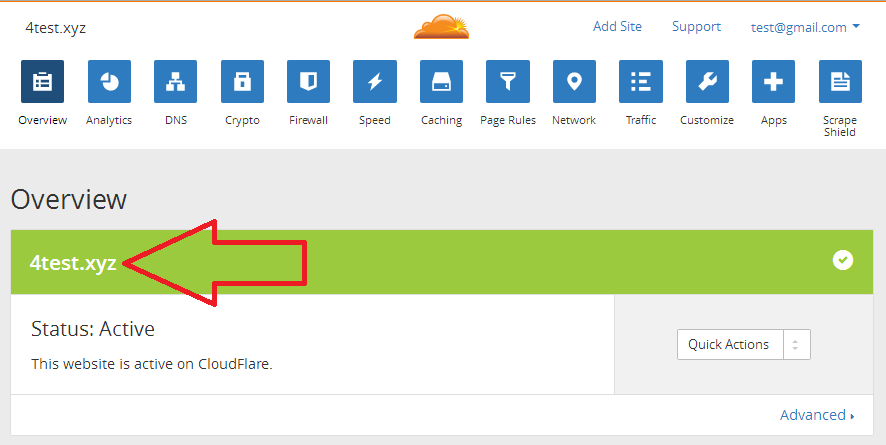
Next, let’s go back to CloudFlare’s tab and click on the “Continue” button. The screen we should get is CloudFlare’s “Overview” tab that is waiting for the domain’s NnameServers to resolve.
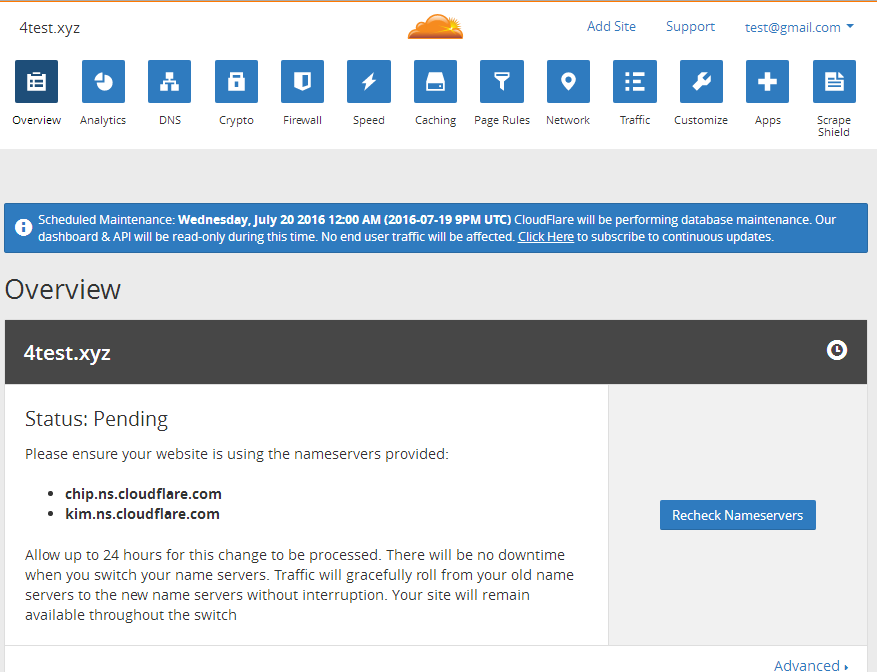
The DNS (Domain NameServers) update should be resolved about 30 minutes or so. Until then the Status will be Pending for the nameservers to resolve. Hit the “Recheck Nameservers” button to see if the DNS is updated. When CloudFlare finds the DNS points to its servers then the “Overview” tab changes its theme to green and the Status should be Active.
While we are at CloudFlare’s control panel lets add Page Rules. Page Rules give you the ability to take various actions based on the page’s URL, such as redirection, caching, enabling / disabling services and some more. We will focus now on the cache Page Rules.
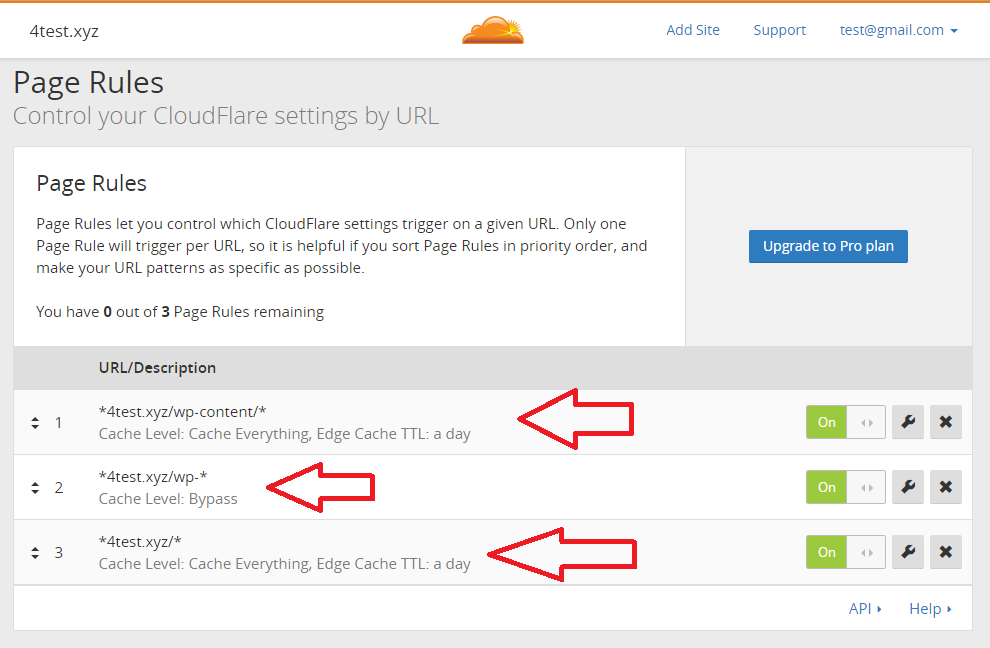
CloudFlare lets you add up to 3 Page Rules on the free account. We will use all available Page Rules. One will be for the WordPress content folder “wp-content” which holds the images, themes & plugins. Another one for the WordPress admin which here we will need to tell CloudFlare not to cache any of the admin related URLs, meaning skipping/by-passing the URL requests. The last page rule is related to all other front-end URLs: pages/posts/archives etc.
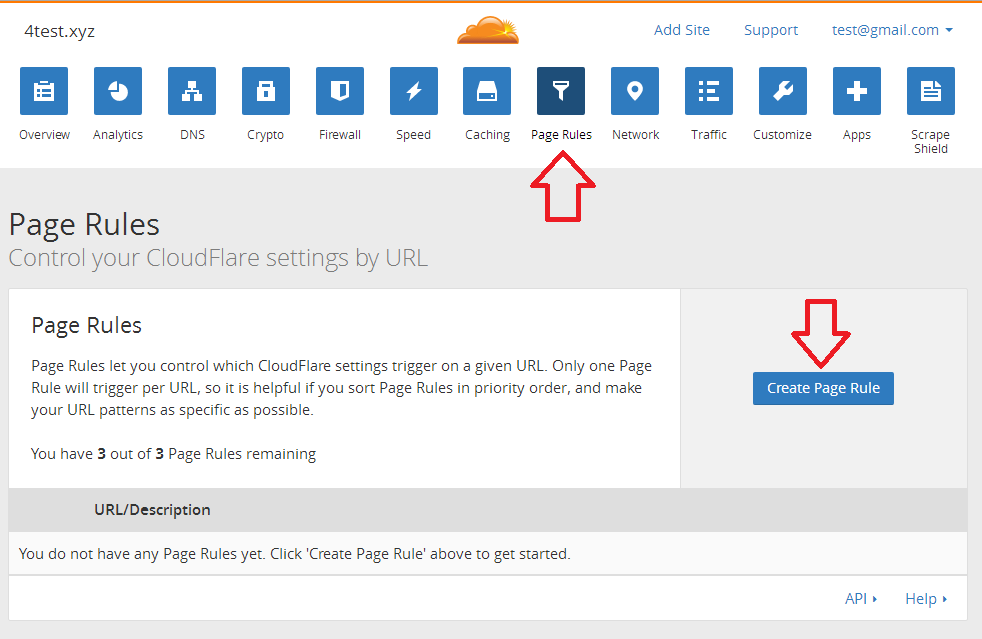
Now, in the CloudFlare’s control panel click the “Page Rules” button in order to go to Page Rules view. Next, click on the “Create Page Rule” right centered button.
Let’s add our first Page Rule which is related to all the WordPress content which is found under the sub-directory wp-content:
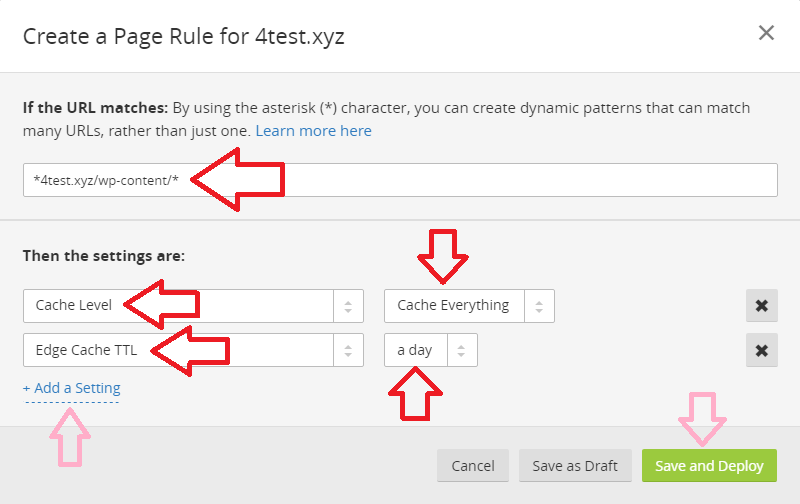
In the big text field that appears first enter the URL pattern:
*4test.xyz/wp-content/*
The pattern will match all the URLs that are under the “/wp-content” sub-directory.
Notice that we use asterisks also at the beginning, now if you have any sub-domains that have WordPress installed then it is great, but if you don’t then you should change the beginning asterisk to your preferred sub-domain.
Next add 2 settings:
- Cache Level → Cache Everything
- Edge Cache TTL → a day
The first setting is pretty obvious but second needs to be explained.
The “Edge Cache TTL” basically tells CloudFlare to cache the URL after achieving it in CloudFlare’s servers. I selected to be a day because most blog resources get updated after a day or so. If by any chance you have a site/blog that is updated frequently you can put less time or the other way around, if you a site/blog that is updated rarely you can put a higher value.
Note do not confuse “Edge Cache TTL” with “Browser Cache TTL”. The browser cache we will configure in W3 Total Cache plugin. Browsing caching tells the browser for how long to cache the URL in the browser cache. The W3 Total Cache plugin handles browser caching in far more detail than CloudFlare does, that’s why I choose to leave out the setting from CloudFlare. The browser caching is just about putting caching response headers to URLs.
Next, let’s add the second Page Rule that is related to all URLs that the WordPress admin uses.

In the big text field that appears first enter the URL pattern:
*4test.xyz/wp-*
The pattern will match all WordPress admin and login URLs.
Next click on the “+ Add a Setting” link button under “Then the settings are” which will show a drop down field that you should select the “Cache Level” option. After selecting the drop down option another drop down will show up near the first one which you will need to select the option “Bypass“. Click “Save and Deploy” button after filling all the proper values.
Note that you should not have posts or pages or any other resource that their slug/permalink starts with: “wp-” because those resources will never be cached.
In the “Order” drop down menu at the bottom make sure you select the “Last” option.
The order of the Page Rules is super important!!! When a URL is requested, CloudFlare goes through the page rules list one by one from the first to the last and executes the first matched rule to the URL and does not go any further in the page rules list. If you did not notice the “Order” drop down or forgot about it CloudFlare lets you sort the page rules, you have to make sure the order the admin URLs pattern are handled second than all other URLs.
Lastly, let’s add the front-end Page Rule which will be executed on all non-admin URLs.

The pattern that matches all URLs is:
*4test.xyz*
The pattern will handle all non-admin and non-wp-content URLs & cache them.
Next add 2 settings:
- Cache Level → Cache Everything
- Edge Cache TTL → a day
In the “Order” drop-down select the “Last” option.
At the end, we should get the following Page Rules list (make sure the order is the same):
Step 7.6: Official CloudFlare WordPress plugin final adjustments.
We have finally have connected CloudFlare to WordPress. Now we need to obtain the original front end users IPs. Right now, all the front end users will have CloudFlare’s IP. Well, let’s change that. Let’s head back to the website’s WordPress control panel and go to the CloudFlare plugin settings: Settings → CloudFlare.
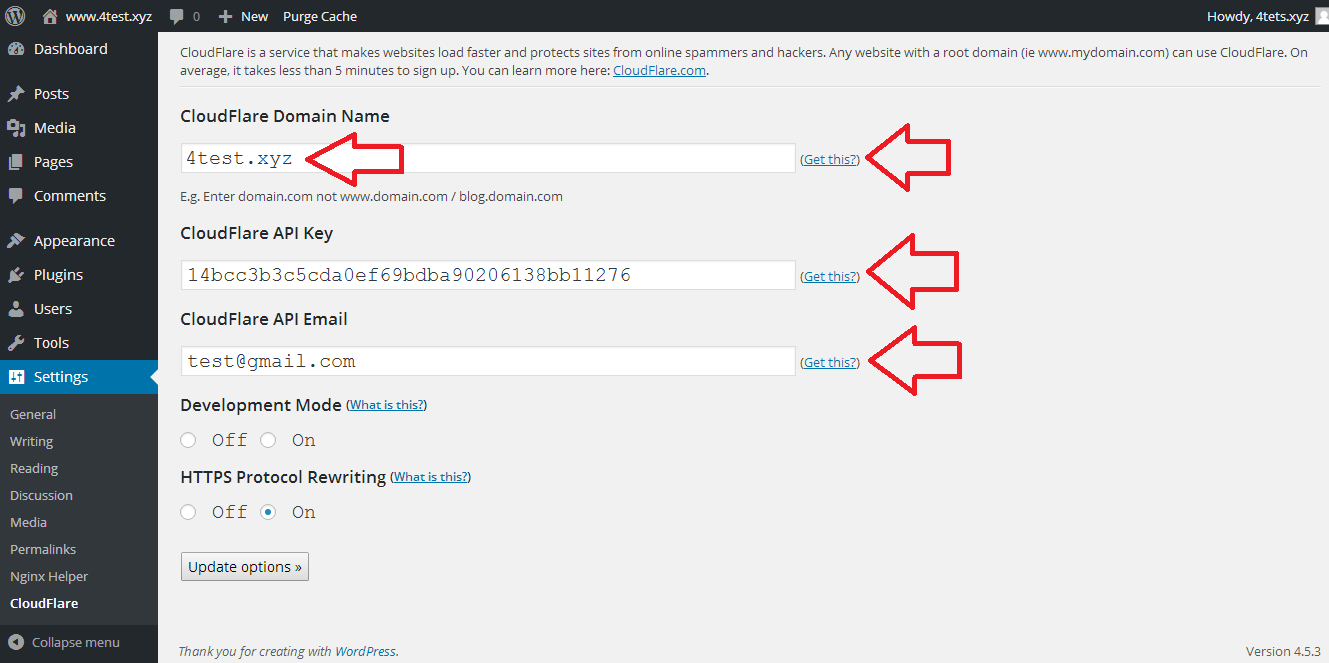
The “CloudFlare Domain Name” field value should be the exact domain that there is in the “Overview” tab in CloudFlare’s control panel, usually, it’s the non-www domain which in our case is “4test.xyz“.
The “CloudFlare API Key” value should have one of CloudFlare’s API keys in the account page at their website. Just click “(Get this?)” link and it will open a new tab with your account settings, and you should scroll down to find the “API Key” section. There is two API keys: Global API Key and Origin CA key. The Origin CA key is more secure as CloudFlare says. I have selected the Global API Key just because I am not NASA or any other enterprise for that matter.
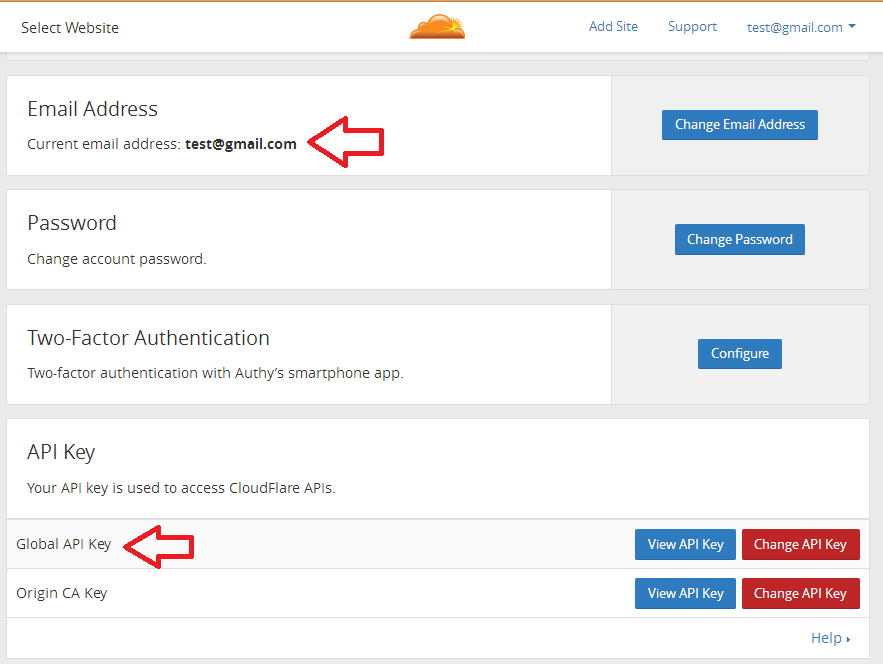
The “CloudFlare API Email” value should be the email you created your account with. Just click the “(Get this?)” link and it will open a new tab with your account settings showing the email address in the “Email Address” section.
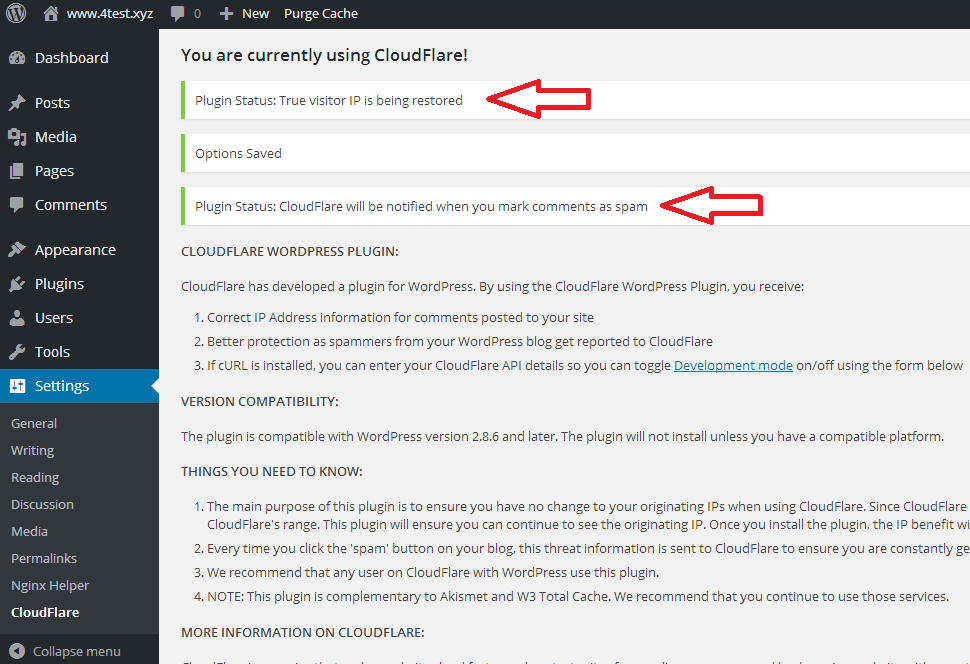
After entering all the values on the CloudFlare WordPress plugin settings screen save the changes by pressing the “Update options »” and we should get 3 notifications/alerts at the top of the plugin settings screen. All the notifications should have a green indication for success: “Plugin Status: True Visitor IP Being Restored” & “Plugin Status: CloudFlare will be notified when you mark comments as spam”.
Step 7.7: Install SuperSonic CloudFlare cache purge WordPress plugin.
When you create a new post or a page you expect the home page to be updated also and when you want to make changes on a given post expect the post front page to be updated automatically, but the post page is cached at CloudFlare’s servers, that’s where SuperSonic plugin comes to the picture. SuperSonic automatically purges CloudFlare’s cache when a post/page/media/comment is updated.
Once you install and activate SuperSonic, in the WordPress admin panel go to “SuperSonic” setting page and in the first tab: “CF Settings” fill the exact settings you did on the official CloudFlares’s WordPress plugin in the previous step:

Next, go to the SuperSonic’s “Options” tab and checkmark the check boxes like the following screenshot:
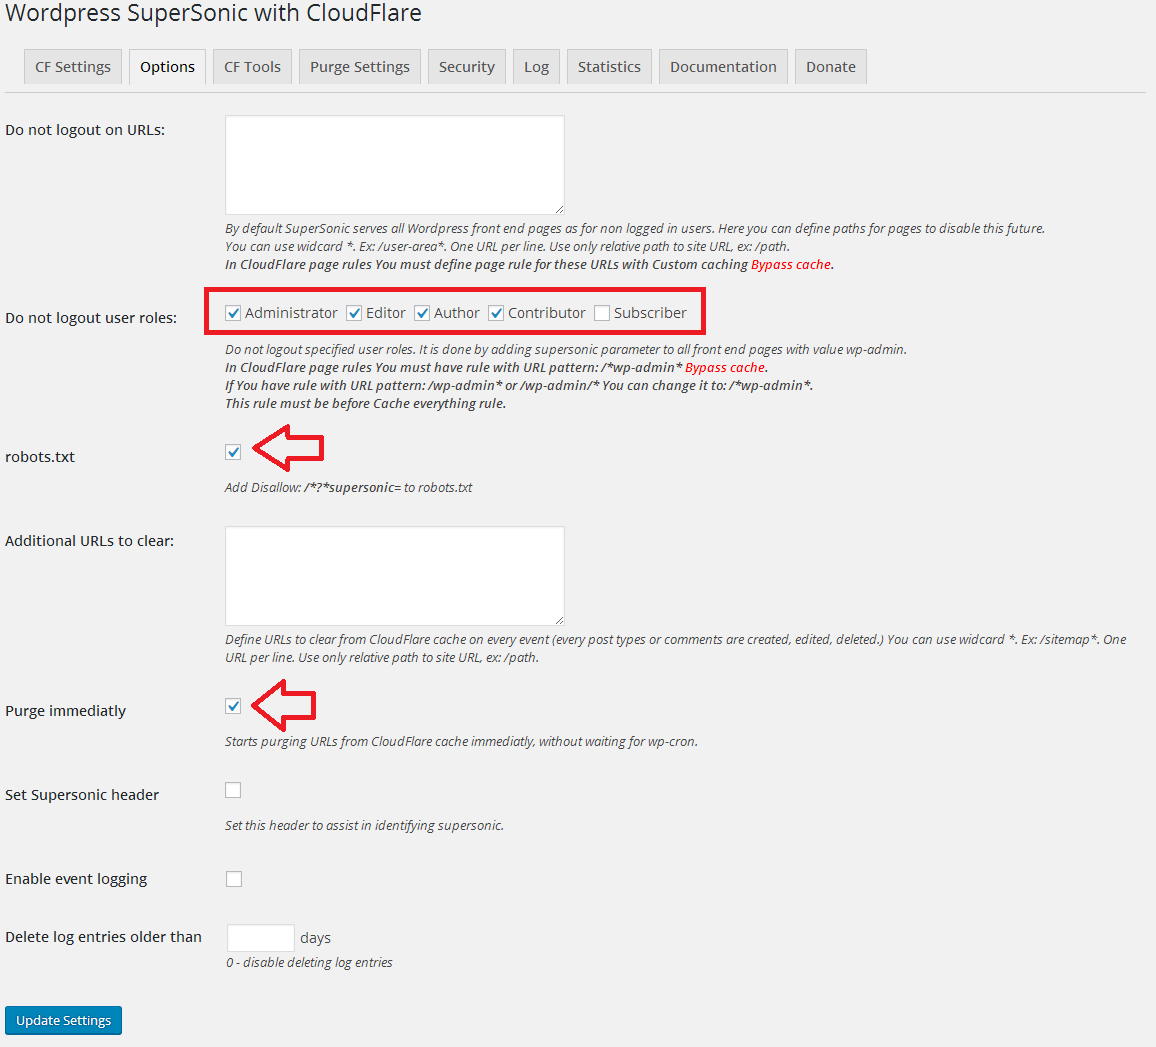
In the “Do not logout user roles” check-mark the roles: “Administrator, Editor, Author, Contributor“, it keeps the users logged in and showing the admin bar on the front-end even thought CloudFlare cashes all resources including posts and pages. SuperSonic keeps the checked marked role users logged in by adding a query string parameter to the resources: “?supersonic=“.
Because SuperSonic adds the query string you should disallow the search engine bots to index those resources with the query string attached to the resources URL for avoiding duplicate content (good for SEO), so you should add to your robots.txt file the row:
Disallow: /*?*supersonic=
You could add the row by check-marking the “robots.txt” option. If you have a special plugin for generating a robots.txt file like the Robots.txt rewrite plugin than check-marking the setting won’t have any effect and you will need to add it by yourself.
The last setting in this tab that needs to be check-marked is “Purge immediately” for purging cache immediately and not to wait for scheduled tasks by wp-cron.
Next let’s go to the “Purge Settings” tab, to activate the automatic purging rules:
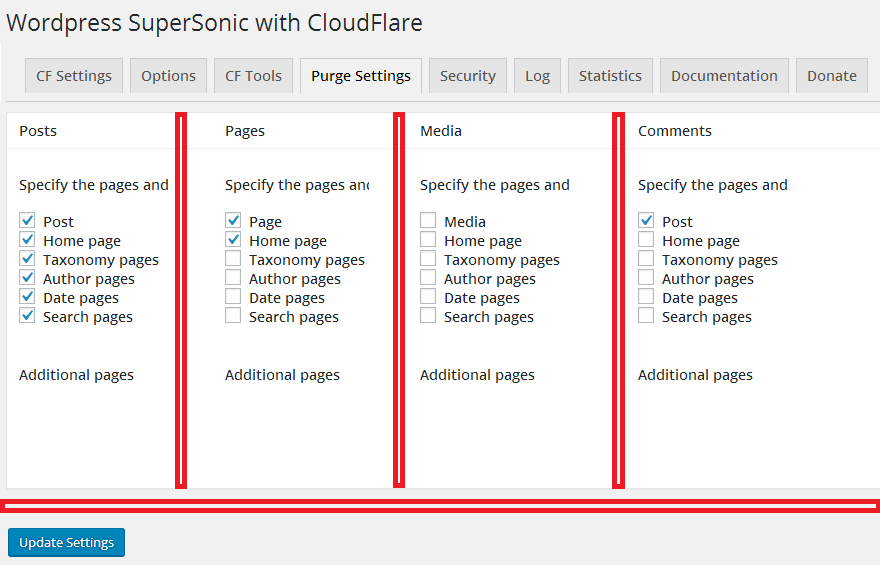
The screenshot is edited so all resource types will fit the screen and will not take extra height on the page and that they will be visible.
I believe that every time a post is modified (added/updated/deleted) it is that all the pages that contained the post or should/shouldn’t have contained the post should be purged automatically. All other resources caching are less dramatic. Eventually, you should decide what suits for your blog/site.
Of course, this plugin has extra good stuff like security settings and the ability to see CloudFlare statistics as visual graphs, but I won’t get into it and you are free to explore by yourself.
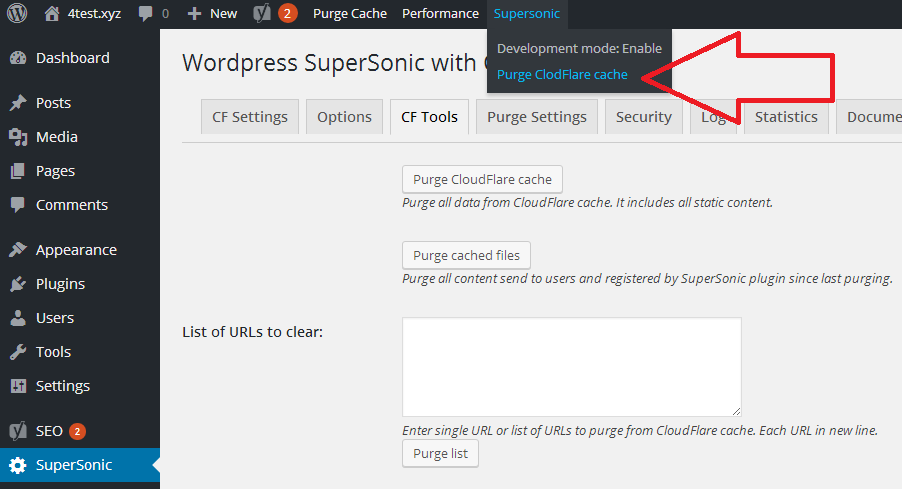
But one thing I like to mention is that in the “CF Tools” there is a button where you can purge CloudFlare’s cache by clicking on a button if you didn’t like the purge for some change you made. You can go to “CF Tools” tab in the top admin bar from anywhere in the WordPress control panel:
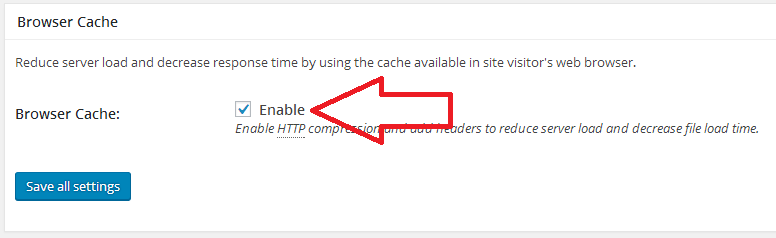
Step 7.8: Configure W3 Total Cache browser caching settings.
 We are only going to configure browser caching for resources in the W3 Total Cache plugin because it is the strongest feature for caching. All other features that W3 Total Cache offers only adds to the performance a little for each feature (this sentence applies to the majority of websites and some other website will have performance boost if tweaking other features like database cashing or object caching).
Go to the W3 Total Cache browser cache settings page in the WordPress control panel: “Performance” → “Browser Cache“, and set the settings like in the screenshot below:

The checkboxes that should be check-marked are the following:
- Set expires header
- Set cache control header
- Set entity tag (eTag)
- Set W3 Total Cache header
- Enable HTTP (gzip) compression
All other should be untouched (if you notice, once you check-mark on the checkbox the corresponding checkboxes under the “General” section also will be checked).
Next in order to make the pages & post to be cashed we need turn on page caching. Go to: “Performance” → “General Settings“:

On the “Page Cache” section check-mark the “Enable” checkbox.
Scroll down to the Browser Cache section and make sure the “Enable” checkbox is check-marked:
Next in order to make logged in users not to get cached pages go to:
“Performance” → “Page Cache” and check-mark the following checkboxes as the screenshot below:
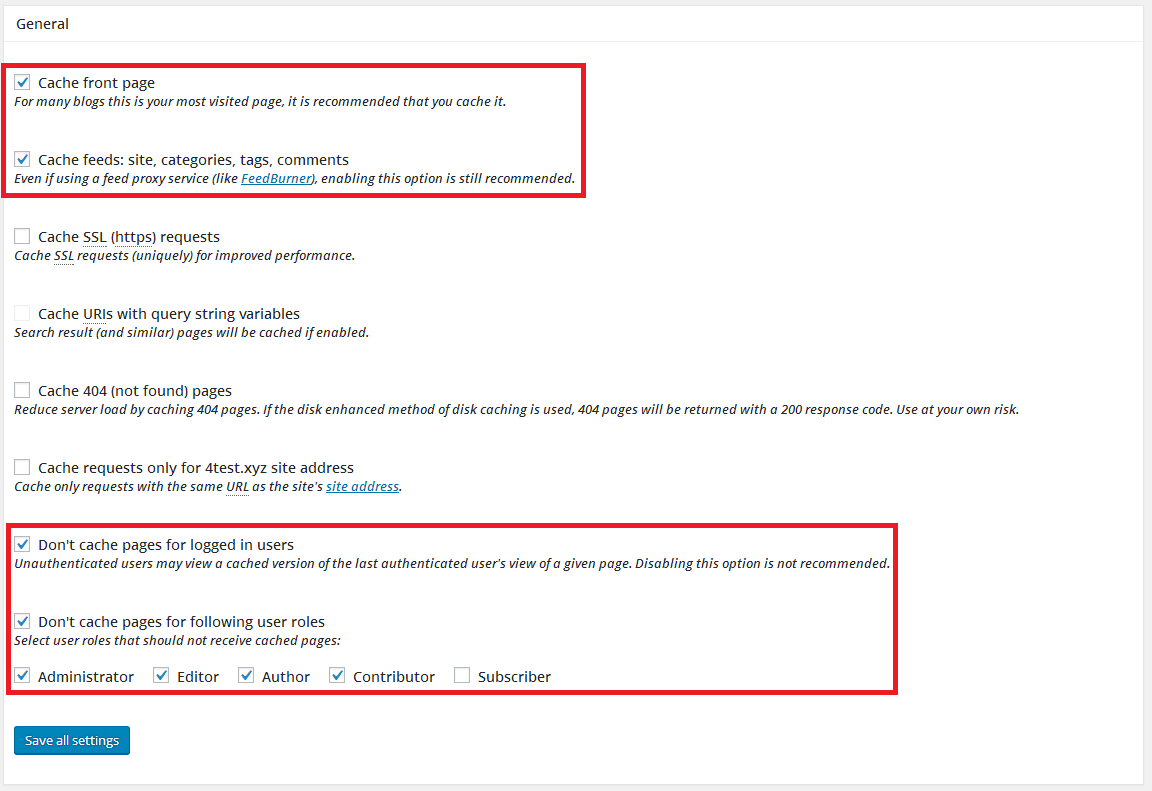
The checkboxes that should be check-marked are the following:
- Cache front page
- Cache feeds: site, categories, tags, comments
- Don’t cache pages for logged in users
- Don’t cache pages for following user roles
- Administrator & Editor & Author & Contributor
That’s it, we are done setting up the W3 Total Cache plugin. We enabled the major caching features to give us the results we need. Of course, there could be more configured but where is the end? I’m sure with the results of these caching setups all will agree to have.
Finally, we have configured CloudFlare to WordPress with browser caching. Now we have a WordPress CloudFlare based CDN, but how we will know that CloudFlare serves our resources?
Well, that’s easy: Go to chrome and open incognito window and enter your site’s home page URL and make sure you are not logged into WordPress control panel and then open: “Chrome Developer Tools” → “Network” tab. Next, refresh the tab to see the requested resources list. Select the page request item that matches your , that should be the first item requested and should appear first, just scroll up in the network request list when the browser finishes loading the page. See the screenshot below:

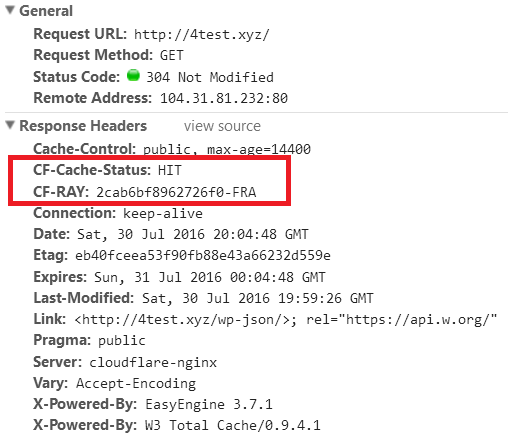
When we have “CF-RAY” header we know that CloudFlare served our page, but when we have “CF-Cache-Status: Hit” we know that CloudFlare served the page from CloudFlare’s cache servers and not from our server.
When there is “CF-Cache-Status: Miss” it indicated that the page was never requested from the last purge, so if you encounter this just hit the refresh button several times. If by any chance you didn’t get the Hit value it is either CloudFlare didn’t cache the pages yet and you need to wait up to 5 minutes or something wasn’t configured currently.
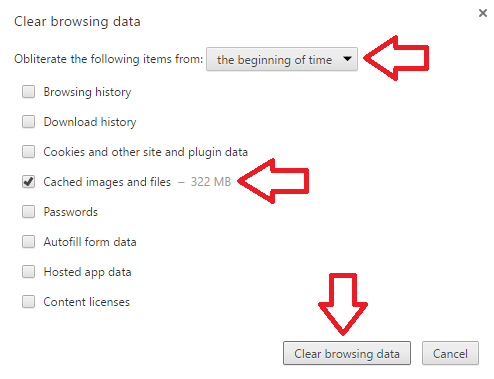
It is better that you clean your browser cache once you have configured CloudFlare & W3 Total Cache. Press “Ctrl+Shift+Del” when you are in the browser or go to the hamburger menu icon → “More Tools” → “Clear browsing data…”. Make sure the “Cached images and files” are selected and clear the browsing data.
As you can see we “X-Powered-By: W3 Total Cache/0.9.4.1” which indicates that we have configured server caching. We need to notice that the header “Cache-Control” has max-age greater than 0 which indicates browser caching. We also need to notice we have an “ETag” header for telling the browser that when this header changes it needs to get the server version of the resource.
Well, all is installed and configured. Now it is time make load/stress testing on the end result to see that all the settings we did works. The load/stress-testing is made by the famous SaaS loader.io which offers to make free test for 1 domain only, with the limitation of 10,000 unique users per second and the test length is 1 minute long only. Of course that these limitations don’t exits for paid users or paid tests.
The graph below shows the load testing result I did on the final configuration. The graph shows to lines: One line indicates the amount of unique users per second and the line shows how long it took to get the home page “4test.xyz“. As you can see the pages are retrieved fast!!! The maximum time it took to get the page is 35 miliseconds which is blazing fast. You can go to the load / stress testing page to see the full test details.
![]()
Well, this is it. You have WordPress installed with NGINX server and LEMP stack on DigitalOcean’s VPS and WordPress has CloudFlare based CDN. You are ready for high traffic volume that’s for sure. Use the power wisely and enjoy the scale.
There are few actions that are needed to explain because a lot of WordPress developers / users use them so I brought them under the appendix step.
I am going to explain how to upload to a droplet using SFTP on Windows OS with the WinSCP client software. For Mac OSX you can follow the steps which probably will be very similar with one of these FTP clients: FileZlila for OSX, Transmit, Cyberduck.
Step 8.1.1: Download and install WinSCP.
If you want to upload your theme (or other things like themes, plugins, assets etc.) you can do it by installing WinSCP FTP/SFTP (Secure File Transfer Protocol) client for Windows. I recommend this over FileZilla because it has the ability to upload changes automatically when a change occurs in the origin folder such a file is updated or folder created and etc. That is a great feature when developing a theme or a plugin.
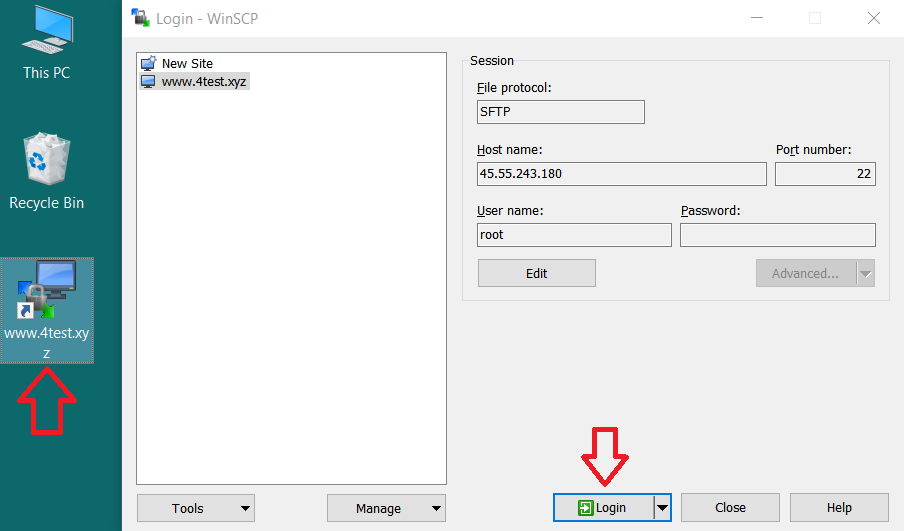
Run “WinSCP.exe” and start to configure the site SFTP. The
The “New Site” node on the left is active and the values on the right should be:
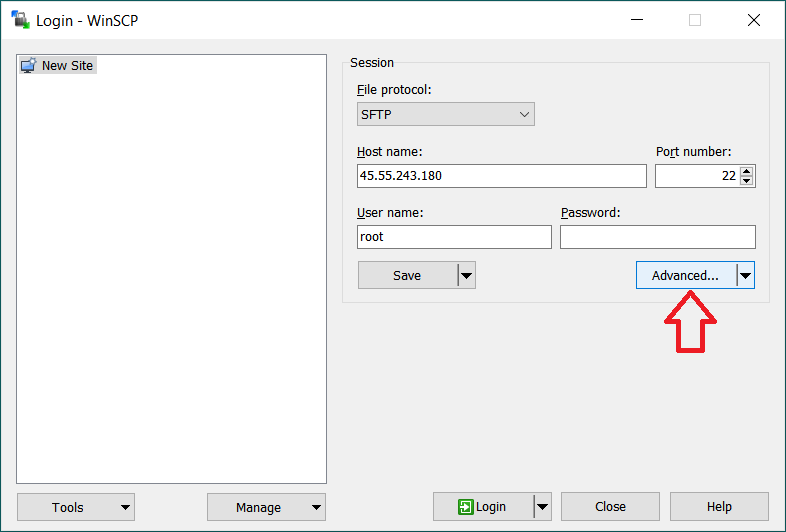
- File protocol → “SFTP” (default)
- Host name → <Your_droplets_IP_address>
- Port number → “22” (default)
- User name → “root“
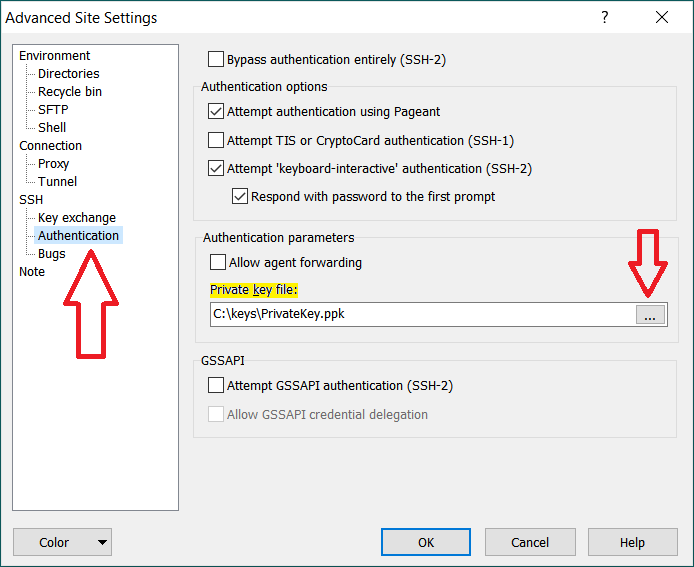
- Password → If you are authenticating with the root password sent by mail then just enter your root password into the “Password” field input. But, if you are authenticating with the private key that we have generated in step 3.5.2 (the preferred way by far) then just hit the “Advanced…” button then the Advanced site settings dialog will show up. Go to: SSH → Authentication → Private key file. Click on the “…” button for opening the file browser and select the private key PPK file. Next, hit the “OK” button to save changes and go back to the connection configuration screen.
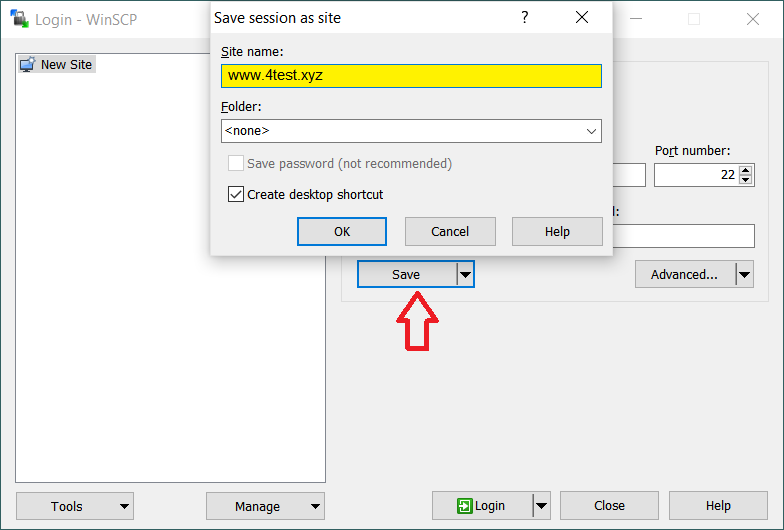
Save the session configuration for future and easy logins. Give the “Site name” the domain of your website in order that it will be easier to distinguish it from other site sessions that you will add in the future. Leave the “Folder” and the “Save password” as is. But the “Create desktop shortcut” is very useful for future connections, especially for working on a project.
Now, let’s log into the droplet through SFTP connection. You can click the “Login” button on the bottom of the session configuration screen or you can just double click the desktop shortcut icon we have created earlier:
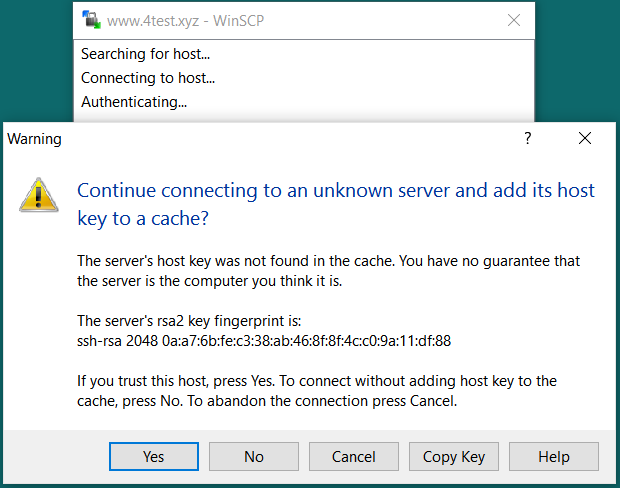
Now, on your first attempt you will get a warning message for establishing a connection with an unknown server, just hit the “Yes” button.
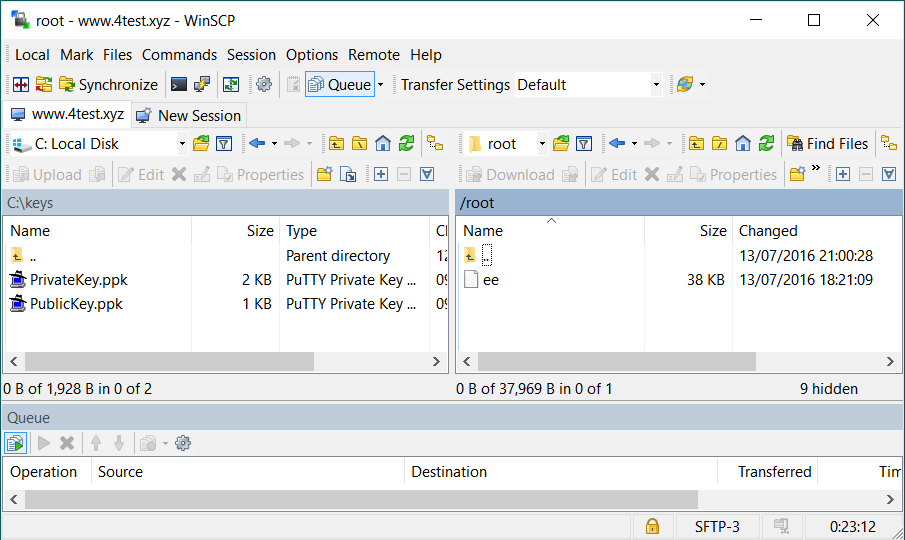
Once the connection is established the WinSCP client is opened (which looks like a TotalCommander). On the left the source/origin (our PC) and on the right the destination (the host).
At first, the right side is the “/root” folder path (This is a folder which has one file named “ee” and it sits under the actual root folder. This is not the root itself!!!). We could navigate one level up “/” (This is the actual root which is parallel to the “C:/” drive on windows) and see what the host stores. I like to mention that navigating between the host folders is slow, so do not get angry.
We actually want to go where our WordPress content resides so go to the path: “/var/www/4test.xyz/htdocs/wp-content“. Of course, change the domain name in the path from “4test.xyz” to yours. It is best to not upload files and folders to other folders other than the “wp-content” for not making a mistake that will damage your droplet.
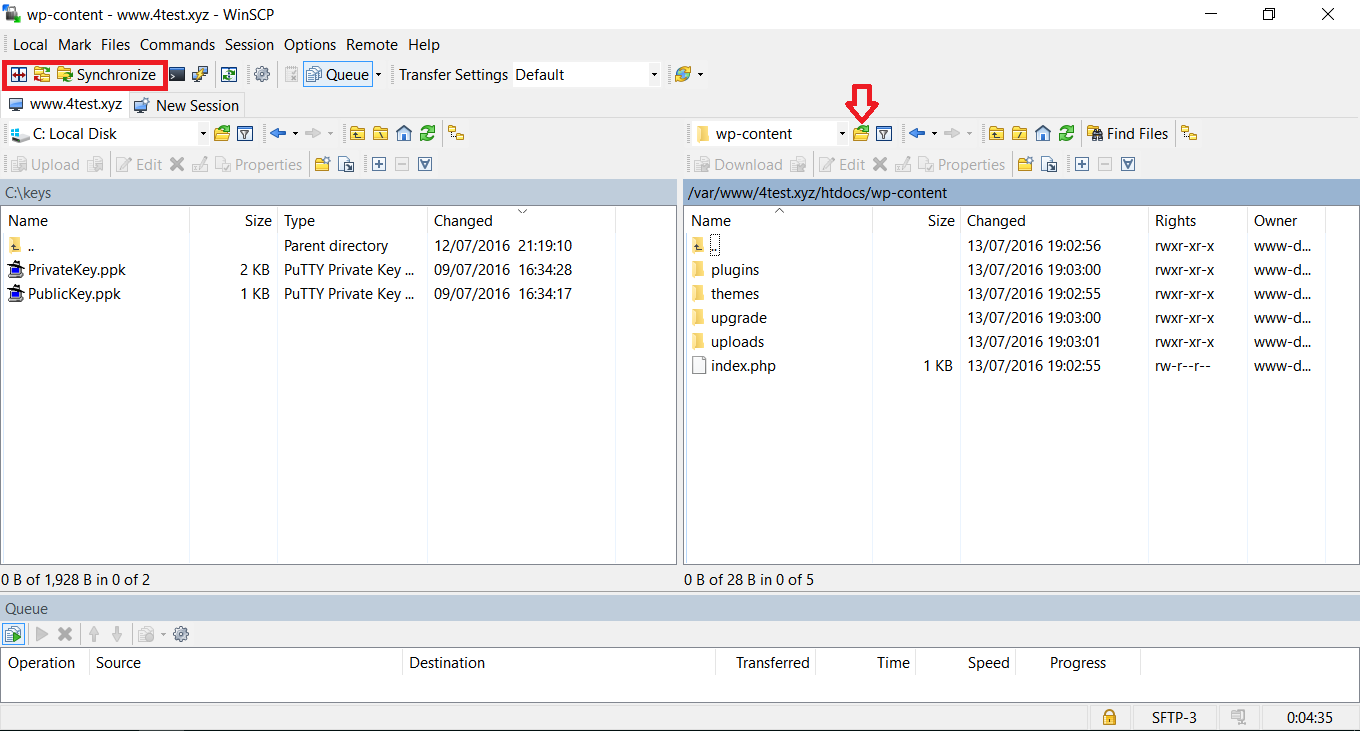
You ca bookmark the folder for future reference on the right side, just press the bookmark button, see the picture above.
There are 3 features for you to look at in WinSCP. The features are located at the top left side: Compare Directories, Keep remote directory up to date, Synchronize local directory with remote directory. Because this post isn’t WinSCP guide, play with the features with a brand new created folder or read about it in the WinSCP official website.
After installing EasyEngine I came across adding some table to the database. I found myself for searching how to access phpMyAdmin I grew and got loved with, so I am going to give a tutorial to it here.
Access the droplet with SSH connection using PuTTY. Execute an EasyEngine shell command that installs phpMyAdmin:
ee stack install --phpmyadmin
Once the installation is complete, access the phpMyAdmin in the browser: “www.4test.xyz/phpmyadmin”. EasyEngine made the access easy to remember, and after that EasyEngine redirects the address to: “https://www.4test.xyz:22222/db/pma/“, so don’t worry when you see this address appear.
When using HTTP instead of HTTPS the screen below will show up (I used Chrome browser):
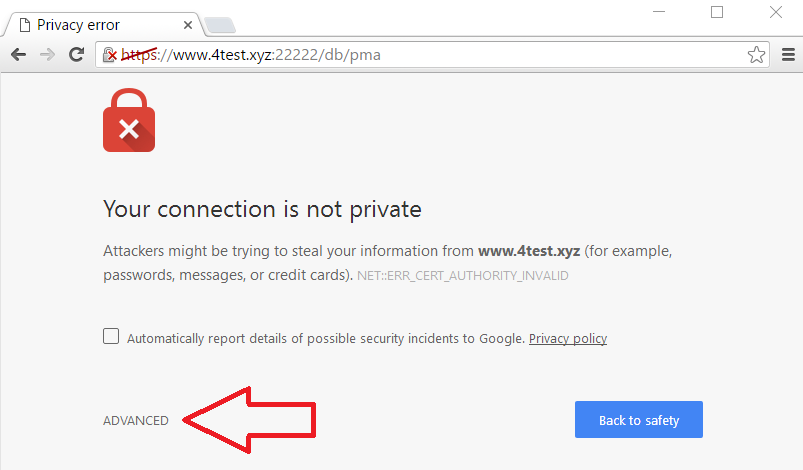
Just click the “ADVANCED” button which by then you will get this screen:
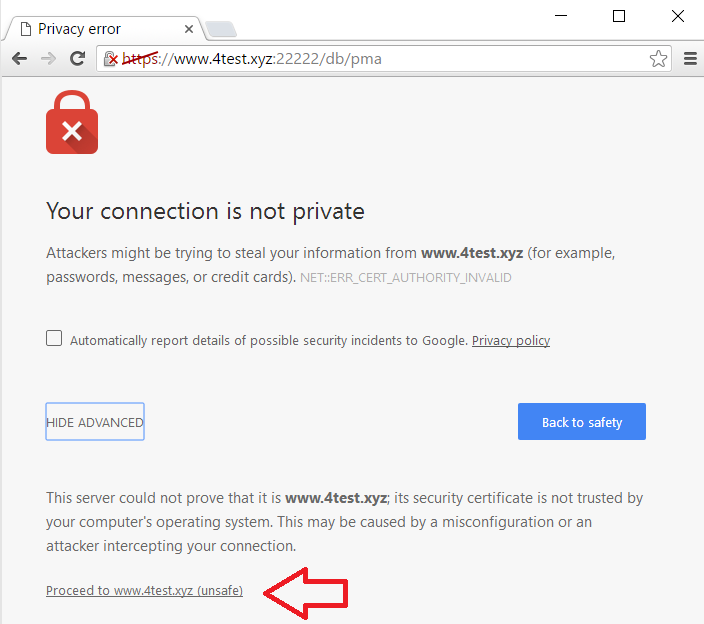
Just hit the “Proceed button to www.4test.xyz (unsafe)” button and we will get the screen:
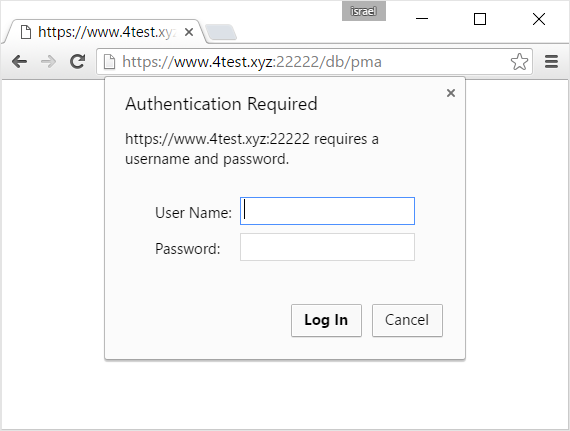
At this time we will need to insert the credentials EasyEngine generated us once we have installed it on Step 6 (hopefully you saved them). These are the HTTP credentials:
HTTP Auth User Name (which is probably “easyengine“) & HTTP Auth Password.
After entering the credentials, the familiar and loved screen of the phpMyAdmin login page will show up (see the next step how to log in):
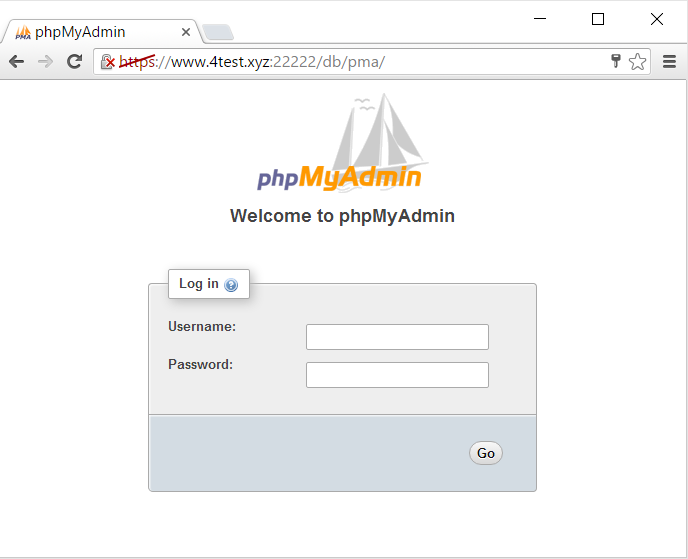
By Default, EasyEngine sets phpMyAdmin and MySQL login credentials as the same. Now, since EasyEngine v3.3.5 the credential details are stored in the file: “/etc/mysql/conf.d/my.cnf“. So, let’s simply run the command in the shell to get the credentials:
cat /etc/mysql/conf.d/my.cnf
Now, for those of you who have EasyEngine under v3.3.5 (run the command “ee -v” to check your EasyEngine version) do an EasyEngine Update by running the command: “ee site update“.
Wrapping Up
We have finally got a brand new WordPress powered site installed with NGINX server on DigitalOcean. It is a lot easier to set it up then being said (or written in our case), that’s because of the convenient way in terms of UI & UX DigitalOcean have done it. It is like easy as pie. I hope this post was beneficial to you and you got it from a-z how to have a brand new site with all that power at your hands.
Please share the power so other people will enjoy it :).
If you think that something is wrong and I did a mistake and you want us to fix it then please write or that there any step you want to add in the appendix section then please feel free to write it down in the comments area.
I wanted to ask you what do you think about DigitalOcean? if you have experience with them can you give some thoughts about the steps above?