Recently, I got to a situation where I was messing with my server on a live website and over the sudden, the server crashed and so did the website. Fixing the server was impossible so I got stuck only with WordPress database files & WordPress website files which from them I needed to restore the website.
I found myself browsing the web on searching how to restore WordPress database from .frm & .ibd files. Instead of having to restore the database with a few clicks it took me 2 days getting to the solution with a lot of trial and error on the way. Here I will save you time from trying other things that might not work and give the exact solution.
I was “playing” with the VPS server with Ubuntu OS, and then I did the most unbelievable thing. I ran the command (The following code is pure evil. Do Not run this code on your server): sudo chmod 7777 / . This Linux command equals to: 
Instead of changing privileges on the current folder “./” I did it on the root folder “/” which caused a total crash to the server. Luckily I could enter the storage (volume) in a “back door” sort of speak, and FTP the MySQL database folder & files.
Tutorial Goal: Our goal is to have one big SQL file that has the entire database structure and the database data and executes the SQL code on a brand new database on our existing MySQL server or a new brand server instance with operable MySQL server.
Just for clearness, the tutorial assumes you have the WordPress *.frm & *.ibd files to recover from. Each .frm file holds a table structure and each .ibd file holds the data of a table that matches the .frm file structure.
Note the tutorial also recovers non-WordPress related tables, so if someone added a table to WordPress database the tutorial also recovers it, and hack if there is not even one single WordPress table related the tutorial covers it.
Note the tutorial bypasses getting the error: “#1932 – Table ” doesn’t exist in engine”, from the phpMyAdmin if anyone is searching the solution for that. Copying the recovered database folder to a new instance of MySQL won’t solve the problem!!!
If you did not receive the message anywhere then don’t pay attention to it and just follow the tutorial.
Note the tutorial will be for the Windows operating system. For Mac OS X users try following the steps and finding the parallel operations that match OS X.
Tutorial: Restore WordPress Database from .frm & .ibd files
Step 1: FTP the database folder to your PC.
First, FTP the database folder to your PC with WinSCP / FileZilla. You can zip the database folder if you admin user to the root folder and you can execute commands or just download the entire folder.
The database folder resides on the path:
/var/lib/mysql/<your_site_name>
For this example, we will use the “4test.xyz” domain so we will have a folder named “4test_xyz” after downloading (and unzipping the zip file) on our PC.
Notice that the dot “.” before the domain extension was changed to underscore “_”.
Step 2: Download MySQL Utilities (MSI file).
The MySQL utilities will a have a command line utility that you can restore a table structure from “.frm” file.
Step 2.1: Start the MySQL Utilities installation.
Step 2.2: Download & install Visual C++ Redistributable Packages (If not installed).
After downloading and running the installation you can come across a message that tells you that you need to have installed Visual C++ Redistributable Packages so Download and install it and start the MySQL Utilities installation over again.
Step 2.3: Add the MySQL Utilities to your system PATH.
Go to:
Desktop → My Computer (Right Click) → Properties → Advanced system settings → → Environment Variables…

Select the PATH variable at the “User Variables” section (The upper box) and press “Edit” (This will add all the MySQL utilities to the Windows command line (CMD) for the current Windows user only. If you want to add the utilities for all Windows users than edit the PATH variable of the “System variables” at the bottom).

Next, add the path of the MySQL utilities installation folder, for example, the default installation path:
C:\Program Files\MySQL\MySQL Utilities 1.6
First, press the “New” button and then put in the path above:
Press the “OK” button all the way until you won’t have any settings open nor windows.
Step 3: Download & Install & Run XAMPP.
XAMPP is an AMP (Apache & MySQL& PHP) stack server. It will help us generate the database SQL file.
Search on your Windows OS the term XAMPP and run the search result “XAMPP Control Panel” software.
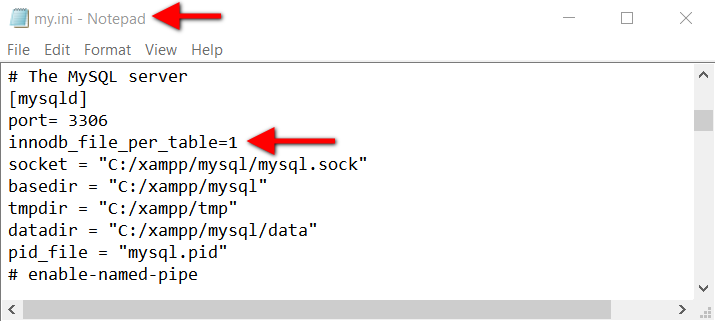
Step 3.1: Set “innodb_file_per_table=1″ inside “my.ini” of the MySQL module.
On the XAMPP control panel go to MySQL → Config → my.ini, in order to edit the MySQL config file.
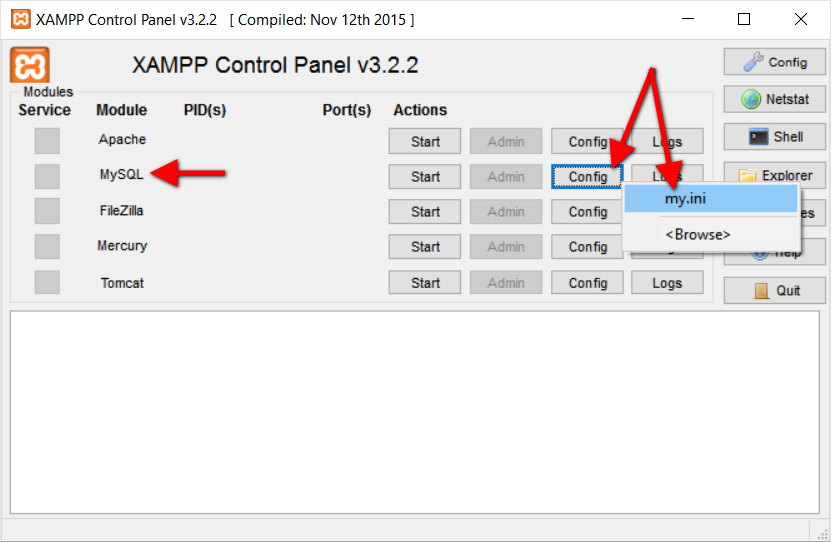
In the “my.ini” file search for the text:
port= 3306
Under the port number line you should add the row (If the innodb_file_per_table variable exists than just change the value to 1):
innodb_file_per_table = 1
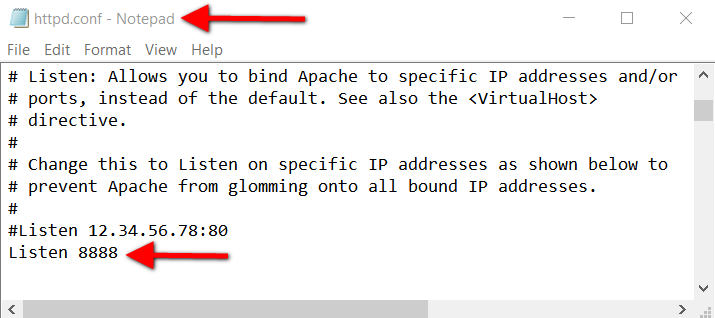
Step 3.2: Change the Apache port number.
For most computers, the port number 80 is always taken by other software that is run on Windows. It is best to leave the “fight” on port 80 to other soft-wares and change the port that Apache runs with.
Back to XAMPP, on the Apache row go to Config → Apache (httpd.conf)
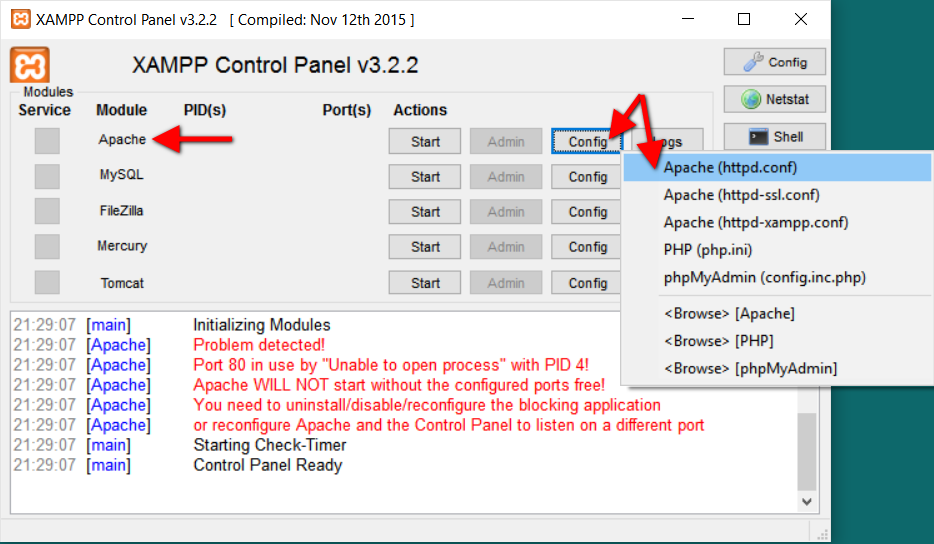
Next search & replace the line:
Listen 80
With the line:
Listen 8888
You can choose any port number you like up until 65535 but you have to make sure that it is not taken by any other software you have installed on your PC. You can check out the port numbers list that popular soft-wares use. It is preferably good you use a number greater than 8000. If you have a software that runs on port 8888 than just change the port number to 8889 and so on, until you find a free port,
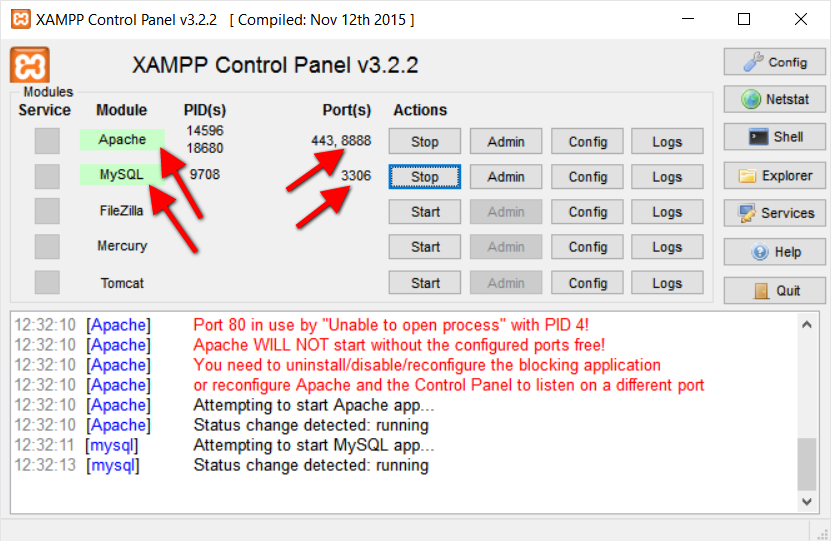
Step 3.3: Start Apache & MySQL.
Click the “Start” buttons for each one of the modules: Apache & MySQL:
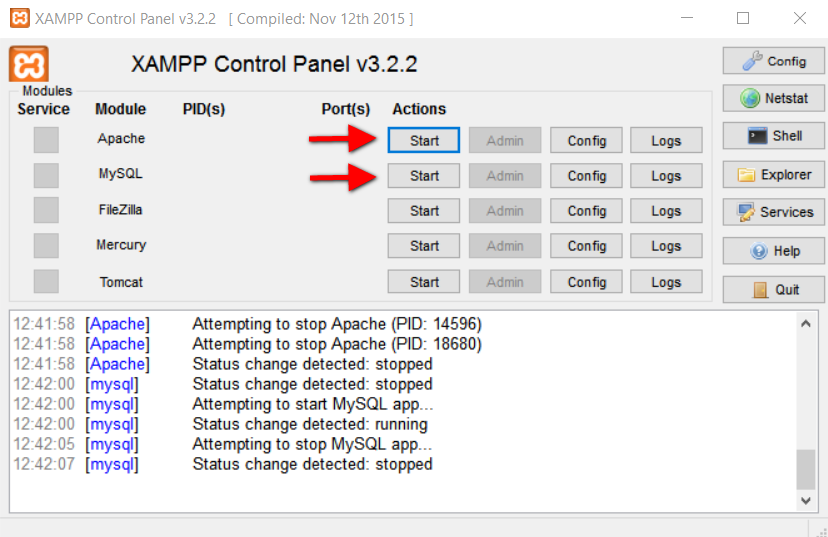
Wait until both the Apache & MySQL texts have a green background. If they stick up until a minute with a red or yellow background than something went wrong and you have to fix it.
Notice that both Apache & MySQL have their own port numbers.
Step 4: Open Windows Command Line.
Search for term “cmd” on Windows OS search and run the program: “Command Prompt“.
Step 5: Navigate to the recovered database folder in the command line.
Let’s say the recovered folder name is “4test_xyz”, so we need to run the command:
cd c:\4test_xyz
Step 6: Create a .bat file that generates SQL file for creating tables structure from the .frm files.
Create a new text file in the recovered folder where the .frm files reside and change its name and extension to “RestoreTablesStructure.bat“.
Next, put the following code in the .bat file:
:: Creating temporary folder for storing all the tables structure SQL files
set structureFolder=tables_structure_0123456789
md "%structureFolder%"

:: This is the code that restores the tables structure from the *.frm files
for %%f in (*.frm) do (
 mysqlfrm --server=root:@localhost:3306 "%%~nf.frm" > "%structureFolder%\%%~nf.sql" --port 3310 -q
)

:: Creating SQL file for storing all the tables structure
set structureSQLFile=%structureFolder%.sql
type NUL > %structureSQLFile%

:: Concatenating the entire tables structure SQL files into one
for %%f in (%structureFolder%\*.sql) do (
 more +1 "%structureFolder%\%%~nf.sql" >> %structureSQLFile%
 echo ; >> %structureSQLFile%
)

:: Deleting the temporary structure folder
rmdir /s /q %structureFolder%

:: Creating the discard tablespan SQL commands for each table
for %%f in (*.frm) do (
 echo ALTER TABLE %%~nf DISCARD TABLESPACE; >> %structureSQLFile%
)

:: Creating the import tablespan SQL commands for each table
for %%f in (*.frm) do (
 echo ALTER TABLE %%~nf IMPORT TABLESPACE; >> tables_import_tablespan_0123456789.sql
)
Next run the bat file in the Windows CMD (command line), by entering the following command:
RestoreTablesStructure.bat
The process of generating the SQL file will take up to 5 minutes (on slow computers even up to 10). The thing that makes the process slow is restoring the tables structure from the .frm files. The command that restores the tables structure is mysqlfrm , which was installed in the MySQL Utilities.
Basically what the .bat code file does is:
- Creates a temporary folder for storing all the tables structure SQL files. Each .frm file will have the corresponding SQL table structure file.
- Restores the tables structure from the *.frm files by using
mysqlfrmcommand, which also requires a MySQL server running on port 3306, which we started on the XAMPP control panel. - Creates SQL file which will hold all the tables structure. The file name will be “tables_structure_0123456789.sql“.
- Concatenating the entire tables structure SQL files into the one it created on the previous task.
- Deletes the temporary tables structure folder, because now all the structures reside in one big SQL file.
- Creates the “discard tablespan” SQL commands for each table. The tablespan will delete all the *.ibd files of the newly created database on Step8 which is found on the XAMPP’s MySQL server. The discard commands will be added to the tables structure SQL file at the end of the tables structure creation.
- Creates a new SQL file named “tables_import_tablespan_0123456789.sql” which has “import tablespan” SQL commands for each table. The import commands will import the recovered *.ibd files. Reminder, the .ibd files contain the tables data.
Step 7: Navigate to the phpMyAdmin of the XAMPP servers.
Go to the browser and open a new tab with the following URL:
http://localhost:8888/phpmyadmin/
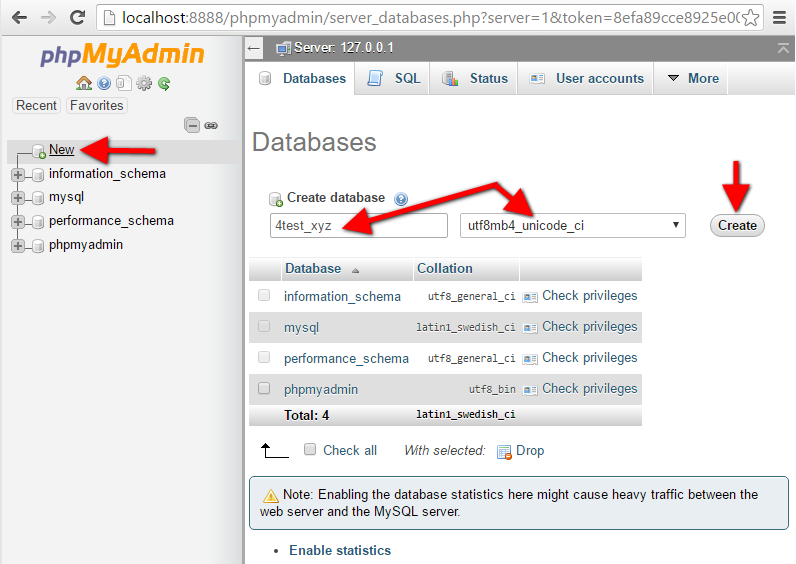
Step 8: Create a new database.
On phpMyAdmin create a new database. Click on the “New” link button on the left sidebar and on the right will show up a create database form which you will need to fill the following fields:
- Database name: name it as your previous crashed database. In our case, it will be “4test_xyz“.
- Collation: On the drop down select the value: “utf8mb4_unicode_ci“.
Press the “Create” button when you are done.
Step 9: Execute the tables structure SQL.
Now is the time to execute the SQL we have generated previously for retrieving the tables structure.
On the phpMyAdmin go to the newly created database on the left sidebar, which in our case is “4test_xyz“, and click on it. On the right side will show up the database control panel. Click on the SQL tab on the top. Copy & paste the SQL code from the file: “tables_structure_0123456789.sql” we have generated earlier into the big text area and click the “Go” button at the bottom.
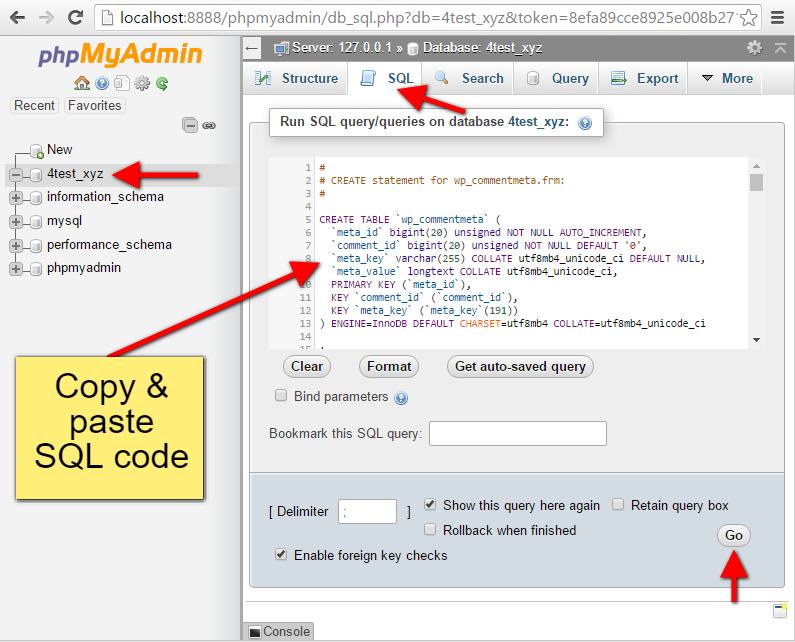
Wait until it finishes executing the SQL. You should receive a message with a green background that says: “# MySQL returned an empty result set (i.e. zero rows).“.
Do not touch anything and go straight to the next step!!!
Step 10: Copy & paste the recovered *.ibd files into the new database folder.
On Windows Explorer go to the new database’s folder, which resides in the MySQL folder in the XAMPP installation. Assuming the database is “4test_xyz” then the path to its folder is:
C:\xampp\mysql\data\4test_xyz
At this point, you should only see .frm files only of the new database without the .ibd files, because we have deleted them with the discard tablespan SQL commands.
Now, copy & paste your recovered folder’s *.ibd files into the new database folder path.
Step 11: Execute the import tablespan SQL commands.
Go back to the phpMyAdmin from where ewe left off and click the SQL tab:

Now take the SQL code from the file: “tables_import_tablespan_0123456789.sql” we have generated earlier and execute it (Note this file is totally different from the file of the tables structure so pay attention to the file you are copying. One of the differences is the number of lines of the code, which far is far smaller).

Now we have recovered the database with its tables structure & data.
Step 12: Export the entire database into one big SQL file that contains all tables structure & data.
Go to the database control panel and select the “Export” tab.
On the “Export method” section select the option: “Custom – display all possible options“.

Scroll down to the “Object creation options” and checkmark the option:
“Add DROP TABLE / VIEW / PROCEDURE / FUNCTION / EVENT / TRIGGER statement”
This will make sure that each table we create will be deleted first before hand if it exists.
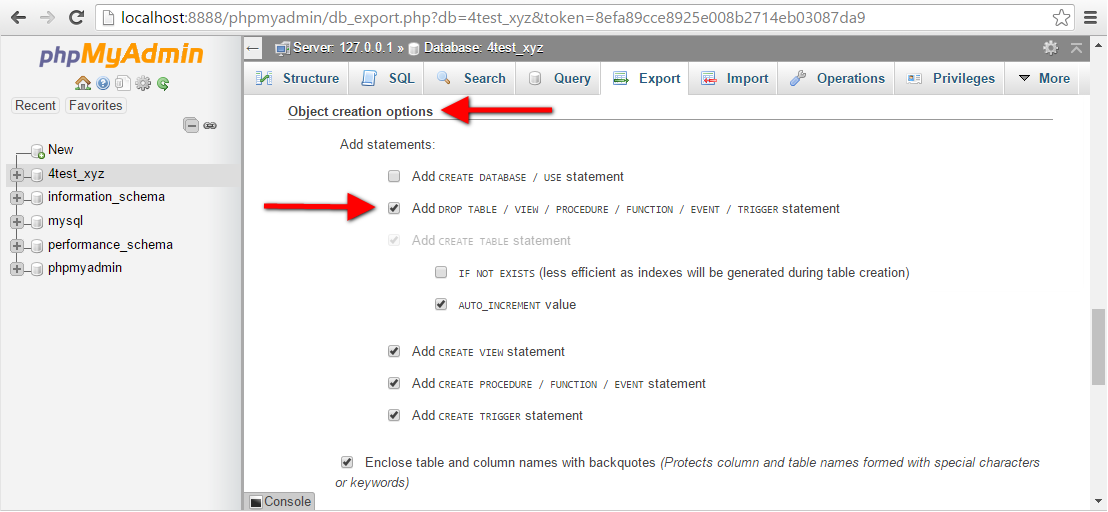
Next scroll down and press the “Go” button.
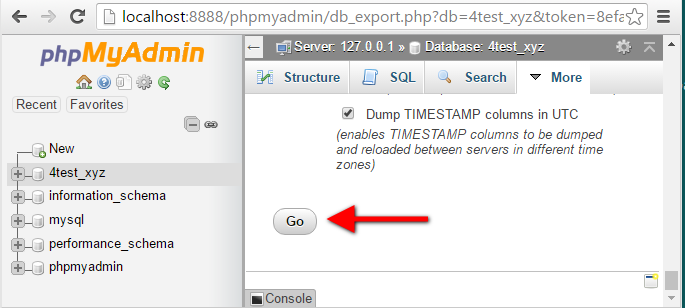
It will start downloading the database SQL file in the defined browser downloads folder. It will take some time so be patient.
Step 13: Create a new WordPress website with a regular installation.
Create a new WordPress installation with its own database and files like as you did regularly when starting a website.
Step 14: Import the SQL file we have Exported from the recovered database.
Two steps ago we have Exported the recovered database with its tables structure and data now its time to Import it:
Method 1: Go to the phpMyAdmin the production environment and click on the left sidebar the newly installed WordPress database. On the right side of the database control panel press the “Import” tab.
Choose the exported SQL file on your PC and hit the “Go” button at the bottom of the page.
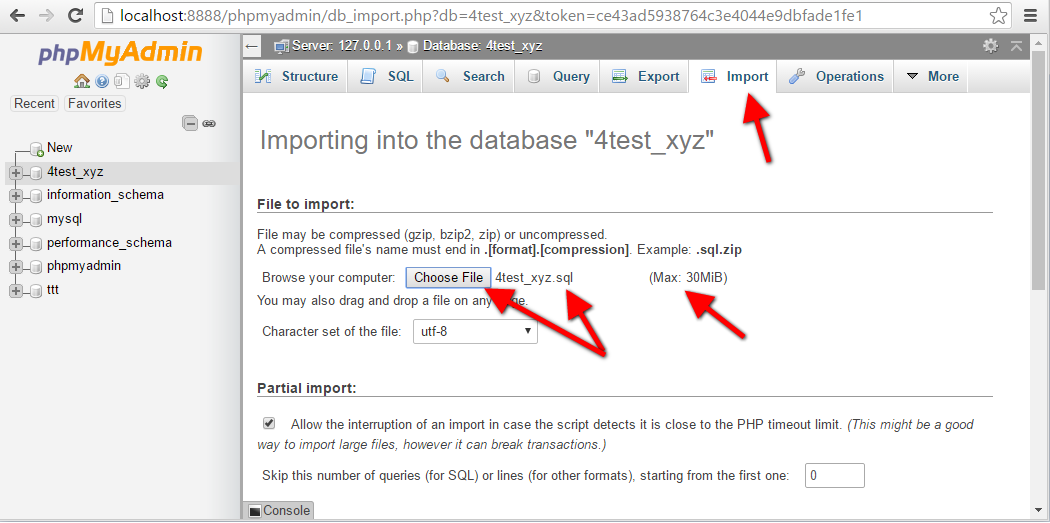
Note you might get into a problem when trying to upload the SQL file because you will need the Max file size for uploading to be bigger at least with 1MB then the SQL file at hand.
This can be accomplished by changing the following parameters in the php.ini file at the Apache folder at your server:
upload_max_filesize = 25M
...
post_max_size = 25M
Of course, you will need to restart the server:
service httpd restart (CentOs)
service apache2 restart (ubuntu)
For shared hosting add the following in your .htaccess file:
php_value upload_max_filesize 25M
php_value post_max_size 25M
Make sure you delete those lines after finishing the import.
Method 2: Executing the mysql command for executing SQL files on remote servers from Windows Command line.
In Windows CMD go to:
cd C:\xampp\mysql\bin
Execute the following command by changing the parameters:
mysql -u {db_username} -h {MySQL_Host_name} -p {db_name} < {Full_path_to_the_SQL_file_on_PC}
Example:
mysql -h 45.55.229.215 -u 4test_xyz -p 4test_xyz < "C:\4test_xyz\4test_xyz.sql"
Step 15: Exit XAMPP Control Panel.
At the Window tray bar right click on the XAMPP icon and click on the “Quit” option.
Wrapping Up
We have finally finished retrieving the database from the .frm & .ibd files. For not getting to the situation again it is preferred to use a backup plugin for WordPress like BackupBuddy.
If you encounter any problem in the tutorial please add a comment and I will try my best to resolve your problem, or if you found an error or such.