As a web page creator, we all have the same problem when it comes to CSS. Managing CSS files and the need of changing the design or tweaking the design on the longer run could be very complex if the CSS is not written in a readable manner. Also, we want other developers to understand it. The answer to this problem is CSS preprocessors. This is more even important in WordPress theme development because we often make changes and we don’t want to mess the code so a CSS preprocessor is highly recommended.
The most popular CSS processors are (at the time being):
We will see how to integrate each CSS preprocessor to your theme development workflow.
Note All integration tutorials up next are on the assumption you use windows OS and installed WAMP server for the development of your WordPress theme. If you use Mac please install MAMP and try to follow the instructions based on the equivalent actions of the Windows and WAMP “world”.
Prerequisites Steps:
Step 1: Download and install WAMP.
Step 2: Download WordPress and install on WAMP:
Extract the WordPress zip file you have downloaded to a new folder in the www folder found in WAMP folder: “C:\wamp64\www\<YourSiteName>”
Step 3: Run WAMP Server and change the port number to 9080 (or which one you want). Changing the port number is optional but if you want a safe start and avoid software conflicts than please change it:
Go to the WAMP tray icon after running the wamp server (Search in windows wamp64.exe or wamp.exe if using the x86 version). Left click it and go to the Apache folder and hit httpd.conf text file.
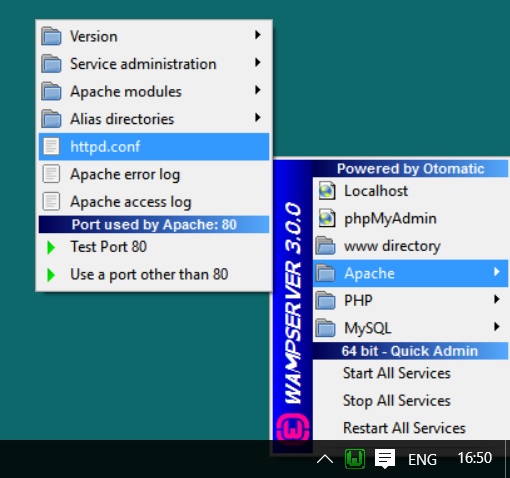
In the text file search search for “:80” and will need to replace two lines:
Listen 0.0.0.0:80 => Listen 0.0.0.0:9080
Listen [::0]:80 => Listen [::0]:9080
Then in the WAMP tray icon hit “Restart All Services”.
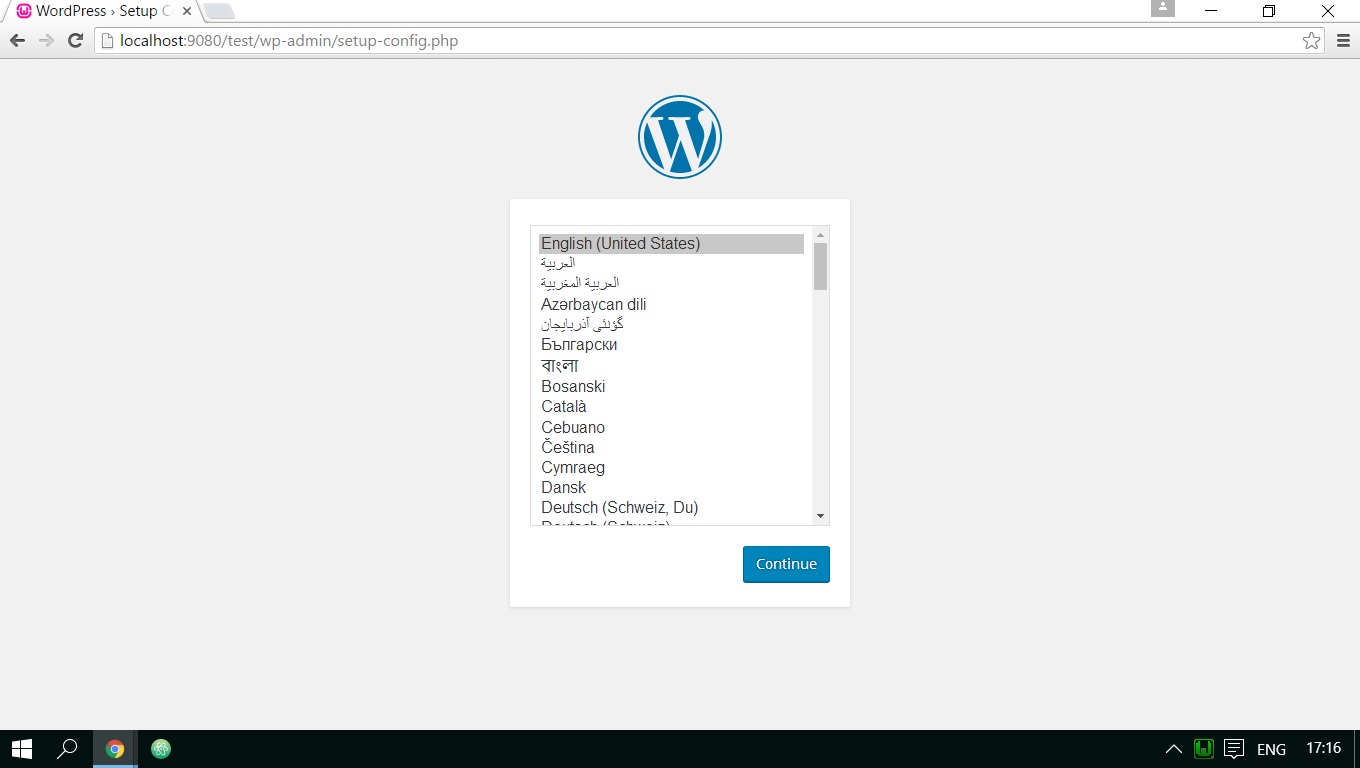
Step 4: Go to PHPMyAdmin and create a new database: “http://localhost:9080/phpmyadmin”. This is the place where all your the databases are stored and where we will create our new database. Let’s create a new database named: “wptest”, afterward let’s go to “http://localhost:9080/test” and start the WordPress installation.
Step 5: Create a new theme or a child theme in your WordPress project:
Let’s assume our site name is “test” and our theme name is “mytheme” than go to “C:\wamp64\www\test\wp-content\themes\” and create a folder named mytheme: so we have the theme folder path: “C:\wamp64\www\test\wp-content\themes\mytheme”.
How to integrate SCSS (SASS) to WordPress theme development workflow
SCSS (Sass) is the most popular CSS preprocessor from all the preprocessors out there and probably what most of the developers or site owners, which will outsource their work, will select.
This explanation will be both on SCSS and SASS because SCSS is a superset of Sass I will mention SCSS only even though we can use Sass after these steps.
Method 1: using Node.js & Gulp.js:
Alternatively, you could have used Ruby & Compass package or Node.js & Grunt.js to work with SCSS(SASS) but I chose Node.js & Gulp.js because they are more trendy and you could see more and more tools, frameworks and code environments and etc, use them. There is, of course, an explanation for that: uses javascript, easy to understand, easy to implement, have great performance and more.
Step 1: Download and install Node.js.
Step 2: Run “Node.js command prompt” (find it with windows search).
Step 3: Go to the themes folder via command line:
cd C:\wamp64\www\test\wp-content\themes
Step 4: Create a “package.json” file with the command:
npm init
After running the command you will need to answer the questions it gives for filling the “package.json” file with relevant data. Example of a generated file using “npm init”:
{
 "name": "mytheme",
 "version": "0.0.1",
 "description": "My wordpress theme description",
 "main": "index.js",
 "scripts": {
 "test": "echo \"Error: no test specified\" && exit 1"
 },
 "keywords": [
 "mytheme"
 ],
 "author": "mgfn.net",
 "license": "UNLICENSED"
}
Step 5: Install gulp and gulp-sass as a development dependency:
npm install --save-dev gulp
npm install --save-dev gulp-sass
Step 6: Create a gulp js file named: “gulpfile.js”, and put the script below inside of it and save:
var gulp = require('gulp');
var sass = require('gulp-sass');

gulp.task('styles', function() {
    gulp.src('mytheme/scss/style.scss')
        .pipe(sass().on('error', sass.logError))
        .pipe(gulp.dest('mytheme'))
});

//Watch task
gulp.task('default',function() {
    gulp.watch('mytheme/scss/*.scss',['styles']);
});
Step 7: Go into your template directory (let’s assume its name is “mytheme”) through regular windows file viewer folder and create a folder named “scss” and in that folder create a file named “style.scss” which there you will put your SCSS code.
Step 8: Go to Node.js command line and execute the command:
gulp
Keep the Node.js command line always open while you make changes on the SCSS file. Each change you will make in the SCSS file will be automatically generated in the CSS file.
Step 9: Include the CSS file in your theme by adding this line in your “functions.php” file in the “wp_enqueue_scripts” hook function:
/*
 * Adding styles and scripots to the template front end
 */
function theme_scripts() {
  wp_enqueue_style( 'theme-style', get_stylesheet_uri() );
}
add_action( 'wp_enqueue_scripts', 'theme_scripts' );
We are done. Now The front end will have a link to the main stylesheet.
Note: If you want to name the stylesheet with a different name such “custom.scss” and leave the “style.css” alone, then just change the name “style” with “custom” on the right places and in the “functions.php” file change the get_stylesheet_uri():
wp_enqueue_style( 'custom-style', get_template_directory_uri() . '/custom.css');
Step 10: (optional step – for testing reasons only)
Put in the “style.scss” file the following code:
@import  "inner1.scss";

a {
  color: red;
  text-decoration: none;

  &:before {
    color: blue;
  }
}
Now for testing @import files Create a file named “inner1.scss” next to to the “style.scss” file and put in the code:
.test-class {
  color: red;
}
After you save the file go to the “mytheme” folder and open the “style.css” file and you will see the generated CSS:
.test-class {
  color: red;
}
a {
  color: red;
  text-decoration: none;
}
a:before {
  color: blue;
}
Method 2: Using the WP-SCSS plugin:
This method uses the admin panel to code SCSS files. I find this method good when you don’t want to deal with uploading the generated CSS files later through FTP or when there is a need to make quick fixes and for testing live new designs and tweaks.
The gulp method feels like you have more control and you can use your favorite IDE such: atom, sublime etc. (list yours if you want to in the comments section). Also with Gulp.js, you can add post-processing tasks which are not dependent on WordPress plugin.
There is another plugin named “Sassify” which I won’t cover because I prefer WP-SCSS for generating SCSS files because of its simplicity.
Step 1: Install the WP-SCSS plugin.
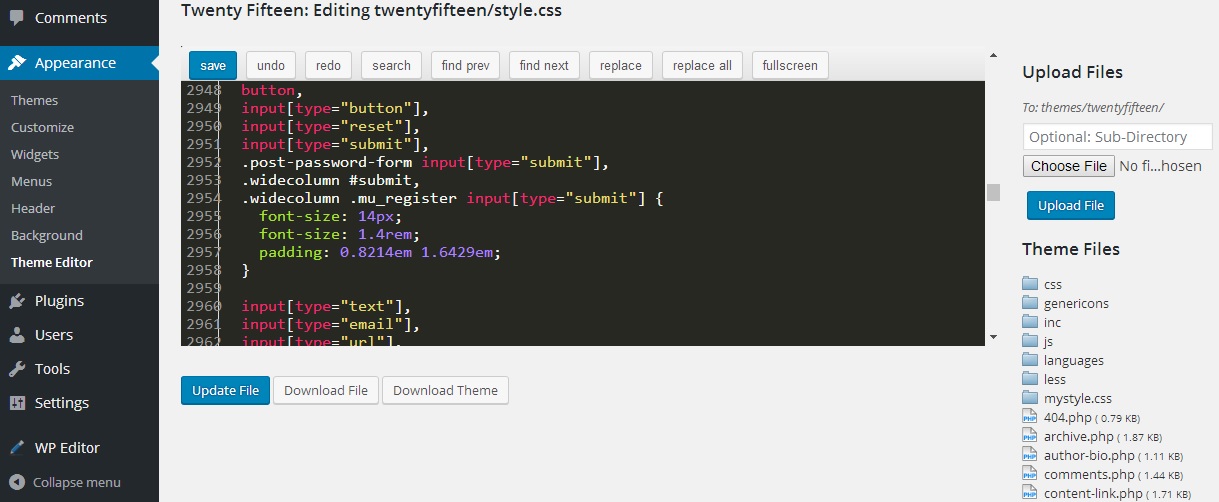
Step 2: (optional) Install the WP-Editor plugin:
This plugin is a replacement for the operating system IDE. You can actually code normally on the WordPress admin panel after you install it. It has a lot of features such as syntax highlighting numerous coding languages including SCSS and LESS, seeing code line numbers, fullscreen option, searching & replacing of text, file uploading and more.
I used the Monokai editor theme with 16px font size so that I will be able to look at the code better, you can change that in the WP-Editor settings page within the WordPress admin panel.
Step 3: Create a folder named “scss” on your desktop and within that folder create a file named “mystyle.scss” which has the following code:
@import "inner1.scss";

a {
  color: red;

  &:before {
    content: "Test";
  }
}
Optionally, create another file named “inner1.scss” next to “mystyle.scss” which has the following code:
.test-class {
  color: blue;
}
Step 4: Upload through FTP the “scss” folder to your theme’s location on your server.
Or, if you installed WP-Editor from step 2 then go to the theme editor view from the WordPress admin panel:
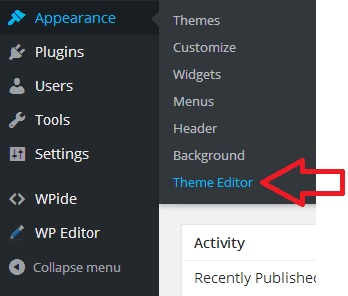
Upload the files one by one under the folder named “scss”.
Put the “scss” text in the Sub-Directory input field and choose the file you want to upload:
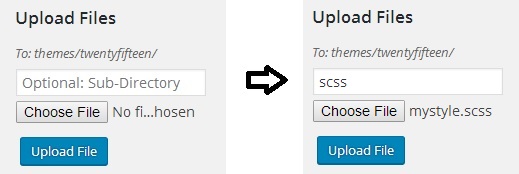
Also, upload an empty folder named “gcss” (stands for generated CSS), where the generated CSS will reside.
If using the WP-Editor option then upload an empty file to a Sub-Directory named “gcss”.
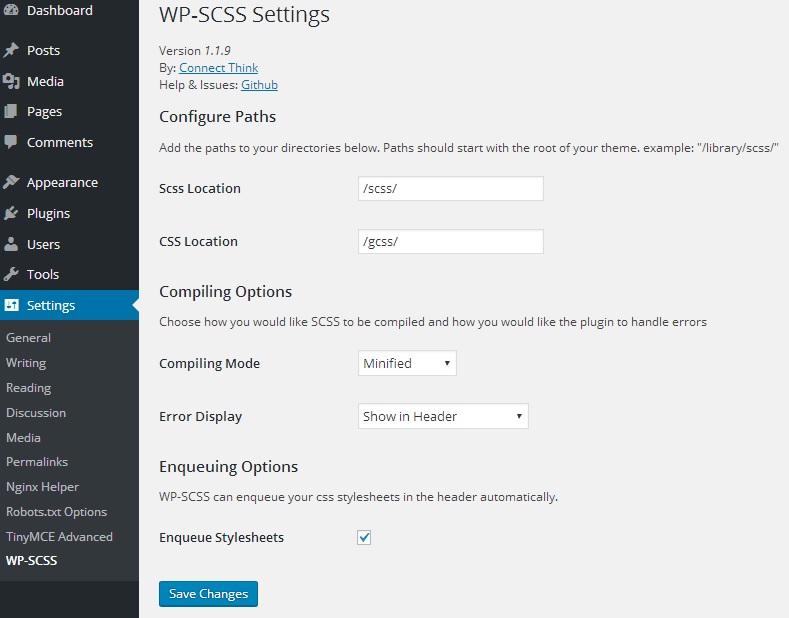
Step 5: Go to the WP-SCSS Settings and fill the values as follows:
Scss Location          => "/scss/"
CSS Location           => "/gcss/"
Compiling Mode         => "Minified"
Error Display          => "Show to Logged In Users"
Enqueue Stylesheets    => Checked
This will add a link tag to a generated CSS file which its name is the same prefix name of the SCSS file but with CSS extension and also it adds a query parameter to the link href URL which is the version number of the changed file: “mystyle.css?ver=1465641802”
<link rel='stylesheet' id='mystyle-style-css' href='http://www.example.com/wp-content/themes/twentyfifteen/gcss/mystyle.css?ver=1465641802' type='text/css' media='all' />
The content of this CSS file is:
.test-class{color:blue;}body{background-color:red;}
Method 3: Using a GUI application.
There are several GUI applications that can process SCSS (SASS). They have one thing in common: They give you the ability to not use the command line. I, of course, can not tell how one must program, I only can recommend, and that’s why I even mentioned this method. But, there are serval cons for using this method: You are very dependent on the app creator. You are stuck on the app and you can not evolve and add toolsets or change them up until the app is updated. The cons can go on, but there is one thing that is positive about it: It is visual unlike the command line which sometimes feels like old school for a lot of programmers out there, and it can be very intimidating. So, if you like using this method and it feels more simple and it is more convenient then than go ahead.
- Compass.app – It concentrates on generating SCSS to CSS. I choose to concentrate on this app among the other options because it works on all operating systems and it does the job we are currently concentrating on SCSS(SASS).
Compass itself is a CSS framework which has a lot of set of features relating CSS and one of them is SCSS. Please check out Compass framework official website. - Fire.app – This app is an expansion of the Compass.app that several toolsets such as CoffeeScript, Auto Refresh, Template languages and so on. Because I think these features are better used on other toolsets I have selected to concentrate on the Compass.app.
- Scout.app – It seems not to work on windows 10, but when I used it on Windows 7 and it was the best among the 3. It solely concentrates on generating SCSS and it was very easy to configure and manage. But, since it is not working on one of the most used operating systems in the world I choose to concentrate on the Compass.app.
- Koala.app: This is a great GUI for SCSS. Simple and very effective. In our opinion, it is better to use Koala.app over Compass.app in terms of simplicity but I choose to give Compass.app a tutorial because Compass is a framework that is recognized and developed by many developers and designers and has features that can improve CSS coding. You can find a tutorial on Koala.app in the LESS GUI section of this post. It is very much the same, in fact, the only thing that can be changed in that tutorial is the file extensions, from “less” to “scss” extensions.
- Others: There are several others also but the above apps GUIs are the must mentions. You can find others by going to the LESS GUI section. There you will find GUIs that read LESS & SCSS files: LiveReload, Crunch2, CodeKit, Prepros.
Compass.app Tutorial:
Step 1: Download, unzip and run the Compass.app.
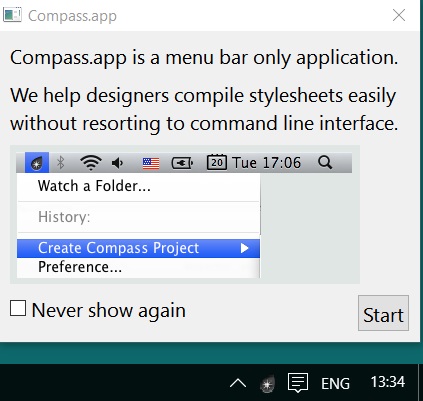
Step 2: Create a new Compass.app project: Go to the Compass.app tray icon on the bottom right of the screen and left click it and go to: “Create Compass Project” => “compass” => “project”
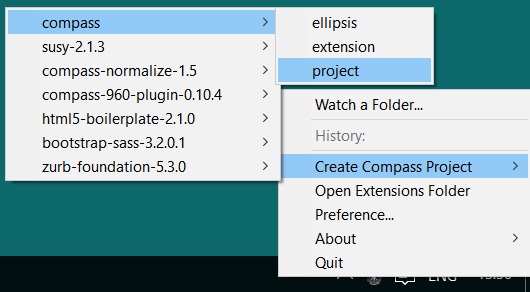
This will open a “Save As” popup window which there you need to navigate to your WordPress theme folder path (let’s assume that your project is named “test” and your theme is named: “mytheme”): “C:\wamp64\www\test\wp-content\themes\mytheme”.
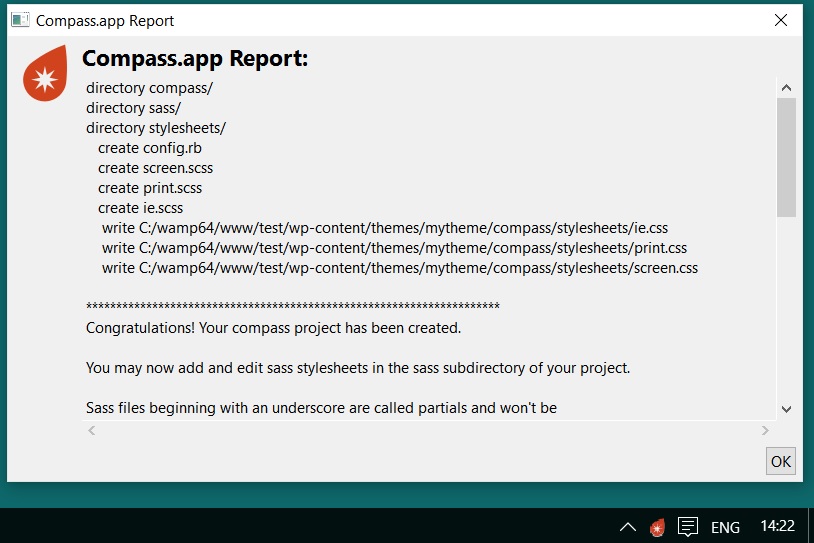
Now let’s call the project “compass” (Put the name in the “File name” text field. There is a mistake here because it should be called “Project name”, because it creates a folder with its boilerplate, but don’t mind the semantics). After hitting “save” button it will show you a compass.app report that it successfully generated the files and folders it needed for watching SCSS files and generating the CSS. Also, after creating the project it will start watching the SCSS files for changes, and the Compass.app tray icon should change to red, which indicates that it currently watches the SCSS files. The SCSS files that are being watched are found in: “/mytheme/compass/sass”. The files extensions are scss, and you are free as from now to code SCSS from within the files by editing them with your favorite document editor such as Notepad++.
You could always stop watching the folder by clicking “Stop Watching <compass_project_name>” within the Compass.app tray icon. And, of course, you could always come back and activate the watching from the tray icon by selecting “Watch a folder” and choosing the compass project path.
Step 3: As you will see, there are 3 files in the “/mytheme/compass/stylesheets” folder: “ie.css” & “print.css” & “screen.css”. We will add the generated “screen.css” file (We are adding this file only for not complicating things too much) to the “functions.php” file (which should be found in the “mytheme” folder):
/**
 * Adding scripts and css to the front end
 */
function theme_enqueue_styles() {
  if (!is_admin()) {
    wp_enqueue_style('theme-extra-styles', get_stylesheet_directory_uri().'/compass/stylesheets/screen.css', array(), "", "screen");
  }
}
add_action('init', 'theme_enqueue_styles');
How to integrate Less to WordPress theme development workflow
Method 1: using Node.js & Gulp.js:
Step 1: Download and install Node.js.
Step 2: Run “Node.js command prompt” (find it with windows search).
Step 3: Go to your project’s themes folder via command line:
cd C:\wamp64\www\test\wp-content\themes\
Step 4: Create a package.json file:
npm init
After running the command you will need to answer the questions it gives for filling the package.json file with relevant data. Example of a generated file using “npm init”:
{
  "name": "mytheme",
  "version": "0.0.1",
  "description": "My wordpress theme description",
  "main": "index.js",
  "scripts": {
    "test": "echo \"Error: no test specified\" && exit 1"
  },
  "keywords": [
    "mytheme"
  ],
  "author": "mgfn.net",
  "license": "UNLICENSED"
}
Step 5: Install gulp & gulp-less & gulp-watch-less as a development dependency:
npm install --save-dev gulp
npm install --save-dev gulp-less
npm install --save-dev gulp-watch-less
Step 6: Create a file named “gulpfile.js” in the themes folder, next to the package.json file we have just created and put the code below in it:
var gulp = require('gulp');
var less = require('gulp-less');
var watchLess = require('gulp-watch-less');

gulp.task('default', function () {
  watchLess('mytheme/less/style.less')
    .pipe(less())
    .pipe(gulp.dest('mytheme'));
});
Step 7: Let’s say your theme’s name will be called “mytheme” so there is a folder in the themes folder next to the package.json & gulpfile.js named mytheme.
Create a folder named “less” in the “mytheme” folder and create a less file named “style.less“. WordPress uses the “style.css” file as the main style of the theme you will create which template child’ can override it, so that’s why it is named “style.less”.
Step 8: Go to Node.js command line and execute the command:
gulp
Keep the Node.js command line always open while you make changes to the LESS files. Each change you will make the gulp task will automatically generate the CSS and will put it in the “style.css” file, which is found in the “mytheme” folder.
Step 9: (optional step – for testing reasons only)
Put in the “style.less” file the following code:
@import  "inner1.less";

a {
  color: red;
  text-decoration: none;

  &:before {
    color: blue;
  }
}
Now for testing @import files Create a file named “inner1.less” next to to the “style.less” file and put in the code:
.test-class {
  color: red;
}
After you save the file go to the “mytheme” folder and open the style.css file and you will see the generated CSS:
.test-class {
  color: red;
}
a {
  color: red;
  text-decoration: none;
}
a:before {
  color: blue;
}
Method 2: Using the WP-Less plugin.
Please read the pros and cons of using a plugin with a CSS preprocessor.
This method is similar to method 2 of using SCSS with WordPress, which is using WP-SCSS plugin. I added anchors in the WP-SCSS method for a little explanation. I didn’t want duplicated text through the post so I created links to anchors. It is best for you to read the anchored text for general knowledge and know what you are doing.
Step 1: Install the plugin WP-Less.
Step 2: (optional) Install the WP-Editor plugin (See the SCSS section for little explanation).
Step 3: Create a folder named “less” on your desktop and within that folder create a file named “mystyle.less” which has the following code:
@import "inner1.less";

a {
  color: red;

  &:before {
    content: "Test";
  }
}
Optionally, create another file named “inner1.less” next to “mystyle.less” which has the following code:
.test-class {
  color: blue;
}
Step 4: Upload through FTP the “less” folder to your theme’s location on your server.
Or, upload them through the theme editor if you installed WP-Editor.
Step 5: Open the “functions.php” file in the theme editor and put the following code at the end of the file:
/**
 * Adding scripts and css to the front end
 */
function theme_enqueue_styles() {
  if (!is_admin()) {
    wp_enqueue_style('theme-extra-styles', get_stylesheet_directory_uri().'/less/mystyle.less');
  }
}
add_action('init', 'theme_enqueue_styles');
This will add a link tag to a generated CSS file which its name is combined with the prefix name of the less file with some generated id: “mystyle-3d95a1a2ad.css”
<link rel='stylesheet' id='theme-extra-styles-css' href='http://www.example.com/wp-content/uploads/wp-less/twentyfifteen/less/mystyle-3d95a1a2ad.css' type='text/css' media='all' />
The content of this CSS file is:
.test-class {
  color: blue;
}
a {
  color: red;
}
a:before {
  content: "Test";
}
Method 3: Using a GUI application.
I have discussed the pros and cons using a GUI application in the SCSS GUI applications list.
There are several GUI applications that are out there, but I choose Koala.app for the best GUI application to work when working with LESS because of its price which is FREE and its simplicity and the ability to be cross-platform, meaning working on all operating systems even on Linux and it also features rich. I will list also other options:
- Koala.app – Recommended.
- Crunch 2 – Free & nonfree version.
- SimpLESS – Free and works like Koala.
- WinLess – Windows only.
- CodeKit – Not free & OSX only.
- Prepros – Not free.
- LiveReload – Mac is nonfree. Windows free. (Has cool feature for refreshing page automatically)
Koala.app Tutorial:
Step 1: Download, install and run Koala.app.
Step 2: Let’s say your WordPress project name is “test” and your theme’s name is called “mytheme”. Create a folder named “less” in the “mytheme” folder and create a less file named “style.less” in the “less” folder.
Step 3: Drag & drop the “less” folder to the Koala.app to start watching the LESS files for changes:
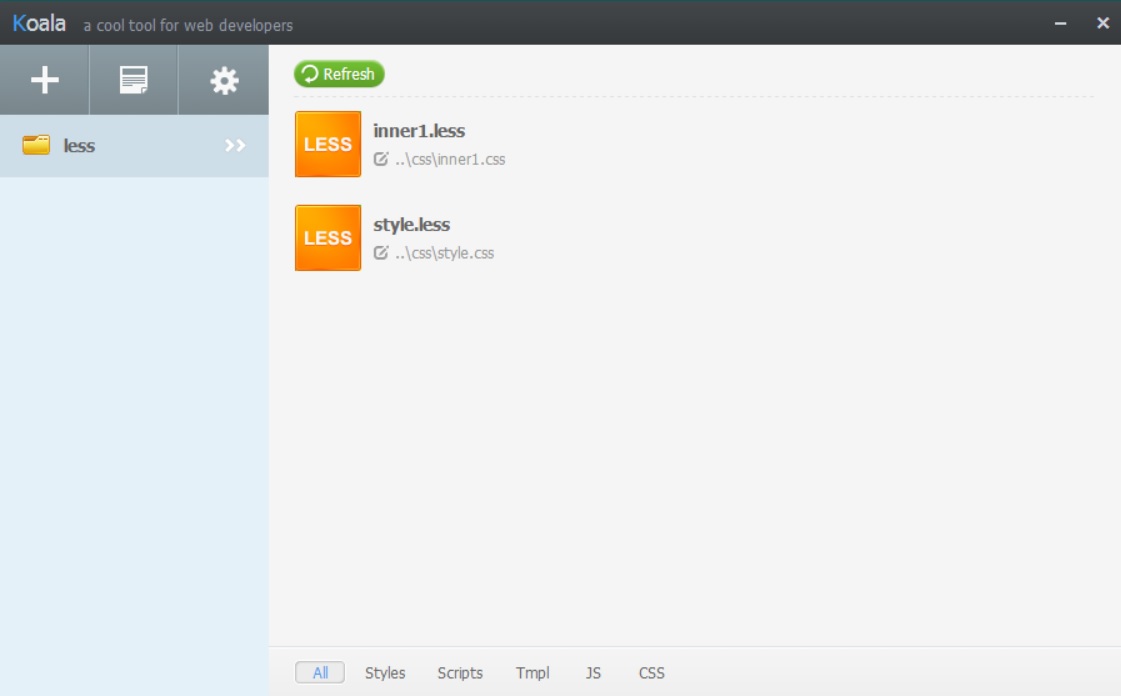
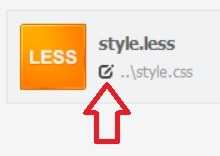
Step 4: Change the “style.less” generated CSS file output path to the parent folder “mytheme”: “/mytheme/style.css”. In order to do this in the Koala.app, you need to click the small icon under the “style.less” file title and change the path to the parent folder and write “style.css”:
Step 5: Include the “style.css” file by adding the following code to the “functions.php” file:
/*
 * Adding styles and scripots to the template front end
 */
function theme_scripts() {
  wp_enqueue_style( 'theme-style', get_stylesheet_uri() );
}
add_action( 'wp_enqueue_scripts', 'theme_scripts' );
How to integrate Stylus to WordPress theme development workflow
The Method: using Node.js & Stylus package (The easiest and fastest way to include a preprocessor on the PC in our opinion),
There is a plugin named WP-Stylus-Processor but it does not work. It crashes the front end site. The plugin itself is outdated and is not compatible with WordPress 4.2 and higher. I suggest to not install the plugin.
Step 1: Download and install Node.js.
Step 2: Run “Node.js command prompt” (find it with windows search).
Step 3: Go to the themes folder via command line:
cd C:\wamp64\www\test\wp-content\themes
Step 4: Install stylus globally:
npm install stylus -g
Step 5: Go into your template directory (let’s assume it’s name is “mytheme”) through regular windows file viewer folder and create a folder named “styl” and within that folder create a file named “style.styl” which will include all your CSS by putting Stylus code and importing other stylus files.
Step 6: Go to Node.js command line and execute the command:
stylus -w mytheme/styl/style.styl -o mytheme/style.css
Keep the Node.js command line always open while you make changes on the Stylus files. Each change you will make in the Stylus files will be automatically generated in the CSS file.
Step 7: Include the CSS file in your theme by adding this line in your “functions.php” file in the “wp_enqueue_scripts” hook function:
/*
 * Adding styles and scripots to the template front end
 */
function theme_scripts() {
  wp_enqueue_style( 'theme-style', get_stylesheet_uri() );
}
add_action( 'wp_enqueue_scripts', 'theme_scripts' );
Step 8: (optional step – for testing reasons only)
Put in the “style.styl” file the following code:
@import  "inner1.styl";

a {
  color: red;
  text-decoration: none;

  &:before {
    color: blue;
  }
}
Now for testing @import files Create a file named “inner1.styl” next to to the “style.styl” file and put in the code:
.test-class {
  color: red;
}
After you save the file go to the “mytheme” folder and open the “style.css” file and you will see the generated CSS:
.test-class {
  color: red;
}
a {
  color: red;
  text-decoration: none;
}
a:before {
  color: blue;
}
How to integrate CSS-Crush to WordPress theme development workflow
The Method: Using a composer and CSS-Crush package.
Step 1: Download and Install Composer (You must have WAMP/XAMPP or PHP somewhere installed in order for the installation will find it).
Step 2: Run “Node.js command prompt” (find it with windows search).
Step 3: Go to the themes folder via command line:
cd C:\wamp64\www\test\wp-content\themes
Step 4: Install CSS-Crush via the command line:
composer require css-crush/css-crush:dev-master
Note: This step will create two files: “composer.json” & “composer.lock” and a “vendor” directory. They all should be there so don’t delete them. The composer.json should look like this:
{
    "require": {
        "css-crush/css-crush": "dev-master"
    }
}
The “vendor” folder should have a file named “autoload.php”, which we will use it for the next steps.
Step 5: Go into your template directory (let’s assume it’s name is “mytheme”) through regular windows file viewer folder and create a folder named “crush” and within that folder create a file named “style.css” which will include all your CSS by putting CSS-Crush code and importing other CSS-Crush files.
Step 6: Create a file named “crush.php” in the “crush” folder and put the following code:
<?php
  require "../../vendor/autoload.php";

  $parentDir = dirname(getcwd());
  $css = csscrush_file('style.css', [
    "output_dir" => $parentDir,
    "output_file" => "style.css"
  ]);
  unlink($parentDir."/.csscrush");
?>
This code will generate the “style.css” file in “mytheme” folder.
Step 7: Include the CSS file in your theme by adding the following lines in your “functions.php” file in the “wp_enqueue_scripts” hook function:
/*
 * Adding styles and scripots to the template front end
 */
function theme_scripts() {
  if($_SERVER['REMOTE_ADDR'] === "::1" || $_SERVER['REMOTE_ADDR'] === '127.0.0.1') {
    require_once "crush/crush.php";
  }
  wp_enqueue_style( 'theme-style', get_stylesheet_uri() );
}
add_action( 'wp_enqueue_scripts', 'theme_scripts' );
Step 8: (optional step – for testing reasons only)
Put in the “style.css” file the following code:
@import  "inner1.css";

a {
  color: red;
  text-decoration: none;

  &:before {
    color: blue;
  }
}
Now for testing @import files Create a file named “inner1.css” next to to the “style.css” file and put in the code:
.test-class {
  color: red;
}
After you save the file go to the “mytheme” folder and open the “style.css” file and you will see the generated CSS:
.test-class {
  color: red;
}
a {
  color: red;
  text-decoration: none;
}
a:before {
  color: blue;
}
How to integrate Myth to WordPress theme development workflow
Method 1: using Node.js & Gulp.js.
There is a regular package installation of Myth, but it does not watch entire directory changes which we need for also using imported files. If you are going to have one file then you better off using the Myth package standalone without ever needing gulp and watch that file changes alone, but you are very limited for future expansion and by making your code much more simple to read and program within it.
Step 1: Download and install Node.js.
Step 2: Run “Node.js command prompt” (find it with windows search).
Step 3: Go to the themes folder via command line:
cd C:\wamp64\www\test\wp-content\themes
Step 4: Create a package.json file with the command:
npm init
After running the command you will need to answer the questions it gives for filling the package.json file with relevant data. Example of a generated file using “npm init”:
{
 "name": "mytheme",
 "version": "0.0.1",
 "description": "My wordpress theme description",
 "main": "index.js",
 "scripts": {
 "test": "echo \"Error: no test specified\" && exit 1"
 },
 "keywords": [
 "mytheme"
 ],
 "author": "mgfn.net",
 "license": "UNLICENSED"
}
Step 5: Install gulp and gulp-myth as a development dependency:
npm install --save-dev gulp
npm install --save-dev gulp-myth
Step 6: Create a gulp js file named: “gulpfile.js”, and put the script below inside of it and save:
var gulp = require('gulp');
var myth = require('gulp-myth');

gulp.task('styles', function () {
 return gulp.src('mytheme/myth/style.css')
 .pipe(myth())
 .pipe(gulp.dest('mytheme'));
});

//Watch task
gulp.task('default',function() {
 gulp.watch('mytheme/myth/*.css',['styles']);
});
Step 7: Go into your template directory (let’s assume its name is “mytheme”) through regular windows file viewer folder and create a folder named “myth” and in that folder create a file named “style.scss” which there you will put your Myth code.
Step 8: Go to Node.js command line and execute the command:
gulp
Keep the Node.js command line always open while you make changes on the Myth file. Each change you will make in the Myth file will be automatically generated in the CSS file.
Step 9: Include the CSS file in your theme by adding this line in your “functions.php” file in the “wp_enqueue_scripts” hook function:
/*
 * Adding styles and scripots to the template front end
 */
function theme_scripts() {
  wp_enqueue_style( 'theme-style', get_stylesheet_uri() );
}
add_action( 'wp_enqueue_scripts', 'theme_scripts' );
We are done. Now The front end will have a link to the main stylesheet.
Note: If you want to name the stylesheet with a different name such “custom.css” and leave the “style.css” alone, then just change the name “style” with “custom” in the right places and in the “functions.php” file change the get_stylesheet_uri():
wp_enqueue_style( 'custom-style', get_template_directory_uri() . '/custom.css');
Step 10: (optional step – for testing reasons only)
Put in the “style.css” file the following code:
@import "inner1.css";

:root {
 --purple: #847AD6;
 --large: 10px;
}

a {
 color: var(--purple);
 background-color: var(--purple);
}

pre {
 padding: var(--large);
}
Now for testing @import files Create a file named “inner1.css” next to to the “style.css” file and put in the code:
.test-class {
  color: red;
}
After you save the file go to the “mytheme” folder and open the “style.css” file and you will see the generated CSS:
.test-class {
 color: pink;
}

a {
 color: #847AD6;
 background-color: #847AD6;
}

pre {
 padding: 10px;
}
Summary
We saw how to use CSS Preprocessor for WordPress theme development. There are basically 3 methods that you can integrate a CSS Preprocessor to your workflow and they apply to all CSS Preprocessor out there:
- Using a command line tool:
I always used Node.JS command line tool with Gulp.JS package because Gulp.JS is very simple and highly used and is fast, but you could have used Node.JS with Grun.JS or Ruby On Rails command line tool or any kind of command line tool out there. - Using a WorfPress plugin:
If a CSS Preprocessor is very popular then probably it will have a WordPress plugin for it to install. But in our opinion, you can’t really use it for real development. It is for on the go changes. It works right on the theme and the generation is run once a change occurs on one of the styling files and you will need to refresh the page or else some user will wait for a several more moments. Also, changes occur on runtime, and users can see when there is a bug. - Using a GUI application:
This is an executable that watches changes and generates CSS. You hand pick them from the app with no command line on the horizon. It is good for using small projects and for simplicity.
There are a lot of more CSS preprocessors today. Each day a new CSS Preprocessor is published with a lot of promises. There are several more that you can look around:
We basically stick with the big 3: SCSS / LESS / Stylus.
There are CSS Postprocessor which comes after the CSS Preprocessor finishes generating the CSS. CSS Postprocessor is good for Autoprefix, minification, SourceMaps and more. One good example is: pleeease. Using both a CSS Pre & Post Processors can give you a great CSS result.
There is a new generation of CSS Processors which combine the best of CSS Preprocessors with Postprocessors. From these CSS Processors, you can actually write your own CSS Processor. The 2 big players:
Got any questions?
If you think there is information missing or there must be a tutorial for some CSS Preprocessor or some tutorial does not seem to work and you can’t get it done or you want to express your thoughts on the post or if you think there is a better way/method to some of the tutorials then feel free to leave a comment below.